Soil Sampling for Meaningful Results
The most critical step in soil testing is collecting the sample. The analytical results of soil testing are only as good as the methods used to collect the sample. It is important that you take the necessary steps to obtain a representative sample; a poor sample could result in erroneous recommendations.
Use the right tools
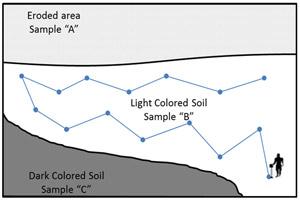
 Figure 1. Sample areas with different properties and/or management histories separately. Collect 12 to 15 subsamples to form one representative composite sample from each area.
Professional turf managers should use professional tools. A ½ inch stainless steel or chrome plated sampling tube provides a clean soil core with minimal disturbance. Use a clean plastic bucket to collect subsamples. Use cartons provided by the soil test lab to store and submit your composite samples. Be sure to bring along a pen and paper to keep notes and a maker to label your samples.
Know your soils
Soil physical appearance, texture, color, slope, drainage, past management, and turf species should be similar throughout the area. Avoid sampling very wet or recently fertilized soils.
It's helpful to draw a map of the property and identify areas where you will collect samples (Fig. 1). Be sure to keep good notes and label your samples with the same ID used to label your map.
For diagnosing a problems, it may be helpful to collect a sample from a healthy area and the area of concern to compare differences in the soils and to inform appropriate modification of management practices.
Collect a representative soil sample
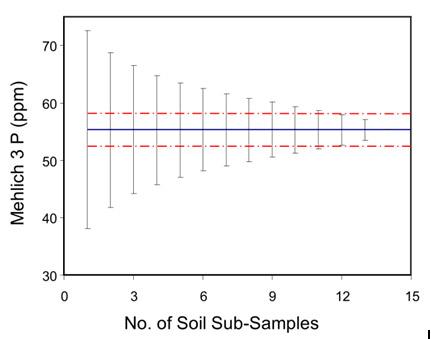
Even in relatively small areas, soil properties and nutrient concentrations can vary widely. To get a representative sample, collect enough subsamples to accurately reflect the average conditions over the entire management unit. As illustrated in Figure 2, it takes at least 12 to 15 subsamples to form a composite sample that accurately reflects average soil nutrient concentrations. Note that more than 12 soil cores were required to form a composite sample with average soil test phosphorus within 5% of the field average.
 Figure 2. Relationship between the number of subsamples per composite and soil test P. Error bars denote one standard deviation and red horizontal lines denote ±5% of the field mean. (Adapted from Kariuki et al., 2009).
To obtain a representative composite sample, use a systematic sampling scheme. One of the simplest ways to do this is to collect samples while walking in a zig-zag pattern across the management unit (Fig. 1).
Sample to the appropriate depth
It is important to collect soil samples from the recommended depth (0-4 to 0-6 inches). This is because soil acidity and some fertilizer nutrients tend to become stratified in turf systems. Shallow sampling depths (e.g., 0-2 inches) tend skew the outcomes of soil tests resulting in erroneous recommendations. For example, phosphorus is a relatively immobile nutrient in soil and tends to concentrate in the surface few inches in undisturbed turfgrass systems. This is illustrated well by the soil test data presented in Table 1. The concentration of soil test phosphorus in the surface one inch was 2 to 7 times higher than the surface 6 inches. Note the resulting difference in recommended fertilizer P2O5. Most soil test calibration and fertilizer recommendations are based on results obtained from samples collected from the surface 4 to 6 inches.
| Site | Sampling depth (inches) |
Morgan Soil Test P (ppm) |
UMass Recommended P2O5 (lbs/1000 sf) |
|---|---|---|---|
| Ithaca | 0-1 | 18 | 0 |
| 0-2 | 9.9 | 0 | |
| 0-6 | 9.2 | 0-1 | |
| Lake Placid | 0-1 | 3.4 | 1-2 |
| 0-2 | 1.2 | 2-3 | |
| 0-6 | 0.8 | 3 | |
| Farmingdale | 0-1 | 13 | 0 |
| 0-2 | 5 | 1-2 | |
| 0-6 | 2 | 2-3 |
Sample handling
Once subsamples have been collected, break-up soil cores, remove stones and plant debris, and thoroughly mix. Once the sample is thoroughly mixed, scoop out approximately one cup of soil and spread on a clean sheet of paper to air-dry. Air-drying samples prevents microbes from mineralizing organic matter. Samples should be air-dried within about twelve hours. The most effective way to air-dry soil samples is to place them in front of a fan set on low speed. Never apply heat to soil samples. Heating samples can cause significant changes in nutrient solubility and soil test results.
Place dry samples in a labeled soil test lab carton or zip-lock bag. Be sure to complete soil test lab sample submission forms. It is a good idea to keep detailed notes about where and when the samples were collected so that soil nutrient levels can be tracked over time.
Sample submission
For detailed sample submission instructions and information on a wide range of soil testing services, visit the UMass Soil & Plant Tissue Testing Lab web site at https://ag.umass.edu/services/soil-plant-nutrient-testing-laboratory or call 413-545-2311.
--
Written by: Dr. John Spargo
Revised: 08/2012