A monthly e-newsletter from UMass Extension, published March to October, for home gardeners.
To read the articles in each section of the newsletter, click on the section headings below to expand the content:
Tips of the Month
July is the Month to…..
- Keep an eye on your container plantings. Ever wonder why container plantings dry out much faster than landscape plants? Potting soils actually don’t contain any soil! They are mixtures of more lightweight materials such as peat moss, perlite, and bark that have been created to be lightweight and to avoid issues with too much water during rainfall. This is great for moving pots around but also means more frequent irrigation can be necessary. Deadheading is also good maintenance – it keeps plants looking their best and encourages new blooms.
- Keep up on garden and landscape maintenance. Remove any dead or diseased plants to prevent the spread of disease. This includes dropped leaves. Don’t compost these plants.
- Keep up with weeding – avoid letting weeds go to seed.
- Brush up on your insects. Learn which insects are beneficial and which are harmful. Pay special attention to your native pollinators. By noting which pollinators are active in your yard, you can ensure you have appropriate overwintering habitats, pollen, and nectar sources. Check out our Gardening to Support Pollinators fact sheet for tips on supporting pollinators at ag.umass.edu/home-lawn-garden/fact-sheets/gardening-to-support-pollinators
- Enjoy the summer blooms! So many great plants are in bloom this month including: Hydrangea, Clethera, Stewartia, Clematis, Echinacea, Hemerocallis, Kniphofia, Lavandula, Leucanthemum, Liatris, Monarda, Perovskia, Phlox, Rudbeckia, Hibiscus, and Salvia
- Remember to do daily tick checks when working outside. The Laboratory of Medical Zoology at UMass Amherst tests ticks for tick-borne diseases. For more information and pricing, go to www.tickreport.com
- Keep an eye on your tomatoes for best performance. Interveinal chlorosis (yellowing) of the lower leaves of tomato plants is generally due to magnesium deficiency. Epsom salt can be applied to supply magnesium. Blossom end rot is a symptom of calcium deficiency, usually brought on by erratic watering. Keep plants mulched and evenly moist to reduce blossom end rot and to avoid fruit cracking. For more information on growing tomatoes, go to ag.umass.edu/home-lawn-garden/fact-sheets/tomato-growing-ii
- Harvest vegetables! Harvest tomatoes when they are fully red, ripe, and moderately firm. Store at 65-70°F for best eating quality. Peppers can be harvested when they are full sized and green or can be allowed to fully ripen to red, orange, yellow, or purple. Peppers should be stored in cool, moist conditions. Sweet corn should be harvested when juice freely squirts from kernels when punctured. It can be stored for several days in the refrigerator, but is best consumed immediately after harvest. For more information on harvesting vegetables, go to ag.umass.edu/home-lawn-garden/fact-sheets/harvesting-vegetables.
- Consider landscape projects such as addressing drainage issues or building a patio. Planting is best done in spring or fall, so summer is the perfect time to tackle other projects. Take a few pictures of your landscape to help remember plants that may need to be moved or where a pop of color would be good for fall planting.
- Start planning your fall garden. Consider adding some edibles to your landscape. Leafy greens such as lettuce and kale can provide interesting foliage.
Mandy Bayer, Extension Assistant Professor of Sustainable Landscape Horticulture, University of Massachusetts Amherst
Timely Topics
UMass Garden Calendar Photo Contest
We'll be having a photo contest for the 2019 UMass Extension Garden Calendar, so have your camera handy and keep an eye out this summer for contest-worthy pics! Submission details will be coming in a later issue of Garden Clippings.
Tree Care After Gypsy Moth Defoliation
The numerous gypsy moth caterpillars finishing up their feeding for the 2017 season during the last ten days of June. The falling frass (excrement) could be heard as it fell onto trees, shrubs, patios, decks, driveways, and cars below, creating quite a mess. The caterpillars have now finished feeding for this year.
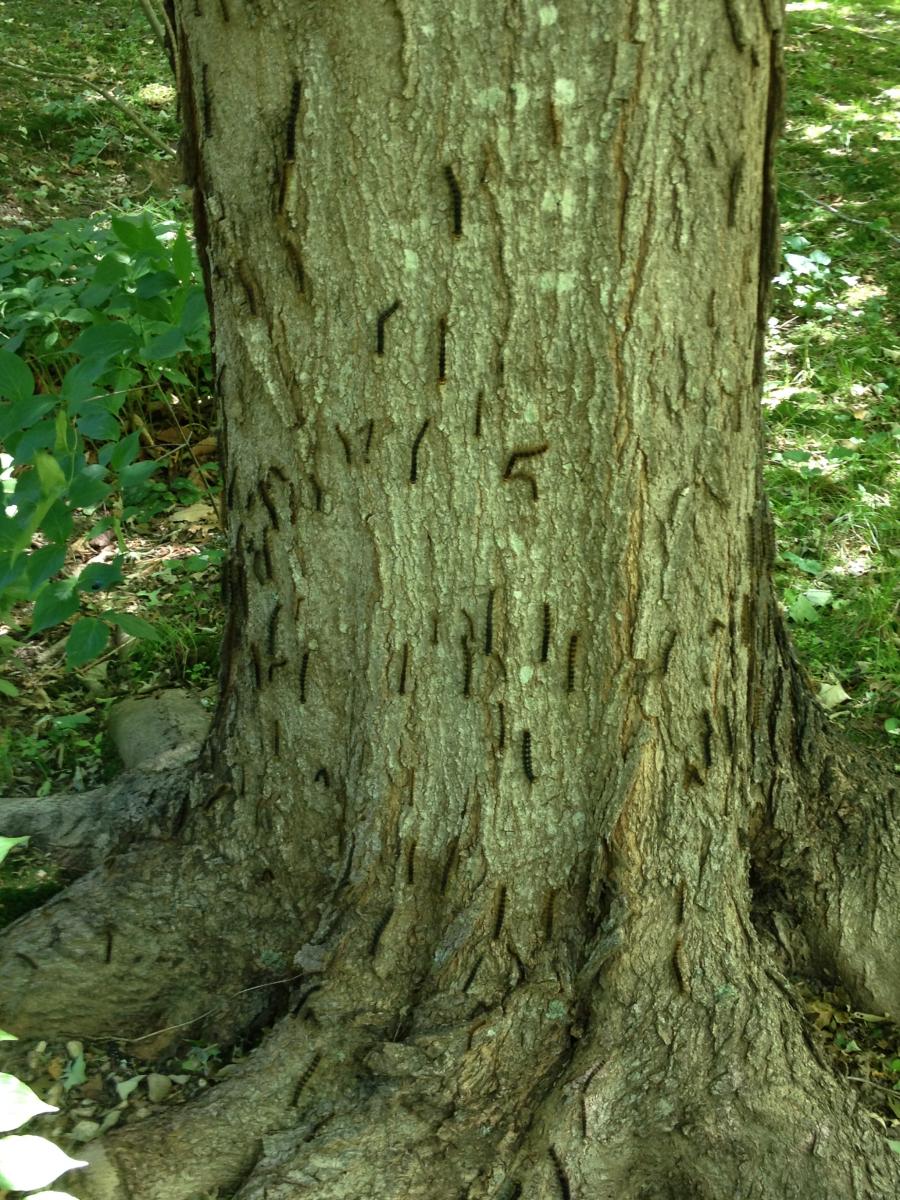 In some areas of Massachusetts, during those last days of June, before the caterpillars finished feeding and pupated, a great number died, succumbing to the caterpillar-killing fungus, Entomophaga maimaiga (image on left). All the wet weather this past spring activated the Entomophaga maimaiga fungus and it paid off. Those caterpillars that died from the fungus in late June provided a place to produce the fungal resting spores that will last for many years and should help infect and reduce future gypsy moth caterpillar populations in years to come.
The caterpillars began hatching about April 26 and, because of the incredible number of gypsy moth eggs laid last June 2016, many people thought that there would be devastating tree defoliation statewide by the caterpillars in 2017. According to UMass Amherst entomology staff, in some areas of Massachusetts defoliation was significant, especially the areas in central/western Massachusetts in the Holyoke range area and along the Mass. Turnpike (I-90) from Palmer to Worcester, where tree defoliation was massive. However, in other areas of the state, defoliation was sporadic, with some areas showing individual trees being defoliated and partial defoliation on others. Some areas show thinned canopies, but, overall, not as bad as expected giving the extremely high numbers of egg masses laid in 2016.
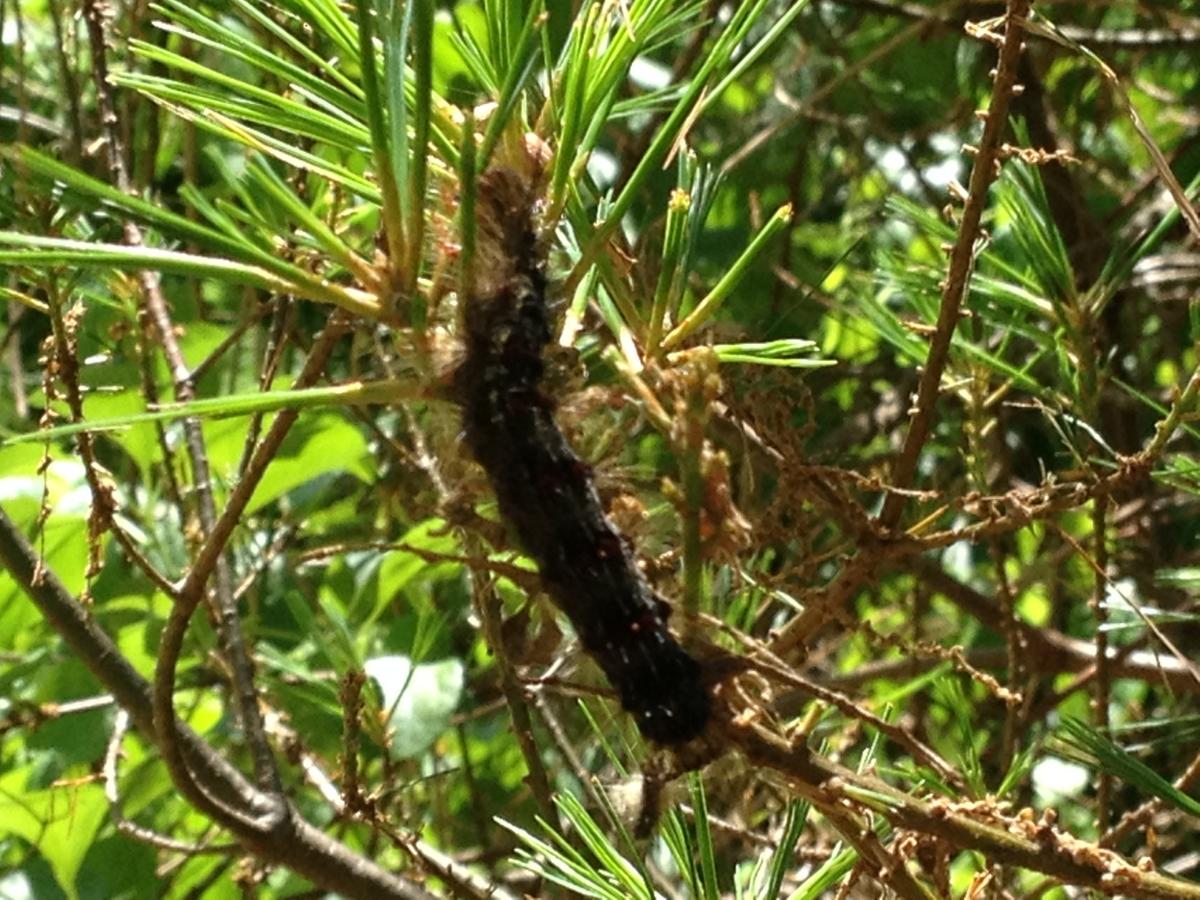 Gypsy moth caterpillars feed on a number of deciduous trees (especially oak) and shrubs (roses, Fothergilla, etc.), but they will also feed on needled evergreens, like spruce and pine, if caterpillar populations are high enough. Many people have commented that their oaks, apples, and crabapples were seriously defoliated; there are also reports of damage to spruce and white pine (image above).
“Now what happens” is what many people are asking and “is my tree going to die, now that it has lost all of its leaves?
What should I do?”
Deciduous trees will not usually die from one year of defoliation; however, repeated years can certainly have a negative impact on trees and trees have died as a result. After-tree care is therefore very important to trees stressed from defoliation.
If you have trees and shrubs, especially large trees, that were defoliated or damaged by the caterpillars, it is critical that these plants receive sufficient water during the hot, usually dry days of July and August and continue throughout the fall until cold weather sets in and the trees go dormant.
Deciduous trees, unlike needled evergreens like pine and spruce, will often put out a second set of leaves after defoliation, but, in order to do that, they need water - a good deep soaking once or twice a week, depending on the weather. It is important not to rely solely on rainfall. Without water, plants cannot carry on photosynthesis, where in the presence of light, they combine water and carbon dioxide and produce the food (sugars, carbohydrates, etc.) they need to produce more leaves and survive. Water is crucial to plant survival, especially those plants stressed by defoliation.
To ensure that defoliated trees, and other plants, are receiving the amount of water needed, purchase a rain gauge (available at garden centers, hardware stores, online, etc.), place out in the open in the yard away from buildings, trees etc., and check it on the same day each week. If there is less than one inch of water in the rain gauge, then it is time to water.
To determine how much time is needed for the sprinkler to deliver one inch of water, turn the sprinkler on and note how much time it takes for the sprinkler to fill the rain gauge with one inch of water. If it takes 45 minutes, then you will know how long to leave the sprinkler on to provide one inch of water to the root zone of plants.
The defoliated trees will need an inch of water over the root zone once a week; twice a week during hot, dry weather. Remember that in some species of trees, 60% of the root system may extend beyond the dripline. Set up a sprinkler over the root zone of the defoliated tree(s); leave the sprinkler on long enough to deliver that one inch of water. Soaker hoses can also be used as long as they are left in place long enough to saturate the soil around the root zone of the tree. Hand-holding a hose for a few minutes a day over the root zone will not get the job done adequately.
Without sufficient water, the defoliated trees, which are already stressed, will be stressed further by drought. Stressed trees are weakened, their resistance is lowered, and they are more prone to attack from secondary organisms like diseases and insects, which may ultimately kill the weakened tree.
It may sound too simple, but watering defoliated trees is the number one action that should be taken now. Fertilization is not recommended.
For a more in-depth article on tree defoliation and what to do, go to horticulture.oregonstate.edu/system/files/onn030213.pdf
Deborah C. Swanson, Horticulturist
News for Gardeners
Dealing with Tomato Diseases
Tomatoes are king in the vegetable garden. Everyone grows tomatoes; even if you aren’t a gardener and don’t have a garden, you probably still have a couple of tomato plants. With growing tomatoes comes what most gardeners simply refer to as ‘the blight’. Blight is a term used to describe plant diseases that cause necrosis or death to parts of the plant. There are many diseases of tomato that can cause blight, but two are very common in the home garden.
The two most common diseases that cause blight in the home garden are early blight (Alternari solani) and septoria leaf spot (Septoria lycopersici). These two diseases are responsible for the majority of frustrations of home tomato growers. The two diseases cause similar overall symptoms; starting with spotting of lower foliage followed by rapid yellowing and withering of leaves, symptoms often move rapidly up the plant, resulting in only a small amount of healthy foliage at the top of the plant. The defoliation results in reduced vigor, poor yields, poor fruit quality, sunburn, and a fruit rot (early blight only).
The two diseases can be distinguished from each other if you look carefully at the symptoms. Early blight causes lesions up to about a half inch in diameter. The lesions on the leaves are very distinctive; they have dark concentric rings within the lesion, giving it a "bull’s eye" appearance. Early blight causes lesions on the stem, petioles, leaves, and infect fruit. Fruit infections are often right at the site where the stem meets the fruit. Septoria leaf spot causes much smaller lesions that are circular and tan to gray in color. Septoria leaf spot primarily attacks foliage, but can also cause lesions on stems, petioles, and the calyx - it rarely causes fruit infections.
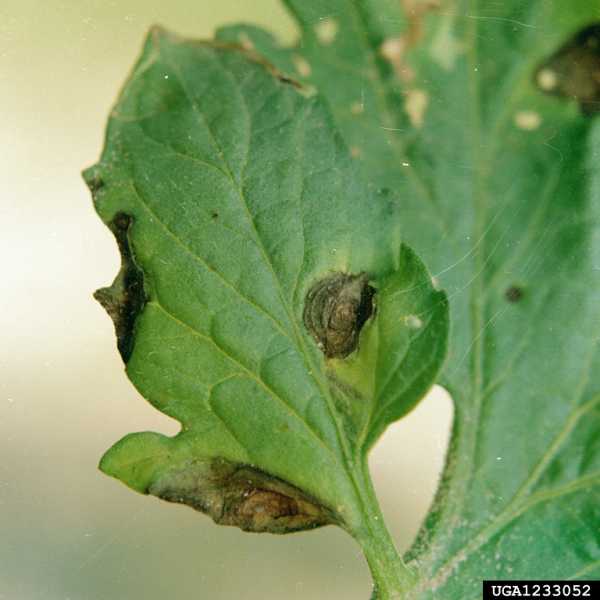
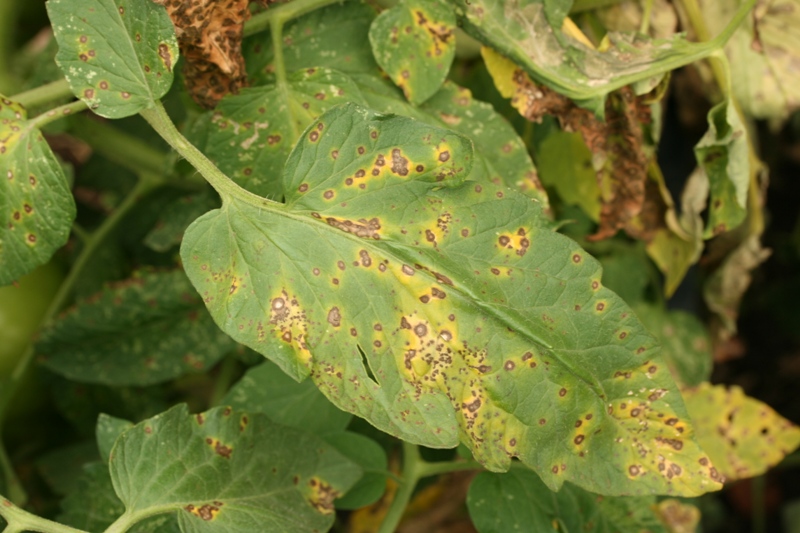
To control these two diseases, you must do many things right; there is no miracle cure or magic solution. Early blight and septoria leaf spot survive on plant debris and can survive in the soil for several years. Other solanaceous crops or weeds can also be hosts for these pathogens. In commercial production of tomatoes, rotation out of solanaceae crops is a key management strategy. In most home gardens, rotation is not realistic - you literally can’t get far enough away. Some gardeners may have enough raised beds to make rotation practical. If so, avoid solanaceae crops for at least three years before planting tomatoes to rotate properly. The use of containers can help as well. By using soilless media or a high-quality compost, you can simply avoid the buildup of disease by using new soil each year.
Use mulches, either plastic or organic materials such as straw. Both diseases require the splashing of spores from the soil onto the lower leaves. By using mulches, you greatly reduce the number of initial infections and slow down the process. Once initial infections occur, more spores will be produced, allowing rapid progression of the disease. This process requires moisture for infection to take place. Use drip irrigation which applies water directly to the soil without splashing or wetting the foliage. Avoid overhead watering, especially in the late afternoon or evening, which will encourage disease and infection. Unfortunately, we can’t control natural precipitation. 2016 was an extremely dry year leading to far less disease then in normal years. We will see what this season holds.
Improve air flow in your garden. Plant tomatoes in rows that are at least five feet apart. This allows air to move up and down either side of the plant, drying foliage quickly. Keep weeds to a minimum - dense weeds at the bottom of plants will slow air circulation. Prune your tomatoes by removing suckers on a regular basis; indeterminate slicing tomatoes should have only 1-3 stems. Pruning maintains a much tidier plant and improves air circulation. Consider other methods of support like a string trellis. This system works great for keeping plants of indeterminate varieties vertical and narrow.
Early blight and septoria leaf spot take advantage of older leaves and plants with poor nutrition. Consider using a little liquid fertilizer starting in mid-July - apply on a weekly or bi-weekly basis. This will keep plants strong and healthy under heavy fruit loads and reduce the susceptibility of older leaves to infection. Lastly, seek out resistant cultivars. Over the last couple of years, several new resistant varieties have become available. Just remember, resistance is not immunity.
If you implement all the above strategies, you will greatly reduce the impact of these two diseases. However, a rainy season can ruin even the best intentions. When all else fails, fungicides can be an effective tool in helping manage these two diseases. Copper hydroxide is one organic fungicide that can help. Success with fungicides requires appropriate timing; apply before disease gets out of hand. When using fungicides, read the label and follow the instructions; it’s the law.
Additional resources
ag.umass.edu/sites/ag.umass.edu/files/pdf-doc-ppt/recognizing_tomato_blights.pdf
ag.umass.edu/home-lawn-garden/fact-sheets/tomato-problems-early-blight
ag.umass.edu/home-lawn-garden/fact-sheets/tomato-growing-i
ag.umass.edu/home-lawn-garden/fact-sheets/tomato-growing-ii
ag.umass.edu/home-lawn-garden/fact-sheets/tomatoes-ten-tricks-for-growing-better-tomatoes
Russ Norton, Cape Cod Cooperative Extension
Trouble Maker of the Month
One Bite Can Change Your Life!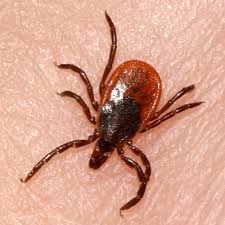
Maintain your tick awareness! Deer/blacklegged ticks (Ixodes scapularis), the American dog tick (Dermacentor variabilis), the brown dog tick (Rhipicephalus sanguineus) and the lone star tick (Amblyomma americanum) are all found throughout Massachusetts. Each can carry their own complement of diseases. Anyone working or playing in tick habitats (particularly wood-line areas, forested areas, and landscaped areas with ground cover) should check themselves regularly for ticks while practicing preventative measures.
If you find a tick attached and/or engorged (swollen and full/partially full of blood) from feeding on you, the UMass Laboratory of Medical Zoology at ag.umass.edu/services/tick-borne-disease-diagnostics has more information; click on the red Test a Tick button. The lab can test the tick for the presence/absence of many tick-borne diseases and can provide you with invaluable information to provide to your doctor.
For information about managing ticks in landscapes, go to the “Tick Management Handbook” from the Connecticut Agricultural Experiment Station at www.ct.gov/caes/lib/caes/documents/publications/bulletins/b1010.pdf.
Ways to Reduce Exposure to Ticks:
- Avoid tick habitats: When possible, take care when spending time in wooded, brushy, or grassy areas. This is not to say that these environments are to be avoided entirely, however, know that in these locations your risk of encountering a tick increases. When in these areas, take the following steps to reduce tick-associated risks:
- Use insect repellent: Products containing the active ingredient DEET (N,N-Diethyl-m-toluamide) may be applied directly to the skin; products containing a pyrethroid, such as permethrin, may be used on clothing. Follow all label instructions for any product used! A URI study found that individuals wearing permethrin-treated sneakers and socks were 73.6 times less likely to be bitten by a tick than those wearing untreated footwear. For more information, visit www.tickencounter.org/prevention/permethrin
- Wear protective clothing: When possible, wear long-sleeved shirts and pants when in tick habitats. Tuck pants into socks and wear light-colored clothing to make it easier to spot any ticks trying to hitch a ride.
- Shower after outdoor activities: Use this as an opportunity to do a thorough tick-check all over the body and in your hair. Check everywhere. Ticks have no reservations about violating privacy.
- Put clothes in the dryer: Particularly after spending time in tick-favored habitats, place all clothing in the dryer. Ticks are prone to desiccation (drying out) and this will kill any attached to the clothing. The CDC (Centers for Disease Control and Prevention) suggest tumble dry on high heat for 10 minutes to kill ticks on clothing. If the clothing is damp, additional time may be required. If the clothing needs to be washed prior to drying, use hot water. If this is not possible, tumble dry on low heat for 90 minutes or high heat for 60 minutes or until clothes are completely dry and warm following a wash. For more information, visit: www.cdc.gov/ticks/avoid/on_people.html
- For additional detail about these steps, go to www.tickencounter.org/prevention/protect_yourself
How to Properly Remove an Attached Tick:
- Use pointed tweezers: Disinfect the tweezers with rubbing alcohol as well as the area the tick is attached to.
- Grasp the tick as close to your skin as possible: Place the tweezers on the tick as close to the skin where it is attached as possible.
- Pull the tick straight out, firmly: The mouthparts of the tick are perfect for gripping tightly to (and in) the skin. Therefore, they are often difficult to remove. Grasping the tick tightly, close to the skin, and pulling slowly upward with the tweezers will achieve the best results.
- Disinfect the skin: Once the tick has been removed, disinfect the area again with rubbing alcohol.
- Consider visiting your physician: Consider visiting your physician following a tick bite, particularly if you develop a rash, fever/chills, or aches and pains. Do not rely on a rash alone to make the determination to visit your doctor. With Lyme disease, for example, the rash (known as erythema migrans or EM) associated with this disease only occurs in 70-80% of persons infected with Lyme disease and may take 3-30 days to develop. Other tick-borne diseases can cause different rashes/symptoms: www.cdc.gov/ticks/symptoms.html
- For step-by-step tick removal instructions, including an animated video, go to www.tickencounter.org/prevention/tick_removal.
*Please note that when a tick is embedded, only the mouthpart is pushed into your skin. Therefore, the “head” of the tick is not ever left behind in the area where the tick was attached. There is no need to “dig out” skin around the area where the tick was attached.
How NOT to Remove a Tick:
- “Painting” the tick: Some myths about coating attached ticks with petroleum jelly or nail polish still exist. DO NOT do this. The goal is to remove the tick as quickly as possible. Increased time attached to your body means an increased chance that the tick could transmit a disease. Note: Depending upon the disease, the amount of time needed for transmission varies.
- Burning the tick: Some myths about burning the tick with a match or other object still exist. DO NOT do this. Remove the tick with pointed tweezers (see above instructions).
- Freezing the tick: Some myths about freezing an attached tick still exist. DO NOT do this. Again, your goal is to remove the tick as quickly as possible (see above instructions).
Further Tick-Related Resources:
Cape Cod Cooperative Extension
Centers for Disease Control and Prevention
Lyme Disease Association, Inc. (non-profit)
Massachusetts Department of Energy and Environmental Affairs
Massachusetts Department of Health and Human Services
Tick Management Handbook, CT Agricultural Experiment Station
Tick-Borne Disease Diagnostics, UMass Amherst
University of Rhode Island TickEncounter Resource Center
Tawny SImisky, UMass Extension Entomologist
Plant of the Month
Aesclepias tuberosa, Butterfly Weed
Asclepius tuberosa is a member of the Apocynaceae, or milkweed family and is an ideal plant for pollinators. The foliage provides food for larval stage of the Monarch butterfly (Danaus plexippus), Queen Butterfly (Danaus gilippus) and the Milkweed Tussock Moth (Euchaetes egle), and the flowers provide a nectar source for adult butterflies as well as many bees, wasps, ants, hummingbirds and beetles. Butterfly weed is hardy to zones 4-9 and reaches 2-3’ high with about a 2’ spread. It has been named Perennial Plant of the Year for 2017 by The Perennial Plant Association.
A. tuberosa is drought tolerant and deer resistant and has long-lasting orange or yellow flowers that appear throughout the summer. The flowers can be used as cut flowers and unlike other milkweeds, it produces little sap. The flowers are flat-topped clusters of upright orange flowers. Each flower has 5 colorful petals that hang down, and 5 upright curved petals called hoods, each possessing one horn forming within the hood. When cross-pollinated, a dry fruit forms (called a follicle), and splits open along one side to disperse the seeds.
A. tuberosa occurs naturally throughout most of the eastern two-thirds of North America in prairies, open woods and hillsides. They grow best in full sun in well-drained soil and once established, plants can tolerate drought, which makes them a good choice for dry, sunny slopes and full-sun gardens. Young plants develop from a single central stem but as plants mature, they develop shoots at the base and produce multiple erect stems from a large taproot. Due to the taproot, division can be difficult, however if attempted, it is best done in early spring before new growth begins.
Butterfly weed is most often grown from seed and can also be propagated by root cuttings. Seed cultivars such as 'Gay Butterflies' may contain bright yellow and red individuals, but the common orange color predominates. Another cultivar to consider is ‘Hello Yellow’ which produces bright yellow flower clusters.
Plants are often slow to emerge from dormancy in spring. Plants can be pruned back in spring. Deadheading flowers during the summer will prevent reseeding, keep the plants more attractive and promote a second flush of color about a month later.
A. tuberosa is prone to aphid infestations. Avoid using neonicotinoid pesticides on A. tuberosa plants in landscapes to prevent killing feeding butterfly larvae and other pollinators. Neonicotinoid pesticides vary in their toxicity to specific insects. Some neonicotinoids are more toxic to butterfly larvae and others are more toxic to bees.
A strong spray of water can be effective to dislodge aphids from plants. Also, insecticidal soap can be used to spot-treat dense aphid infestations. Soaps kill on contact and do not have residual activity. If aphids become a persistent pest problem each year, consider including nearby plantings of habitat plants such as alyssum (Lobularia maritima ‘Snow Princess’) to attract natural enemies that will feed on aphids. Habitat plants are pollen producing, flowering plants that are highly attractive to natural enemies and many pest species. They provide food (pollen, nectar or pests) and shelter for natural enemies, and a place for them to lay eggs. Alyssum, fennel, dill and marigolds are examples of habitat plants that effectively attract hover flies. The hoverfly larvae feed on aphids and other soft-bodied insects.
Note that all parts of A. tuberosa are poisonous if ingested.
References
Shinn M. 2017. Perennial Plant of the Year: Asclepias tuberosa, Horticulture
http://www.hortmag.com/plants/perennial-plant-of-the-year-2017-asclepias-tuberosa
2017 Perennial Plant of the Year. Perennial Plant Association
www.perennialplant.org/index.php/component/k2/item/190-2017-perennial-plant-of-the-year
Asclepius tuberosa. North Carolina State University Extension
plants.ces.ncsu.edu/plants/all/asclepias-tuberosa/
Tina Smith, UMass Extension Floriculture Program
Additional Resources
Landscape Message - for detailed timely reports on growing conditions and pest activity
Home Lawn and Garden Resources
Find us on Facebook! https://www.facebook.com/UMassExtLandscape/
Follow us on Twitter for daily gardening tips and sunrise/sunset times. https://twitter.com/UMassGardenClip
Diagnostic Services
The UMass Extension Plant Diagnostic Lab provides, for a fee, woody plant and turf disease analysis, woody plant and turf insect identification, turfgrass identification, weed identification, and offers a report of pest management strategies that are research based, economically sound and environmentally appropriate for the situation. Accurate diagnosis for a turf or landscape problem can often eliminate or reduce the need for pesticide use. Sampling procedures, detailed submission instructions and a list of fees.
The UMass Soil and Plant Nutrient Testing Laboratory at the University of Massachusetts Amherst provides test results and recommendations that lead to the wise and economical use of soils and soil amendments. The Routine Soil Analysis fits the needs of most home gardeners. Sampling procedures plus the different tests offered and a list of fees.
Spread the Word!
Share this newsletter with a friend! New readers can subscribe to our Home Gardener E-Mail List.