General Information
This guide is intended for commercial farmers to provide information on cultural and pest management practices for small fruit crops in New England. Both cultural and chemical pest control measures are suggested, and the use of integrated pest management (IPM) practices is encouraged. General concepts of IPM are described in the “About Pest Management” section of this guide. Contact your state small fruit or pest management specialists for details regarding specific crops.
All pesticides listed in this publication are registered for suggested uses according to federal and state regulations in effect on the date of this publication. Occasionally there are materials that are not registered in all New England States. Check with your states' Regulatory Agency when in doubt. Pesticide labels change frequently. Applicators must read the labels carefully before application to be sure of restrictions and rates.
Trade names are used for identification only; no product endorsement is implied, nor is discrimination intended against similar materials.
The user of this information assumes all risks for personal injury or property damage. If the information in this guide does not agree with the current labeling, follow the label instructions. The label is the law.
Berry Crops at a Glance
Below are some vital statistics relevant to several small fruit crops. Many factors including site suitability, time commitment and market strategies will have to be thoroughly researched before entering into a small fruit enterprise. Consult with local growers, Extension Specialists, and others to help determine the suitability of a small fruit enterprise. Books and guides can also be very helpful in answering questions about small fruit production. See the resource list at the end of this guide for some useful references.
| General Info. | Strawberry | Summer Raspberry | Blackberry | Blueberry | Grape |
|---|---|---|---|---|---|
| Expected Yield (lb/A) | 10-20,000 | 2-7,000 | 3-7,000 | 6-12,000 | 6-12,000 |
| Age to maturity | 2 years | 3 years | 3 years | 6-8 years | 3-4 years |
| Life of planting | 3-5 years | 8-12 years | 5-10 years | 30+ years | 20+ years |
| Hardiness | -15˚F (covered) | -10˚F | 0˚F | - 20˚F | 0 to -25˚F* |
| Optimal pH | 5.5-6.5 (6.2) | 5.8-7.0 (6.5) | 5.5-7.0 (6.5) | 4.8-5.2 (5.0) | 5.5-7.0 (6.5) |
| Typical Spacing | 1.5’ x 4’ | 2’ x 8’ | 3’ x 10’ | 5’ x 10’ | 8’ x 12’ |
| Plants/Acre | 7,260 | 6,300 | 1,950 | 1,060 | 550 |
*Depending on cultivar
Warning and Disclaimers
Important! The information in this guide is for educational purposes. The information and recommendations presented here were updated in Summer 2023 and contain the best available knowledge at the time of printing. Any reference to commercial products, trade or brand names is for information only, and no endorsement or approval is intended. The Cooperative Extension System does not guarantee or warrant the standard of any product referenced or imply approval of the product to the exclusion of others which may be available. Refer to tables in the Pest Management section for active ingredients and trade names of pesticides referred to elsewhere in this guide. All agrochemicals/pesticides listed are registered for suggested uses in accordance with federal laws and regulations as of the date of printing. State regulations may vary. If the information does not agree with the current labeling, follow the label instructions. The label is the law.
Warning! Agrochemicals/Pesticides are dangerous. Read and follow all instructions and safety precautions on labels. Carefully handle and store agrichemicals/pesticides in originally labeled containers out of the reach of children, pets and livestock. Dispose of empty containers immediately in a safe manner and place. Contact your State Department of Environmental Protection or similar agency for current regulations.
The user of this information assumes all risks for personal injury or property damage.
Soil Health & Nutrient Management
Soil Health
What is Soil Health?
Soil health (or soil quality) has been defined as the capacity of a soil to sustain plant and animal productivity, maintain or enhance water and air quality, and support human health and habitation over a human time scale. In more specific terms, a healthy soil must have: good tilth and drainage, sufficient depth for crop growth, sufficient exchangeable nutrient supply (not excessive or prone to leaching), small population of weeds, insect pests or plant pathogens, large population of beneficial organisms, no toxins, and resilience to adverse conditions. A number of individual soil tests may be used to assess soil health (including those obtained with Routine Soil Analysis); however, a comprehensive evaluation should include a suite of complementary tests to measure soil chemical, physical, and biological properties.
Characteristics of Healthy Soils
(summarized from Cornell's Berry Soil and Nutrient Management – A Guide for Educators and Growers)
What are the characteristics of a healthy soil? Sufficient soil depth for plant root development is important; a soil depth of 8 inches or greater is preferred in the case of berry crops. A healthy soil should have good tilth, water storage and drainage. It should have sufficient but not excessive nutrients and be free of chemicals harmful to plants such as heavy metals, herbicide residues or other contaminants.
Healthy soils should have low populations of plant disease and parasitic organisms such as fungi, bacteria, nematodes, springtails, and so on. Conversely, a healthy soil should contain high populations of beneficial organisms like mycorrhizae and earthworms.
Finally, healthy soils should exhibit resistance to being degraded and along with that – resiliency or the ability to recover quickly from adverse events such as flooding, drought, hurricanes, etc.
Understanding the Three Soil Health Processes
 Think of soil health then in terms of the three major realms that impact it: the physical, the chemical, and the biological. These three realms intercept and interact (Figure 2). If any process is compromised, the others are also affected. A healthy soil is balanced in this respect and therefore provides for better growing conditions, crop resiliency and reduced inputs.
Over past decades, chemical aspects of soil were, in general, perhaps overemphasized. While good testing procedures and crop recommendations resulted from this focus, not nearly as much attention was paid to the physical and biological aspects of soil. Research is ongoing in the physical and biological realms today, providing a more complete understanding of soil health and as a result, more comprehensive short-term and long-term management strategies for soil health improvement.
The Chemical Processes
The chemical processes in soil provide essential nutrients for plants. Soil pH is a critical component of the chemical process as it affects nutrient availability. Any changes in soil pH must be addressed, before the planting is established; failure to adjust soil pH to optimal levels for the crop will seriously impact plant establishment as well as future crop production. Soil pH adjustment is more difficult after a perennial crop is established and may reduce the success of the planting.
Chemical processes also includes both macronutrients (nutrients needed in larger quantities, such as N, P and K), secondary nutrients like Ca, Mg and S, and micronutrients required in smaller quantities (such as B and Zn); specific recommendations have been developed for correcting deficiencies of these nutrients essential for berry crop production.
The Physical Processes (summarized)
The physical processes of soil may be limited by inherent or dynamic qualities; some of these may be remediated; others may not.
- Internal drainage – poor internal drainage reduces root growth and function and may support disease development.
- Water availability is a function of soil texture, soil organic matter content, and rooting depth.
- Soil aggregate (crumbs) stability – is a function of adequate soil organic matter which generates humates and other substances that hold soil particles together and contribute to good soil tilth.
- Soil structure – soils with a range of pore sizes are able to provide good drainage, aeration, and rooting, while also retaining moisture.
- Compaction – compaction layers, either near the surface or deeper, can inhibit root penetration and also water drainage contributing to excess runoff or erosion.
The Biological Processes
Understanding soil biology is very much at forefront of our science today. Soil represents a complex environment with highly variable conditions. Most biological activity occurs near the surface of the soil where most of the organic matter is located. There are 3 general types of organic matter found in soil: Living, dead, and very dead. All 3 play important roles in helping produce high yields of healthy crops. Adding organic matter to soil results in many benefits.
- Living Organic Matter - includes plant roots, bacteria, fungi, nematodes, and many other types of organisms. They use resources in soil in various ways, decomposing organic matter, cycling nutrients to make them available for plants, influencing other biota (such as by supressing pathogens), and responding to their chemical and physical environment in very complex ways.
- Dead Organic Matter - is composed of recently dead soil organisms and crop residues that provide food (energy and nutrients) for soil organisms to live and function. Dead organic matter is also called “active” or “particulate” organic matter. This is the other essential partner in mineralizing nutrients for plants, aggregating soils, and forming humus.
- Very Dead Organic Matter - is not a biologically active fraction; rather it consists of well-decomposed organic materials, also called humus. Humus supports the chemical activities of soil; it contains very high amounts of negative charges that hold nutrients and cations in the soil. Humus also has high water-holding capacity, and stores carbon.
Plant Nutrients - Macro & Micro
Nitrogen
Nitrogen (N) greatly influence the growth and yield of crops. Management of soil and fertilizer N is difficult because N undergoes numerous transformations and is easily lost from the soil. These losses concern growers for three principal reasons: 1) N losses can and often do adversely affect plant growth and crop yield, 2) when N is lost in the nitrate form, there is a chance for contamination of groundwater and drinking water supplies, and 3) it is expensive to replace lost N.
The Nitrogen Cycle
This Nitrogen Cycle illustration shows nitrogen (N) inputs, losses and transformations.  When inputs exceed plant needs, nitrates can accumulate in the soil and pose a threat to groundwater. Conversely, when plant-available forms of N from the soil and any inputs are too low, crop growth suffers. The key to successful management of N is to find the relatively "thin line" between too much and too little N. It is not an easy task. N transformations and losses are affected by soil conditions and the vagaries of the weather. The rates of most N inputs are difficult to accurately estimate.
Nitrogen Inputs
As can be seen from the N cycle, there are two sources of the N used by plants: ammonium (NH4) and nitrate (NO3). In addition to commercial fertilizer sources, available N may be added to the soil through mineralization (the microbial conversion of organic N to ammonium and then nitrate) of soil organic matter, manure and other organic residuals, and plant litter.
Soil organic matter: Organic matter contains the largest pool of soil N, usually comprising more than 90 percent of total soil N. The total amount of N in the plow layer of agricultural soils is surprisingly large. One can estimate the total N in pounds per acre in the 6" to 7" of surface soil by multiplying the soil's organic matter content by 1,000. Thus, a soil with 4% organic matter contains about 4,000 lbs total N per acre.
The amount of this total N available to plants in any one year, however, is relatively small. Research has shown that for most soils 2 to 4% of the total N is converted (mineralized) annually to forms plants can use. Thus, soil with a total of 4,000 lbs N per acre would produce 80 to 160 lbs N per acre annually for plant use. If the crop needs 200 lbs N per acre for adequate growth and development, some additional N must come from non-soil sources. Manure and/or fertilizer are the most likely candidates to furnish rapidly available N. The rate of mineralization is dependent on microbial activity, especially bacterial activity. Such activity is favored by warm soils with adequate, but not excessive moisture and a pH above 6. These conditions are also favorable to most fruit crops. On well-managed soils used for fruit production, 20 to 40 lbs of N per acre will become available during the growing season for each percent of organic matter if the weather is favorable.
Manures and other waste products: The N content of manures and their N fertilizer equivalents are highly variable. Differences in N content are due to the species of animal, the animal's age and diet, the moisture content of the manure, handling and storage and the amount of bedding in the manure. The N fertilizer equivalent of a given manure varies not only with the animal species and the total N content of the manure, but also with the time of application (Table 3). The values in this table are based on numerous analyses of Connecticut manures as well as published data from other states. If specific manure analysis data for the farm are not available, growers should estimate N credits by the table. The time elapsed between spreading and incorporation is also important. About half of the N in dairy manure and three quarters of the N in poultry manure is in the form of ammonia, which is volatile. If left on the soil surface, this N will volatilize and be lost. To avoid this loss, manure should be incorporated shortly after spreading. NOTE: Manure has the potential to contain human pathogens. Various application practices can be employed to limit the risk of pathogens from the manure ending up on fruit (see the Produce Safety section for management practices).
Previous manure applications: Up to 50% of the total N in cow manure is available to crops in the year of application. Between 5% and 10% of the total applied is released the year after the manure is added. Smaller amounts are furnished in subsequent years. The quantity of N released the year after a single application of 20 tons per acre of cow manure is small (about 15 lbs N per acre). However, in cases where manure has been applied at high rates (30 to 40 tons per acre) for several years, the N furnished from previous manure increases substantially.
The buildup of a soil's N-supplying capacity resulting from previous applications of cow manure has important consequences for efficient N management, two of which are:
- The amount of fertilizer N needed for the crop decreases annually;
- If all the crop's N needs are being supplied by manure, the rate of manure needed decreases yearly.
With cage layer poultry manure, a higher percentage of the total N in the manure is converted to plant-available forms in the year of application. Consequently, there is relatively less carry-over of N to crops in succeeding years. This is due to the nature of the organic N compounds in poultry manure. This does not mean, however, that there is never any carry-over of N from poultry manure applications. If excessive rates of poultry manure (or commercial N fertilizers) are used, high levels of residual inorganic N, including nitrate, may be in the soil the following spring. High levels of soil nitrate in the fall, winter and spring have the potential to pollute groundwater and coastal sea water.
Previous crops: Cover crops can supply appreciable amounts of N to succeeding crops. Legumes, such as alfalfa and red clover, can provide 100 pounds or more of N to crops that follow. Other legumes, mixed grass-legume stands and grass sods supply less N to succeeding crops (Table 2). Keep in mind that most of the N is in the leaves, not the roots. If a legume hay crop is harvested, most of the N is removed from the field along with the hay.
| Previous Crop | Nitrogen Credit Lbs N per acre |
|---|---|
| Grass sod | 20 - 40 |
| “Fair” clover (20-60% stand) | 40 - 60 |
| “Good” clover (60-100% stand) | 60 - 90 |
| “Fair” alfalfa (20-60% stand) | 60 - 90 |
| “Good” alfalfa (60-100% stand) | 100 - 150 |
| Sweet corn stalks | 30 |
| “Good” hairy vetch winter cover crop | 120 - 150 |
Compost as a nutrient source: Finished compost is a dilute fertilizer, typically having an analysis of about 1-1-1 (N-P2O5-K2O). The nitrogen content of composts varies according to the source material and how it is composted. In general, nitrogen becomes less available as the compost matures. Nitrogen in the form of ammonium (NH4+) or nitrate (NO3-) is readily available, however in a finished compost there should be little ammonium, and any nitrate that is produced could have leached away, especially if the compost is cured or left out in the open. The majority of the nitrogen in finished compost (usually over 90%) has been incorporated into organic compounds that are resistant to decomposition. Rough estimates are that only 5% to 15% of the nitrogen in these organic compounds will become available in one growing season. The rest of the nitrogen will become available in subsequent years. NOTE: Compost made with animal source material has the potential to contain human pathogens. Compost management and application practices can be employed to limit the risk of contaminated compost ending up on fruit (see Produce Safety for management practices).
Synthetic fertilizers: Fertilizers used to supply N include urea (46-0-0), diammonium phosphate (DAP: 18-46-0), monoammonium phosphate (MAP: 11-48-0), urea-ammonium nitrate solution (UAN: 32-0-0), calcium ammonium nitrate, calcium nitrate, potassium nitrate and various manufactured and blended fertilizers such as 15-8-12, 15-15-15 and 10-10-10. In bulk blended or custom blended mixes, N-containing fertilizers with almost any grade can be provided.
| APPLICATION TIMING (lbs N/ton) | |||
|---|---|---|---|
| Kind of Manure | April/May1 | Fall Only2 | Other times3 |
| DAIRY (COW) | |||
| Solid | 5 | 2 | 3 |
| Liquid | 16 | 18 | 12 |
| POULTRY, CAGE LAYER | |||
| fresh (20-40% DM)4 |
16 | 5 | 8 |
| sticky-crumbly (41-60% DM) |
22 | 7 | 11 |
| crumbly-dry (61-85% DM) |
32 | 10 | 16 |
|
1 “April/May” credits refer to manure applied and incorporated in April and/or May for spring-planted crops and for manure applied and incorporated within four weeks of planting at times other than spring. 2 Use “fall only” values for manure applied in no-till or maintenance situations where the manure is not incorporated. 3 "Other times” means any time or any combination of times other than April/May or fall only for manure applied for spring-planted crops. 4 DM = Dry matter. |
|||
Nitrogen Losses
Nitrogen losses occur in several ways. The loss of available soil N not only costs growers money, it has the potential to negatively impact both air and water quality. Understanding the cause of N losses can help growers make management decisions to improve N use efficiency and minimize negative environmental impact.
Volatilization Losses: These losses occur mainly from surface-applied manures and urea. The losses can be substantial — more than 30% of the N in top-dressed urea can be volatilized if there is no rain or incorporation within two or three days of application. Losses are greatest on warm breezy days. Volatilization losses tend to be greater from sandy soils with pH values above 7. Incorporate manures right after applying them to avoid volatilization losses. Under the right conditions more than 50% of the ammonium N may be volatilized within the first 48 hrs. of applying manure if it is not incorporated.
Not only does volatilization reduce the fertilizer value of manure and urea, it can degrade air and water quality. Ammonia in the atmosphere can form particulates that contribute to smog. Ammonia emissions can also contribute to eutrophication of surface waters via atmospheric deposition.
Leaching Losses: Nitrogen can be lost by leaching in either the ammonium or nitrate form. Usually, much more N is leached as nitrate than as ammonium. Leaching losses are greatest on permeable, well- or excessively-drained soils underlain by sand or gravel when water percolates through the soil. Percolation rates are generally highest when the soil surface is not frozen and evapotranspiration rates are low. Thus, late fall and early spring are times when leaching potential is greatest. Cover crops growing during these times can take up this residual N and prevent it from leaching. The N will then be released for crop use after the cover crop is plowed down in the spring. Of course, leaching can occur any time there is sufficient rainfall or irrigation to saturate the soil. This is why it is important to attempt to match fertilizer N application rates with crop N needs.
Denitrification Losses: These losses occur when nitrate is converted to gases such as nitrous oxide (N2O) and nitrogen (N2), when the soil becomes saturated with water. Poorly drained soils are particularly susceptible to such losses. In especially wet years on some soils, more than half the fertilizer N applied can be lost through denitrification. Favorable conditions for denitrification often occur in early spring and late fall. Minimizing the concentration of nitrate in the soil during these periods by delaying N application in the spring and planting cover crops in the fall will help reduce denitrification losses.
Immobilization: Immobilization occurs when soil micro-organisms absorb plant-available forms of N. The N is not really lost from the soil because it is held in the bodies of the microorganisms. Eventually, this N will be converted back to plant-available forms. In the meantime, however, plants are deprived of this N, and N shortages in the plants may develop. Immobilization takes place when highly carbonaceous materials such as straw, sawdust or wood chips are incorporated into the soil. Manure with large amounts of bedding may cause some immobilization.
Crop Removal of Nitrogen: In most cases, the greatest removal of N from the soil is via crop removal. Strawberries remove approximately 100 lbs of N per acre annually (in foliage and harvested fruit). On the other hand, mature highbush blueberries only remove approximately 50-60 lbs of N per acre (in foliage, wood and harvested fruit). Raspberries likely remove somewhere in between. Anticipated crop removal of N is one of the factors used in calculating N budgets and making N fertilizer recommendations. Depending on the crop, variable amounts of the N absorbed by the crop are returned to the soil after harvest in non-harvested plant parts. For example, strawberry renovation returns a significant amount of crop biomass plus straw mulch to the soil, contributing to the N budget.
Phosphorus
Phosphorus (P) is referred to as P2O5 (phosphate) for the purposes of soil testing, fertilizer grades and recommendations. Among other important functions, phosphorus provides plants with a means of using the energy harnessed by photosynthesis to drive its metabolism. Deficiency can lead to impaired vegetative growth, weak root systems, poor fruit and seed quality, and low yield; however, excessive soil phosphorus levels are a concern due to the potential negative impact on surface water quality. Most P losses occur with runoff, but where soil levels are extremely high, subsurface losses can occur. Phosphorus enrichment is a leading source of water quality impairment of many lakes, streams, and rivers in New England.
Soil P exists in a wide range of forms. Some P is present as part of soil organic matter and becomes available to plants as the organic matter decomposes. Most inorganic soil P is bound tightly to the surface of soil minerals (e.g.., iron and aluminum oxides). Warm, moist, well-aerated soils at a pH level of about 6.5 optimize the release of both of these forms. Soil tests attempt to assess the ability of soil to supply P from bound forms during the growing season. When a soil test indicates that P is low and fertilizer is needed, the rate recommended is intended to satisfy immediate crop needs and begin to build soil P levels to the optimum range (i.e., build and maintain). Once soil test levels are in the optimum range, only a small amount of P is needed to replace the amount removed each year to maintain soil levels.
If your soil test results indicate above optimum levels, P application is unnecessary and should be limited. Where soil P levels are excessive, P application should be eliminated, and additional steps should be taken to minimize the risk of surface water contamination by limiting runoff losses.
Potassium
Potassium (K) is expressed as K2O similar to the way P is expressed as P2O5. Crop need for K varies. Plants use K to open and close stomates and to move nitrates from the roots to the leaves. Potassium rivals N as the nutrient absorbed in greatest amounts by plants. Like N, crops take up a relatively large proportion of plant-available K each growing season. Plants deficient in K are unable to utilize N and water efficiently and are more susceptible to disease. Most available K exists as an exchangeable cation (see below). The slow release of K from native soil minerals and from fixed forms in clays can replenish some of the potassium lost by crop removal and leaching. This ability, however, is limited and variable. Fertilization is often necessary to maintain optimum yields. See the table at the beginning of each crop section for the potassium needs for each crop.
It is important that the soil K plus the applied K is enough to meet crop needs. However, excessive levels should be avoided because K can interfere with the uptake of Ca and Mg (see “Base Saturation”). K is subject to leaching on sandy soils low in organic matter. If high amounts of K are needed, split applications should be used. Potassium sulfate (0-0-50) or sulfate of potash magnesium (Sul-Po-Mag, 0-0-22) are the best sources of potassium for brambles and strawberries. Although muriate of potash (KCl, 0-0-60) is less expensive, brambles are sensitive to the chloride in this fertilizer.
Calcium
Calcium is usually supplied in sufficient quantities by liming if appropriate liming materials are chosen (see “Soil pH and Exchangeable Acidity”). If soil pH is high and Ca is needed, small amounts can be applied as calcium nitrate fertilizer (15% N, 19% Ca). Ca can also be applied without affecting pH by applying calcium sulfate (gypsum, 22% Ca) or superphosphate (14 to 20% Ca).
Magnesium
Magnesium is necessary for chlorophyll production and nitrogen metabolism. High soil potassium levels can lead to reduced uptake of magnesium. Magnesium deficiency is characterized by interveinal reddening on older leaves, beginning at the leaf margin. Magnesium, K, Ca, and P can be applied in late fall after plants are dormant. Nutrients can then move into the root zone and be available when growth begins again in the spring. Magnesium is most economically applied as dolomitic or high-mag limestone (see “Soil pH and Exchangeable Acidity”). If liming is not needed, Sul-Po-Mag (11% Mg, 22% K) can be used. You can order blended fertilizer containing Mg.
Minor Elements
Minor elements are difficult to analyze accurately with soil tests. Plant tissue analyses are more reliable for determining whether or not plants are getting sufficient quantities of minor elements. Of the minor elements, boron (B) and zinc (Zn) are the most likely to be needed to supplement soil levels.
Special Note on Lead
Many laboratories routinely screen all soil samples for elevated levels of extractable lead. Lead is naturally present in most New England soils at low concentrations (15-40 ppm total lead). At these levels, lead generally is thought to present minimal danger to people or plants. Soil pollution with lead-based paint and the tetraethyl lead of past automotive fuels have increased soil lead levels to several thousand ppm in some places. Unless the estimated total lead level in your soil exceeds 299 ppm (Modified Morgan extractable level of 22 ppm) it is simply reported as low and can be considered safe (assuming the sample submitted is representative of the area of concern). Estimated total lead levels above 300 ppm are a concern. In such cases, consult your state's Extension Service for further assistance or see: "Soil Lead: Testing, Interpretation, & Recommendations" for more information on soil lead testing and recommendations.
| CROP | AGE | AMOUNT/TIMINGS (ACTUAL N) | N SOURCE | COMMENTS |
|---|---|---|---|---|
| Strawberries | 0 | 30 lb/A early June 30 lb/A early Sept. |
ammonium or calcium nitrate | Be sure plants are growing well prior to application |
| 1+ | 70 lb/A at renovation 30 lb/A early Sept. |
ammonium or calcium nitrate or urea | Adjust fall amount based on leaf tissue analysis | |
| Raspberries and Blackberries (summer bearing) |
0 | 25-35 lb/A 4 weeks after planting | calcium nitrate | Avoid touching plants with fertilizer |
| 1 | 35-55 lb/A split between May and June | ammonium nitrate or urea | Use higher amount on sandier soils or if irrigation is used | |
| 2+ | 40-80 lb/A split between May and June | |||
| Raspberries (fall bearing) |
0 | 25 lb/A 4 weeks after planting | calcium nitrate | Avoid touching plants with fertilizer |
| 1 | 50-80 lb/A split between May and June | ammonium nitrate or urea |
Use higher amount on sandier soils or if irrigation is used. Adjust based on leaf tissue test on mature plantings |
|
| 2+ | 70-100 lb/A split between May and June | |||
| Blueberries | 0 | Do not fertilize newly planted blueberries |
Soil pH should be adjusted to 4.5-5.0 prior to planting Use ammonium sulfate where soil pH is >5.0 Adjust based on leaf tissue test on mature plantings |
|
| 1 | 15 lb/A, split between May and June | ammonium sulfate or urea DO NOT use aluminum sulfate |
||
| 2 | 20 lb/A, split between May and June | |||
| 3 | 25 lb/A, split between May and June | |||
| 4 | 35 lb/A, split between May and June | |||
| 5 | 45 lb/A, split between May and June | |||
| 6 | 55 lb/A, split between May and June | |||
| 7+ | 65 lb/A, split between May and June | |||
| Currants and Gooseberries | 0 | 25 lb/A, 4 weeks after planting | calcium nitrate | |
| 1 | 50-80 lb/A, split between May, June, August | calcium nitrate | ||
| 2+ | 70-100 lb/A, split between May and early August | calcium nitrate | ||
| Elderberries | 0 | Do not fertilize newly planted elderberries | ||
| 1+ |
Apply 1/8 lb of ammonium nitrate for each year of the plant's age, up to one pound per plant |
ammonium nitrate or 10-10-10 |
In spring, spread fertilizer with a spreader in bands one foot wide along both sides of the rows. | |
| Juneberries | 0 | 25 lb/A, 4 weeks after planting | calcium nitrate | Avoid touching plant with fertilizer after planting. |
| 1 | 50-80 lb/A, split between May and June | urea or ammonium nitrate | Use higher amount of sandier soils or if irrigation is used. | |
| 2+ | 70-100 lb/A, split between May and June | urea or ammonium nitrate | Use higher amount on sandier soils or if irrigation is used. Adjust with leaf tissue analysis. |
|
| Source: 2016 Cornell Pest Management Guidelines for Berry Crops | ||||
Soil Testing
Soil & Tissue Testing
Soil tests provide the best way to determine pre-plant requirements for lime and fertilizers. For perennial fruit crops, leaf tissue or petiole analysis are the best ways to determine nutrient status for established crops. With the information from these tests, growers can make informed decisions about fertilizing and liming small fruit crops to achieve optimum yield and quality and to safeguard water quality in a cost-effective manner. Following is a list of soil test laboratories in New England. It is best to use local labs because they are calibrated for local soils and recommendations are tailored to New England conditions.
Soil Testing Labs of New England
soil testing (1), leaf tissue analysis (2), compost testing (3), manure testing (4)
CONNECTICUT
UConn Soil Nutrient Analysis Lab (1, 2)
6 Sherman Place, Unit 5102
Storrs, CT 06269-5102
Telephone: 860-486-4274
Email: soiltest@uconn.edu Website: http://www.soiltest.uconn.edu/
The Connecticut Agricultural Experiment Station (1)
Gregory Bugbee, State Laboratory
123 Huntington St., P.O. Box 1106
New Haven, CT 06504
Telephone: 203-974-8521
Email: Gregory.Bugbee@ct.gov Website: https://portal.ct.gov/CAES/Soil-Office/Soil-Office/Soil-Testing-Offices-Instructions
MAINE
The Analytical Laboratory and Maine Soil Testing Services (1,2,3,4)
5722 Deering Hall, Room 407
Orono ME 04460-5722
Telephone: 207-581-3591
Email: hoskins@maine.edu Website: https://umaine.edu/soiltestinglab/
MASSACHUSETTS
UMass Soil & Plant Tissue Testing Laboratory (1,2)
203 Paige Laboratory/UMass
161 Holdsworth Way
Amherst MA 01003-9302
Telephone: 413-545-2311
Email: soiltest@umass.edu Website: https://ag.umass.edu/soiltest
UNH Cooperative Extension Soil Testing Program (1,2,3)
Barton Hall B206
Durham NH 03824
Telephone: 603-862-3200
Email: soil.testing@unh.edu Website: https://extension.unh.edu/agriculture-gardens/pest-disease-growing-tools/soil-testing-services
VERMONT
UVM Agricultural & Environmental Testing Lab (1,3,4)
262 Jeffords Hall, 63 Carrigan Drive, UVM
Burlington VT 05405
Telephone: 802-656-3030, 800-244-6402
Email: AgTesting@uvm.edu Website: https://www.uvm.edu/extension/agricultural-and-environmental-testing-lab
http://www.blinc.com/agriculture-analysis
Woods End Research Lab, Inc. (1,3)
290 Belgrade Rd., P.O. Box 297
Mt. Vernon, ME 04352
Telephone: 207-293-2457
Email: lab@woodsend.com Website: https://woodsend.com/
1087 Jamison Rd.
Washington Court House, OH 43160
Telephone: 800-321-1562
http://www.spectrumanalytic.com/
Taking a Soil Sample
Although soil samples can be taken any time, many prefer to take samples in summer or fall because this allows time to apply any needed lime, plan a fertility program and order materials well in advance of spring planting. Avoid sampling when the soil is very wet or soon after a lime or fertilizer application. If a field is uniform, a single composite sample is sufficient. A composite sample consists of 10 to 20 sub-samples taken from around the field and mixed together. To obtain sub-samples, use a spade or a soil probe to take cores or thin slices of soil representing the top 6” to 8” of soil. Put these sub-samples into a clean container and thoroughly mix. Take about one cup of the mixture, dry it at room temperature, put it in a zip lock bag and tightly close it. Label each sample on the outside of the bag. To get accurate recommendations, make sure to download and fill out sample submission forms from the lab where samples will be sent.
In many cases, fields are not uniform, due to uneven topography, wet and dry areas, different soil types, or areas with varying previous crop and fertilizing practices. In such cases, the field should be subdivided and composite samples tested for each section.
Soil testing laboratories vary somewhat in their services and prices. Soils should be tested for organic matter content every two or three years. Be sure to request this if it is not part of the standard test. For more information, check with your state’s laboratory or Extension Specialist.
Cation Exchange Capacity
Cation exchange capacity (CEC) is a measure of the soil’s ability to retain and supply nutrients, specifically the positively charged nutrient ions called cations. These include the cations calcium (Ca2+), magnesium (Mg2+), potassium (K+), ammonium (NH4+), and many of the micronutrients. Cations are attracted to negatively charged surfaces of clay and organic particles called colloids. CEC is reported in units of milli-equivalents per 100 grams of soil (meq/100 g) and can range from below 5 meq/100 g in sandy, low organic matter soils to over 15 meq/100 g in finer textured soils and those high in organic matter. Low CEC soils are more susceptible to cation nutrient loss through leaching, and may not be able to hold enough nutrient cations for a whole season of crop production.
Base Saturation
The cations calcium (Ca2+), magnesium (Mg2+), potassium (K+), hydrogen (H+) and aluminum (Al3+) account for the vast majority of cations adsorbed on the soil colloids in New England soils. Hydrogen (H+) and aluminum (Al3+) are considered acidic cations because they tend to lower soil pH while calcium (Ca2+), magnesium (Mg2+), and potassium (K+) are considered basic cations and have no direct influence on soil pH. Base saturation is the portion (expressed as a percentage) of the soil’s cation exchange capacity occupied by calcium (Ca2+), magnesium (Mg2+), and potassium (K+). At one time, many labs provided fertilizer recommendations to achieve very specific ideal potassium, calcium, and magnesium saturation ratios. This approach was never well supported by data. Research conducted over the last several decades indicates that an ideal basic cation ratio does not exist and fertilizing to achieve a prescribed level of potassium, calcium, and magnesium saturation is unjustified. Still, base saturation can provide useful information. Your report will include the base cation saturation values observed for your sample and the ranges typically observed in New England soils. When base saturation is well outside of these ranges it is typically associated with deficient or excessive potassium or very acidic or alkaline soil conditions. Following the fertilizer and lime recommendations provided with your report will typically result in base saturation values within normal ranges.
Soil pH and Exchangeable Acidity
One of the most valuable pieces of information you can get from soil testing is a measure of the soil pH. Soil pH is an indicator of the soil’s acidity which is a primary factor controlling nutrient availability, microbial processes, and plant growth. A pH of 7 is neutral, less than 7 is acidic, and greater than 7 is alkaline. Maintaining proper soil pH is one of the most important aspects of soil fertility management. When the soil is acidic, the availability of nitrogen, phosphorus, and potassium is reduced, and there are usually low amounts of calcium and magnesium in the soil. Under acidic conditions, most micronutrients are more soluble and are therefore more available to plants. Under very acidic conditions aluminum, iron, and manganese may be so soluble they can reach toxic levels. Soil acidity also influences soil microbes. For example, when soil pH is low (below 6), bacterial activity is significantly reduced. Acidic soil conditions also reduce the effectiveness of some herbicides.
When soil pH is maintained at the proper level, plant nutrient availability is optimized, solubility of toxic elements is minimized, and beneficial soil organisms are most active. While most plants grow best in soil with a pH between 6 and 7, there are some notable acid-loving exceptions, such as blueberry, which performs best in soils with a pH near 5.
Due to the climate and geology of New England, soils here tend to be naturally acidic (4.5-5.5).The most effective way to increase soil pH is to apply agricultural limestone. The quantity of lime required is determined by the target pH (based on crops to be grown) and the soils buffering capacity. Buffering capacity refers a soil’s tendency to resist change in pH. Soil pH is a measure of active acidity, based on the concentration of hydrogen ions (H+) in soil solution, and is an indicator of the current soil condition. When lime is added to a soil, active acidity is neutralized by chemical reactions that remove hydrogen ions from the soil solution. However, there are also acidic cations (H+ and Al3+) adsorbed on soil colloids (the CEC) which can be released into the soil solution to replace those neutralized by the lime. This exchangeable acidity, which is reported in units of meq/100 g, is directly related to the quantity of lime required to increase the pH from its current level to the target level determined by the selected crop. Soils such as clays or those high in organic matter have a high cation exchange capacity (CEC) and a potential for large amounts of exchangeable acidity. These soils are said to be well buffered. Buffer pH is a measure of reserve acidity and is used by the soil testing laboratory to estimate buffering capacity and lime requirement. Low buffer pH readings indicate high amounts of reserve acidity, and therefore, high amounts of lime will be recommended.
Occasionally soil pH must be lowered, because either the plant requires acid soil or the soil was previously over-limed. Incorporating elemental sulfur (S) is the most effective way to lower soil pH. Once applied, the sulfur oxidizes to sulfuric acid. Applying 5 to 10 lbs. of sulfur per 1000 sq. ft. will lower the pH of most New England soils by approximately half a unit. Use the lower rate for very sandy soils. No more than 15 lbs. of sulfur per 1000 sq. ft. should be applied at any one time. Retest the soil after 4 to 6 months to determine if more sulfur is needed.
Cover Crops & Green Manures
Cover Crops
Cover crops are grown to protect and/or enrich the soil rather than for short term economic gain. When turned into the soil, a cover crop is called a green manure, so the terms are reasonably interchangeable.
When a cash crop is not growing, it is wise to sow something to protect the soil from wind and water erosion, thus the term cover crop. It is also wise to “rest” your fields by occasionally rotating out of cash crop production, while at the same time growing something to improve soil fertility, thus the term green manure. Some green manure crops can also suppress weeds, by “smothering” them and starving them for light. Use high seeding rates if cover crops are grown for weed suppression.
Depending on their growing requirements, cover crops can be sown after vegetable harvest, between a spring and fall crop or by overseeding into a standing small fruit crop after a final cultivation.
In selecting a green manure crop, consider the following: seed cost, winter hardiness (if applicable), ability to fix nitrogen, suppress weeds, and suitability to soil conditions, tillage equipment and the crop to follow. Here is a list of some common cover crops in New England and a description of their uses.
| Material | Carbon:Nitrogen Ratio |
|---|---|
| Legume hay | 15-19:1 |
| Non-legume hay | 24-41:1 |
| Corn stalks | 42:1 |
| Oat straw | 70:1 |
| Rye straw | 82:1 |
| Cow manure | 18:1 |
| Finished compost | 17-20:1 |
| Agricultural soils | 8-14:1 |
| Hardwood sawdust | 500:1 |
Legumes
Sow when “free” nitrogen is desired for a subsequent cash crop with a high nitrogen demand. Legumes generally require good drainage and fertility. Most grow slowly at first so they do not compete much with weeds until well established. Drill seed for best stands. Mix seed with proper inoculant to insure nodulation. Often sown with a nurse crop such as oats, or in mixes with perennial grasses. When legumes are mowed, tarnished plant bugs may be driven into adjacent crops, such as strawberries or raspberries increasing the likelihood of damage.
Red Clover is a short-lived perennial that is somewhat tolerant of acid or poorly drained soils. Mammoth red clover produces more biomass for plow-down than medium red clover, but does not regrow as well after mowing. Mammoth will often establish better than medium in dry or acid soils. Sow in early spring or late summer.
White Clover is a low-growing perennial, tolerant of shade and slightly acid soil. Ladino types are taller than the Dutch or wild types. White clover is a poor competitor with weeds unless mowed. Suitable for use in walkways or alleys. Expensive seed.
Sweet Clover is a biennial (except for annual types like Hubam) that is deep-rooted and adapted to a wide range of soils. It is a good soil-improving crop with a strong taproot that opens up subsoil. Yellow sweet clover is earlier maturing and somewhat less productive than white sweet clover. Sow in early spring or late summer at 15 to 20 lb/acre. Heavy growth is produced in spring after overwintering. Incorporate in late spring or mid-summer at flowering. May deplete soil of moisture, which can be a problem for subsequent crops in dry years.
Hairy Vetch has become increasingly popular as a cover crop. It can fix tremendous amounts of nitrogen. Generally this cover crop is seeded in the fall after August 15 or before mid September in most areas. It should be allowed to grow at least until mid May before plow down. It is advisable to seed winter rye (30-40 lbs/acre) or oats (40-50 lbs/acre) with the vetch when seeded in the fall to take up unused nitrogen and to ensure a good ground cover for erosion control. Most growers prefer oats to winter rye because the oat will not overwinter and the vetch alone is easier to manage the following spring. Hairy vetch can also be seeded in early spring or summer. When seeded in early April it will produce significant nitrogen in time for a late seeding of sweet corn or brassica. When seeded in the summer it will usually winter kill and the following spring the nitrogen will become available for an early crop. Treat seed with a pea-type inoculant.
Alfalfa requires deep, well-drained soil with a pH near neutral for good growth. It is a long-lived perennial that is probably not worth the expense in a short-term rotation. Fixes large amounts of nitrogen if maintained for several years. Seed early spring or late summer at 15 to 25 lb/acre.
Nonlegumes
These are selected when nitrogen contribution to the soil is not a priority. They tend to grow more rapidly and thus are better at short-term weed suppression than legumes. Late-season grasses are useful for recovering leftover nitrogen after crops have been harvested.
Winter Rye is a common winter cover crop, sown after cash crops are harvested in the fall. It is very hardy, adapted to a wide range of conditions, and seed is inexpensive. The latest-sown cover crop, it produces a lot of biomass in the spring. This adds organic matter to the soil but may be difficult to incorporate prior to crop planting.
Oats are used as a winter cover crop to protect the soil without requiring intensive management in the spring, because they are frost-killed. Shallow incorporation of residues may still be necessary before crop planting. Enough growth is needed before first frost to adequately protect the soil, so plant by late August, at a rate of about 100 lb/acre. Oat residues left on the soil surface may chemically suppress weed growth, and act as a physical barrier. Oats are also a good cover crop to plant any time during the spring or summer when land is out of production. Unlike winter rye, oats grow vigorously and upright when seeded in the spring or summer and compete effectively with weeds. Can grow in soils with low pH (5.5).
Ryegrass is a low-growing cover crop that produces an extensive root system good at capturing leftover nitrogen. It is well suited to undersowing, after last cultivation of a cash crop, in order to establish a winter cover prior to harvest. Annual ryegrass is less expensive than perennial ryegrass, and is more likely to winterkill; however, it may overwinter in milder areas, and perennial ryegrass may winterkill in harsher zones. These crops form a dense sod that reduces erosion.
Sudangrass and Sorghum-sudangrass (Sudex) are fast-growing, warm season crops that require good fertility and moisture to perform well. Under such conditions, their tall, rank growth provides excellent weed suppression. Such heavy growth can be difficult to cut and incorporate. Due to its growth habit, sudan grass should be cut back when growth exceeds 20-25 inches or plowed down if a second growth is not desired.
Buckwheat is a fast-growing summer annual that can be used to protect the soil and suppress weeds for a month or two between spring and fall cash crops. It grows fairly well on acid and low phosphorus soils. It decomposes rapidly and is easy to incorporate, but does not contribute a lot of organic matter to the soil. Mow or incorporate at flowering, prior to setting seed so it does not become a weed in subsequent crops. Grows well in low soil pH. To smother weedy fields, some growers plant two successive crops of buckwheat followed by winter rye. Do not allow buckwheat to go to seed prior to plow-down.
Annual Field Brome: Winter annual grass. Establishes rapidly and has extensive fibrous root system contributing organic matter to soil. Plow down in spring. Seed not readily available so plan ahead.
Japanese Millet: Summer annual grass. Fast growing and competes well with weeds. Establishes faster than sudan grass on cool soils. Can be cut back and allowed to regrow after reaches 20 inches. Can reach 4 ft. in 7-8 weeks. Do not allow to mature and drop seed.
Mustards: This includes white or yellow mustard (Sinapis alba), brown or Indian mustard (Brassica juncea), and black mustard (B. nigra L.). Mustards produce glucosinolates, which are compounds that have broad activity against bacteria, fungi, insects, nematodes and weed seeds. Mustards are often considered “biofumigants”, and managed to try to benefit from these effects by mowing and incorporating into the soil immediately afterwards.
Mixtures
Legumes and grasses are often mixed as cover crops to hedge against failure of one and to get some of the benefits of both. The grass will usually establish quickly, holding soil in place and “nursing” the legume along. By taking available soil N, the grass promotes N-fixation by the legume. Fertilization with N or the absence of mowing favors growth of grass over legume. Some common mixtures, in addition to vetch and rye described above, are red clover and oats (combine or mow oat heads, leaving established clover); ryegrass and white clover for mowed alleys. Timothy is often used as a nurse crop for alfalfa. It is advisable to trial unfamiliar cover crops or mixtures on a small scale to determine if they are suited to your climate and management resources before growing them widely.
Note: N fixed in root nodules moves to the leaves and stems of legumes. If hay is harvested from the field prior to plowing, very little N will be contributed to the subsequent crop.
| Cover Crop | Recommended Seeding Dates | Seeding Rate |
|---|---|---|
| Alfalfa | Early April to late May or Late July to mid August | 14 - 20 lbs/A |
| Buckwheat | Late May to early June or Late July to early August | 60 - 75 lbs/A |
| Clovers (Alsike, Ladino, White) | Early April to late May or Late July to mid August | 4 lbs/A (alsike and white) 2 lbs/A (ladino) |
| Red Clover | Early April to late May or Late July to mid August | 8 - 10 lbs/A |
| Sweet Clover | Early April to mid May or Early August | 12 - 20 lbs/A |
| Hairy Vetch | August to early Sept. | 30 - 40 lbs/A |
| Annual Field Brome | July and August | 20 lbs/A |
| Japanese Millet | Late May to mid July | 20 lbs/A |
| Spring Oats | Early to mid April or Mid August | 100 lbs/A |
| Annual Ryegrass | Early April to early June or Early August to early Sept. | 30 lbs/A |
| Perennial Ryegrass | August to mid Sept. | 25 lbs/A |
| Winter Rye | August to mid Sept. | 80-100 lbs/A |
| Sudan Grass | Late May to Early June | 80 lbs/A |
| Sorghum-Sudan Grass Hybrids | Late May to Early June | 35-50 lbs/A |
| Mustards | Late May to July | 10-25 lbs/A |
Soil Organic Matter
Soil organic matter (SOM) is a small but critical component of soils. SOM is continuously being produced by plants and animals and broken down by soil microbes that use it as a source of energy. As such it provides food for a diverse population of microbes in the soil and this helps prevent any one type of organism, such as a plant pathogen, from dominating. As microbes break down SOM, nutrients are released which are available for plant growth. This process is called mineralization and can provide some or all of the nutrients needed for successful crop production. Soil microbes are most active in warm soils (over 70°F) that are moist, but well aerated, with a pH between 6 and 7 (ideal conditions for most fruit crops). Mineralization of nutrients will proceed rapidly under these conditions.
SOM also improves soil structure. It binds individual soil particles together into aggregates. This makes soil friable, allowing for good drainage, aeration, and root growth. SOM also improves the moisture holding capacity of soils. SOM is also the chief contributor to cation exchange capacity in New England soils.
Adding to Soil Organic Matter
Using compost is an effective way to add organic matter to the soil. Small fruit growers can make compost on the farm although most don’t have enough raw materials to satisfy their needs. Some bring in additional materials such as municipal yard wastes to compost on site. Others purchase compost from the increasing number of commercial composters. Regardless of the source, compost should be finished before use. Finished compost has no recognizable bits of matter and will not heat up after turning. Compost should also be tested for nutrient content. Finished compost should have a low ammonium content, high nitrate level and a pH near neutral. Repeated use of a compost high in a particular element could cause a nutrient imbalance. For more information, obtain a copy of Berry Soil and Nutrient Management – A Guide for Educators and Growers (see Resources in Appendices at the end of this publication).
Animal manure is an excellent source of nutrients and organic matter. About half of the nitrogen in fresh dairy manure and 75% of the nitrogen in poultry manure is in the form of ammonia. Ammonia is subject to loss through volatilization if not incorporated immediately after spreading. In the soil, ammonia is converted to nitrate and is available for plant use. However, nitrate is subject to leaching and large applications should generally be avoided. There are times when readily available N is needed, but fresh manure should be applied only with caution. Many people prefer to compost manure before field application to stabilie the N contained in manure. Manure can be mixed with other materials for composting. Manure samples can be analyzed by several of the laboratories listed under Soil Testing.
Manure often contains human pathogens and therefore application practices that avoid transferring pathogens to produce should be utilized when using manure in food production systems. See more on safe application practices in the Produce Safety section.
Cover crops are used by most growers to protect soil from erosion and to take up unused N. Cover crops also contribute to SOM when they are plowed down, although SOM varies considerably among crops (see Cover Crop section).
Carbon-To-Nitrogen Ratio
Organic matter is broken down by microbes which use carbon (C) for energy. They also have a need for nitrogen. Microbes have a requirement of about one N atom for each 25 C atoms. This is a carbon-to-nitrogen ratio (C:N) of 25:1 or 25. If the organic matter has a higher C:N (more C and less N), microbes will need more nitrogen and will take it from the soil. Microbes are more efficient than crops in obtaining N from the soil. If there is not enough nitrogen for both the microbes and the crop, the crop will not obtain what it needs. Eventually there will be a net gain in nitrogen, but crops can suffer in the short term. If organic matter with a high C:N is applied to soil shortly before planting a crop, additional N may be needed to assure the needs of both the microbe and the crop are met. Organic matter with a C:N of less than 25:1 (25) should not be a problem and in some cases can contribute N for crop use. See Table 5 for examples of C:Ns of some sources of organic matter.
Guidelines for Organic Fertilization
An organic fertility program should consider the biological, physical, and chemical characteristics of the soil in order to optimize and sustain soil fertility and crop production. Organic growers should confer with their certifier to ensure that any amendments are in accordance with USDA National Organic Program (NOP) standards. See Organic Certification for additional information.
Organic Matter
Organic matter management is an essential part of organic agriculture. Generous additions of compost, animal or green manures are needed to feed soil microbes, but organic growers need to carefully monitor soil test P levels when adding organic amendments to the soil (see discussion below Building Soil Organic Matter). Organic matter management is essential because the by-products of decomposition of organic amendments bind soil particles to improve the physical condition, or structure of soil, and also because organic matter is the storehouse of nutrients in the soil. Many nutrients, especially N, P, S, Cu, and Zn, are released when organic matter decomposes. The good structure promoted by organic matter results in enhanced root growth, which increases plant retrieval of soil nutrients, which is a classic synergistic effect. Decaying soil organic matter releases nutrients unevenly during the growing season. In the late spring after the soil warms there is usually a flush of nutrients, and the rate declines after that with the rate during the season dependent mostly on soil moisture. When the release of nutrients, or mineralization, is low, as when soils are cool in the early spring, fertilizing with soluble forms of nutrients may benefit crops. This is why some relatively available phosphorus and nitrogen should be banded, or placed near the roots of crops early in the growing season. For example, use bone meal and dried blood or a seed meal like peanut or soybean to provide some available P and N, respectively, or use a commercial organic fertilizer blend. Information on the nutrient content of various organic soil amendments can be found at MOFGA Fact Sheet #11.
Soil amendments of animal origin (blood meal, manure, compost with animal source material, etc.) have the potential to contain human pathogens. Knowledge of your source material and application practices that avoid the potential of transfer of human pathogens to fruit are an important part of managing your soil (See the Produce Safety section for details).
Nitrogen
Nitrogen is the most common limiting nutrient on organic farms. The most common organic sources of N are seed meals, fish meal, blood meal and livestock manures. Most sources of N used by organic farmers are expensive and that explains why most growers turn to livestock manures, compost or crop rotations with legumes. When using manure or immature compost, remember that only up to half the N becomes available to plants during the season following incorporation. Each ton of compost containing 1% N can provide a crop with 5 to 10 lb of N per acre. When calculating N needs, remember that there is a release of about 20 lb/acre or more of N for each 1% soil organic matter. These releases of N vary with drainage and other soil conditions, and may not be well timed to crop needs, especially early, short season crops. Annual crops need N most intensely about three to four weeks after emergence or transplanting. Therefore, sidedressing, or spreading soluble N along the crop row, at this time is most efficient. Because soluble organic N fertilizers are expensive, it is advisable to use lower rates than recommended for synthetic fertilizers. A sidedressing of 25 lb/acre of actual N is reasonable for many crops growing in a fairly fertile soil. This requires 200 lb dried blood, 400 lb soy or cottonseed meal, or the equivalent from other sources of N.
Phosphorus
Phosphorus is low in many unamended New England soils, and can limit crop growth, especially early in the season. Soils testing less than 10 lb/acre available phosphate (P2O5) usually require substantial applications of phosphate. Hard rock phosphate contains about 2% available P2O5; soft, or colloidal, rock phosphate contains 3% available P2O5. Thus, a ton of these materials provides only 40 to 60 lb available P2O5/acre. Bone meal contains about 20 times more available P2O5 by weight, but is more expensive. Bone Char contains 16% available P2O5 and is less expensive than bone meal. With soils low in P, it can help crops to place proportionally more P fertilizer in the crop row than to broadcast it evenly. Maintain a pH of 6 to 7 with limestone to maximize P2O5 availability. Compost and manures tend to contain P2O5 as well as N or K2O. Repeated applications will raise P levels substantially and care must be taken to avoid building excessive P levels in the soil that could lead to contamination of ponds and lakes. Monitor P levels and adjust compost or manure applications accordingly.
Potassium
Sul-Po-Mag is the Potassium fertilizer of choice when Mg is also needed. Potassium sulfate is commonly used when no Mg is needed. Potassium becomes very slowly available from granite dust or greensand, which may be applied at 3 to 5 tons to the acre to build up K reserves. Wood ashes contain soluble K, but must be used with caution because they will raise the pH rather rapidly and can be caustic. The liming effect of 1 pound of ashes is roughly equal to 2/3 of a pound of limestone. No more than 1/2 ton of ashes per acre should probably be applied at once, and only then if called for by low pH, low K and sufficient Mg.
Magnesium
Magnesium is best applied as dolomitic lime, but when liming is not required, other Mg sources are Sul-Po-Mag or Epsom salts. Sul-Po-Mag is the better choice if potassium is also required, as it is less expensive than Epsom salts. However, Epsom salts can be applied as a foliar spray to alleviate Mg deficiency. Dissolve 1.5 lb per 10 gal water and spray at weekly intervals.
Micro-nutrients
Micro-nutrients are generally sufficiently supplied to plants by regular additions of organic matter to the soil. Wood ash is another excellent source of micronutrients. Some seaweed extracts may also supply trace minerals. In soils low in boron (B), remedial applications are widely recommended for crops that readily suffer from B deficiency. In this case, 1 to 2 lb/acre of B is applied to the soil with other fertilizers. It is difficult to apply such a small amount uniformly, but boron can be ordered as part of a fertilizer blend. Most boron products are soluble and can sprayed evenly over the soil. Several forms of B are listed by the Organic Materials Review Institute (OMRI), including Solubor, Fertibor and Biomin Boron. It is advisable to monitor B levels with soil tests and tissue tests (for perennial fruits). Excess levels of B are toxic to plants, and some crops are quite sensitive to boron.
Rock Powders
Rock powders can be used, along with organic matter, to build up and balance soil reserves of plant nutrients. However, these are not very soluble nutrient sources, and are not effective for treating short-term nutrient deficiencies. Using some soluble fertilizers may be advisable while building soil reserves of plant nutrients with rock powders and organic matter.
Limestone is a widely used rock powder. It raises the soil pH and provides calcium (Ca) and varying amounts of magnesium (Mg). When Mg tests below about 100 lb/acre, high-Mg limestone, or dolomite, should be used for liming. If Mg is above about 150 lb/acre, use calcite, or low-Mg lime. Choose your fertilizer materials considering the desired 20:4:1 base saturation ratio of Ca:Mg:K in the soil, but remember, this goal is only a ballpark figure and is definitely secondary to establishing the proper pH of 6 to 7 for most crops and supplying nutrients shown to be deficient by a soil test.
Organic Certification
Consumers of organic fruit represent a growing market segment. Federal legislation now requires certification of food products that are labeled as organic except for producers who gross under $5,000. These small producers must follow the same practices as certified growers. Organic agriculture is based on the use of practices and inputs that enhance the physical, biological and chemical aspects of the soil and its ability to sustain crop and animal production in an environmentally safe manner. In general, the use of synthetic substances for pest management or to supply nutrients is prohibited. Organic agriculture relies on cultural practices and natural materials for pest management and on-farm or locally available sources of nutrients as much as possible.
This guide includes information on organic practices, as well as many materials and inputs approved by the National Organic Program. Such products are designated with the symbol . The Organic Materials Review Institute (OMRI) is an organization that lists products allowed for certified organic production. Note that some are regulated and subject to restrictions. In some cases, certain formulations of a product are permitted and others are not. The list of substances approved by OMRI is subject to change. Be sure to check with your certifier in advance to be certain that the materials and practices you plan to use are approved. Some materials labeled as organic may not be allowed by the program. For a current list, visit the OMRI web site at: www.omri.org.
The following is a list of certifying organizations currently accredited by USDA.
Connecticut and Massachusetts:
Baystate Organic Certifiers
Don Franczyk (Director)
1220 Cedarwood Circle
N. Dighton, MA 02764
Telephone: 774-872-5544
Email: baystateorganic@earthlink.net Website: https://baystateorganic.org/
Maine:
MOFGA Certification Services
P.O. Box 170
Unity, ME 04988
Telephone: 207-568-4142
Email:certification@mofga.org Website: http://www.mofgacertification.org
New Hampshire:
Allen Wyman
NH Department of Agriculture, Markets & Food
Division of Regulatory Services
25 Capitol St., P.O. Box 2042
Concord, NH, 03302-2042
Telephone: 603-271-3685
Email: allen.g.wyman@agr.nh.gov Website: http://www.agriculture.nh.gov/divisions/regulatory-services/
Rhode Island:
Matt Green
Div. of Ag.
235 Promenade St.
Providence, RI 02908
Telephone: 401-222-2781 x4509
Website: https://dem.ri.gov/natural-resources-bureau/agriculture-and-forest-environment/agriculture/regulatory-services/organic-certification
Vermont:
Vermont Organic Farmers, LLC
P.O. Box 697
Richmond, VT 05477
Telephone: 802-434-4122
Email: //info@vermontorganic.org">info@vermontorganic.org Website: http://nofavt.org/
Organic Materials Listing:
OMRI:
Organic Materials Review Institute
P.O. Box 11558
Eugene, OR 97440
(541) 343-7600
http://www.omri.org
info@omri.org
Pest Management
Information About Pesticides
A pesticide can be referred to by : 1) a common name (active ingredient) or 2) a trade or brand name. In most of the tables in this guide, trade names are used as they are more easily recognized and are what you will look for when buying pesticide materials.
Labeled Formulations: The recommendations within this publication list only one formulation. Growers should be aware of other formulations. The rates to be applied are on the label. Note: There may be several products registered with the same active ingredient. Each label is different, and some crops may be listed on some labels but not on others. It is the responsibility of the user to read the label and be sure that the material selected is labeled for the proposed use. Ask your supplier for clarification if you are not sure if the formulation or product is exactly what you are looking for.
Labels are for your protection and information: Look for the percentage (by weight) or amount of material in the formulation. Compare costs of two similar products on the basis of effectiveness, the amount of actual pesticide contained and the quantity of the formulations needed/acre. Follow all safety precautions. Some pesticides are extremely dangerous to handle. Protect yourself and your employees.
Control of pests not on the label: Always be certain the crop is on the label before using a pesticide on that crop. Pests that are not listed on the label may not be effectively controlled by that product.
To avoid illegal residues: Adhere strictly to pre-harvest interval (PHI). Accurately calibrate your equipment; never exceed label recommendations. Prevent drift to adjacent properties or crops, or contamination of bodies of water. The applicator is held responsible for problems caused by drift or contamination. High-volume, low-pressure, ground applications cause less drift than low-volume, high-pressure, air-blast, ground applications, aerial applications or dust.
Emulsifiable concentrates (EC) are less troublesome to spray equipment than wettable powders (WP). The water-based flowable concentrates and wettable powders are less likely to cause plant injury than oil-based concentrates of similar materials.
Wettable powders/suspendable powders (WP) are less likely than ECs to cause injury to sensitive plants or to cause trouble when mixed with fungicides or other pesticides.
Dry flowables (DF) are similar to wettable powders in their formulation but are pelletized to minimize dust.
Flowables (F) are liquid formulations with similar properties to latex paint. Clean equipment immediately after use.
Tank mixture and aerial application: Check the label and consult your state pesticide regulatory agency.
Disposal of pesticides: Read label. Contact your state pesticide regulatory agency for instructions on disposal of chemicals.
Restricted-Use Pesticides
In accordance with federal and state pesticide regulations, those pesticides that are highly toxic and those that persist and accumulate in the environment are placed on a restricted-use list and shall be sold and used only by certified applicators. For information about training for certified applicators contact your Extension Specialist. In some instances, states may require additional permits for certain pesticide users.
Poisoning Information
Make sure your doctor has a copy of the Note to Physicians that is placed on the labels of dangerous pesticides. Treatment for pesticide poisoning is very precise. The antidotes can vary for the different pesticides. In an emergency, call your doctor and provide specific information on the trade name and common name of the pesticide exposed to. Your doctor will then consult the center if necessary.
Pesticide Storage
Any restricted pesticide or container contaminated by restricted pesticides must be stored in a secure, locked enclosure while unattended. That enclosure must bear a “pesticide storage” warning sign readable at a distance of 20’. If any pesticide has to be stored in other than its original container, that container must be labeled with the name and concentration of the active ingredient and the signal word and warning statements for the pesticide along with a copy of the label. Keep an inventory of all pesticides stored in an area away from the storage site, so that it may be referred to in case of an emergency at the storage site.
Make available to personnel at all times: a respirator with chemical cartridge, gas mask with canister, goggles, rubber gloves and aprons, fire extinguisher and a detoxicant for spilled materials suggested by your local fire department. Instruct all personnel on proper use of the above equipment and on what to do in case of emergency. A shower stall with plenty of soap should be made available on the premises. Prompt washing in case of accidental spillage may be a matter of life and death.
Keep your local fire department informed of the location of all pesticide storage areas. Fighting a fire that includes smoke from burning pesticides can be extremely hazardous. Firefighters should be cautioned to avoid breathing any smoke from such a fire. A fire with smoke from burning pesticides may endanger people in the immediate area or community. They may have to be evacuated if the smoke from a pesticide fire drifts in their direction.
Storage Guidelines
- Store pesticides in a cool (between 40° and 80°F), dry, well-ventilated area that is not accessible to children and others who do not know or understand the safe and proper use of pesticides.
- Pesticides should always be stored in their original containers and kept tightly closed. For the protection of others, especially firefighters, the storage area should be posted as Pesticide Storage and kept securely locked.
- Herbicides, especially hormone-like weed killers such as 2,4-D, should not be stored with other pesticides (primarily insecticides and fungicides) as they can volatize and be absorbed by other pesticides.
- Plan pesticide purchases so that supplies are used by the end of the growing season. When pesticides are stored for the winter, keep them at temperatures above freezing, under dry conditions and out of direct sunlight.
- If pesticides have frozen, place pesticides in warm storage (50° to 80°F, or 10° to 26.7°C). Shake or roll container every few hours to mix product or eliminate layering. If layering persists or if all crystals do not completely dissolve, do not use product. If in doubt, call the manufacturer.
- Read the label. Special storage recommendations or restrictions will be printed on the label.
- Write the purchase or delivery date of the product on the label with waterproof ink. Products may lose their effectiveness over several years.
- Monitor pesticides for signs of quality deterioration (See Table 7).
| FORMULATION | GENERAL SIGNS OF DETERIORATION |
|---|---|
| EC | Evidence of separation of components such as sludge or sediment. Milky appearance does not occur when water is added. |
| Oils | Milky appearance does not occur when water is added. |
| WP, SP | Excessive lumping; powder does not suspend in water. |
| D, G | Excessive lumping or caking |
Diagnosing Plant Problems
Effective fruit crop production depends on the grower developing a system of crop management that is appropriate for each farm. Decisions need to be made for how to manage all of the normal cultural practices such as planting, fertility, harvesting, and pruning as well as managing the insect, disease, and weed problems that occur either regularly or sporadically. The information in this guide will address management issues related to both common, expected pest problems as well as the occasional appearance of minor pest problems.
Effective pest management depends on:
- correct diagnosis of the problem and correct identification of the pest causing it.
- use of techniques to prevent or delay infestations or infections as well as techniques to control them.
- early detection of pests by frequent inspection of plants.
- tolerance of pests at population densities that do not cause economic damage.
Diagnostics
Correct diagnosis of a problem and correct identification of the pest (insect, disease, biotic factor, nutrition, etc.) causing it are key to successful crop management and profitability. Below is a list of laboratories that offer disease diagnostics on a fee-for-service basis. In general, virus screening is a procedure that is done outside of this region and is referred out by one of the clinics listed below. Contact your local clinic or lab for more information on virus screening.
In order to submit a sample for diagnosis, some basic preparation instructions should be followed. These include:
- Collect specimens that show a range of symptoms (i.e., from healthy to seriously affected), usually collected from the margin of the affected area. Avoid specimens that are completely dead or decayed as they are not diagnostically useful.
- Fill out case-history or sample submission form like the one at the end of this guide. This is very important. Without the information included in the form, a correct diagnosis is very difficult.
- Pack specimen in dry paper and place in a plastic bag (never pack with wet paper towels).
- Mail specimen and case-history form same-day or overnight delivery, or deliver specimen personally the same day. If this is not possible, place in a refrigerator and mail or deliver the following day. Specimens should come to the diagnostic labs early in the week to avoid problems with weekend hold-overs.
- Soil samples for nematode analysis.
Plant Diagnostic Clinics of New England
(D=disease ID, I=insect ID, N=nematode analysis, W=weed ID)
CONNECTICUT
The Plant Disease Information Office (D,I,W,N)
The Connecticut Agricultural Experiment Station
123 Huntington Street, P.O. Box 1106
New Haven, CT 06504
https://portal.ct.gov/CAES/PDIO/PDIO-Home/PDIO-Home
(203) 974-8601
Radcliffe Hicks Bldg, Rm 4
1380 Storrs Rd., Unit 4115
Storrs, CT 06269
(203) 974-8601
MAINE
Insect Pest and Disease Diagnostic Lab (D,I)
Pest Management Office
17 Godfrey Drive
Orono, ME 04473-3692
https://extension.umaine.edu/ipm/ipddl/
1-800-287-0279 (within Maine)
(207) 581-3880
MASSACHUSETTS
UMass Extension Plant Diagnostic Laboratory (D,I,N,W)
Room 3, French Hall
230 Stockbridge Road
Amherst, MA 01002
https://ag.umass.edu/services/plant-diagnostics-laboratory
(413) 545-3208
NEW HAMPSHIRE
Barton Hall, 34 Sage Way
https://extension.unh.edu/agriculture-gardens/pest-disease-growing-tools/plant-diagnostic-lab
(603) 862-3200
RHODE ISLAND
URI Plant Protection Clinic (D,I)
3 East Alumni Avenue
Kingston, RI 02881
http://web.uri.edu/ceoc/plantclinic/
(401) 874-2900
VERMONT
University of Vermont Plant Diagnostic Clinic (D,I,W)
Attn: Ann Hazelrigg
201 Jeffords Hall, 63 Carrigan Drive
University of Vermont
Burlington, VT 05405
https://www.uvm.edu/extension/pdc
(802) 656-0493
VIRUS TESTING
Agdia Inc. (D)
30380 County Rd. 6
Elkhart, IN 46514
www.agdia.com
(800) 622-4342
Integrated Pest Management (IPM)
Integrated Pest Management (IPM) is the coordinated use of pest and environmental information to design and implement pest control methods that are economically, environmentally and socially sound. IPM promotes prevention over remediation and advocates integration of multiple control strategies to achieve long-term pest management solutions.
IPM consists of gathering information, interpreting data, creating a flexible management plan, making timely decisions and taking the proper action. Information gathering and decision-making techniques include: accurate pest identification, learning about the weak link in a pest's life cycle or biology, scouting and monitoring crops in fields, using action thresholds to minimize spraying, and keeping records of findings to assess the effectiveness of management decisions.
Monitoring Pests and Making Control Decisions
- Accurate pest identification is a crucial first step on the road to a solution. Misidentification of pests is a common cause of pest control failure and crop damage. See the "Diagnostics" section for more information on identification.
- The biology and life-cycle of a pest often reveals the key to successful control measures. Detailed, pest-specific information is available in fact sheets on IPM web sites or publications listed in the Appendices. See also specific crop listings in this guide for basic descriptions.
- Scouting involves using systematic methods of inspecting the crops on a regular basis to quantify pest populations or crop injury/damage. Scouting techniques vary considerably depending upon the type of pests (weed, insect, disease or other) involved. Details are available in pest and crop-specific IPM fact sheets and manuals, and in crop listings in this guide.
- Monitoring weather conditions or Trapping pests can be used to assess or predict current or future pest problems and help to prevent crop damage. Equipment and procedures vary by pest and more resources can be found in the Appendices.
- Action thresholds are usually expressed as a fixed number for individual pests (i.e., 7 moths/week or 2 weeds/foot of row) or crop injury (i.e., 20% defoliation), or as a rating for weather conditions (i.e., 15 Disease Severity Units). Thresholds tell you when to control the pest(s) to prevent or minimize economic damage to crops. Some thresholds are given for pests in the individual crop sections in this manual and others vary by state or region. Contact your state's Extension IPM personnel for local action thresholds.
- Record-keeping involves recording data on weather, pest populations, crop conditions and control procedures all season. Good records help determine which pest control strategies are working and where improvements should be made in the future.
Along with information gathering and decision-making techniques, a variety of preventative and curative control methods are used to construct a complete IPM management plan for each pest, crop and farm. Cultural, mechanical, physical, genetic, and biological controls help prevent severe pest problems, while pesticides are used when additional control measures are required.
- Cultural controls are modifications of the crop production systems that suppress pest populations and occurrence. A few examples include: the use of better site selection, crop rotation, modifying planting times or plant spacing, improved water and nutrient management for better crop health or to limit weed competition, breaking up plow pans, cleaning soil from machinery between fields, and the use of cover and smother crops.
- Mechanical and physical controls consist of using supplies, equipment, or some factor, such as temperature, humidity or light, to disrupt pest life cycles and/or suppress populations. Mechanical and physical controls function by cutting, crushing, burying or excluding pests with implements and barriers, or by heating, cooling, drying, wetting, or regulating light in some way. Some examples include: plowing, cultivation, flaming, plastic or organic mulches, row covers, greenhouse ventilation, washing, cold storage and roguing infected plants.
- Genetic controls are generally achieved through traditional breeding programs that select crop varieties with resistance or tolerance to insects, nematodes or diseases or with plant growth characteristics which favor plant success (such as early emergence, heat or cold tolerance, canopy or leaf traits).
- Biological control is the use of naturally occurring or introduced beneficial organisms to control or suppress pest populations. Biological control agents come in all shapes and forms including: beneficial insects, mites, spiders, nematodes, fungi, bacteria, viruses, protozoa and plants. In the broadest interpretation, they would include things like microbial pesticides and the use of trap crops. Common examples range from parasitic wasps, entomophagus and competitive fungi and bacteria, to predacious bugs, beetles and spiders. Natural enemies of pests exist everywhere in nature and should be preserved whenever possible. Many beneficials can be purchased for use in the greenhouse or for specific crops.
- Pesticides should be used in conjunction with the control measures previously mentioned and only when pest population densities will cause economic damage, or when environmental conditions favor disease. Selective insecticides are products that primarily target the pest(s) you wish to control, with few or no detrimental effects on most beneficials. They may also have other attributes making them less harmful to the user and the environment and may be lumped into a larger category of Biorational pesticides (see Biorational Pesticide section). If the use of a pesticide is required, choose a selective product or another biorational pesticide if possible. Selective insecticides usually spare biological control agents, reduce the risk of secondary pest outbreaks, reduce the impact on the environment, improve farm safety, and minimize the number of applications needed. Broad-spectrum insecticides usually kill many different kinds of pests and beneficial organisms. The use of broad-spectrum insecticides can often lead to resurgence of primary pest populations due to a lack of natural controls, or to secondary pest outbreaks and additional applications. Broad-spectrum insecticides should only be used if no other viable options exist to manage the pest. Proper pesticide application and resistance management techniques should be used to maximize the effectiveness and preserve the useful life of the available products.
Much of the space in this publication is dedicated to lists of pesticide options for weeds, insects and diseases on specific commodities. Effective pest management involves much more than using pesticides. For detailed information on IPM, see the list of publications in the Appendices section, or visit your local Extension System's IPM web site.
Pesticide Safety and Use
Who can apply pesticides
Farmers who use pesticides may require pesticide applicator licenses or permits according to state and federal law. It is important to check with your state lead agency (SLA) for pesticide regulation to determine what is appropriate in your state. In general:
- Farmers who apply restricted use pesticides on their crops need to have a private applicator license or permit.
- Workers who help someone who is licensed or certified to apply restricted-use materials may also need a license to assist.
- Farmers who use only general use pesticides may also require licenses or permits; these requirements vary from state to state.
- In most states, commercial (for hire) applicators must follow rules that are more restrictive than those of private applicators.
Please note that the requirements of the EPA Worker Protection Standards (WPS) must still be followed regardless of whether a pesticide license or certification is required. See the section below on WPS. As of this printing, the following are contacts who can provide information on specific requirements for pesticide licenses and certification for each state.
Connecticut: 860-424-3369, http://www.ct.gov/deep/cwp/view.asp?A=2710&Q=324260
Maine: 207-287-2731, https://www.maine.gov/dacf/php/pesticides/applicators/licensing.html
Massachusetts: 617-626-1784, http://www.mass.gov/eea/agencies/agr/pesticides/
New Hampshire: 603-271-3550, http://agriculture.nh.gov/divisions/pesticide-control/index.htm
Rhode Island: 401-222-4700, http://www.dem.ri.gov/programs/agriculture/pesticides-regulatory.php
Vermont: 802-828-2431, https://agriculture.vermont.gov/public-health-agricultural-resource-management-division/pesticide-programs
All pesticides are poisonous. However, some are more toxic than others. The toxicity of the pesticide is usually stated in the precaution label. For example, a skull and crossbones figure and the signal word “Danger” are always found on the label of highly toxic (Toxicity Class I) materials. Those of medium toxicity (Toxicity Class II) carry the signal word “Warning.” The least toxic materials (Toxicity Class III) have the signal word “Caution.” The toxicity of a pesticide is expressed in terms of oral and dermal LD50. LD50 is the dosage of poison that kills 50% of test animals (usually rats or rabbits) with a single application of the pure pesticide for a given weight of the animal (mg/kg of body weight). The lower the LD50 value, the more toxic the material. Oral LD50 is the measure of the toxicity of pure pesticide when administered internally to test animals. Dermal LD50 is the measure of the toxicity of pure pesticide applied to the skin of test animals. Generally, an oral application is more toxic than a dermal one.
| TOXICITY CATEGORY |
SIGNAL WORDSA REQUIRED ON LABEL |
ORAL LD50 (MG/KG) |
PROBABLE LETHAL ADULT HUMAN DOSE |
|---|---|---|---|
| I Highly Toxic | DANGER and POISON, plus skull and crossbones symbol |
0 to 50 | A few drops to 1 tsp |
| II Moderately Toxic | Warning | 50 to 500 | 1 tsp to 2 tsp |
| III Slightly Toxic | Caution | 500 to 5,000 | 1 oz to 1 pint (1 lb) |
| IV Almost non-toxic | Caution | more than 5,000 | 1 pint (1 lb) |
| a Note: certain products may use signal words which do not correlate with LD50 ratings due to some special property of the chemical. For example, chlorothalonil has a very low toxicity (LD50 10,000 mg/kg) yet has DANGER signal words on many of its formulations, due to eye toxicity/injury. | |||
All pesticides listed in this publication are registered and cleared for suggested uses according to federal and state regulations in effect on the date of this publication. Follow current label.
Trade names are used for identification only; no product endorsement is implied, nor is discrimination intended against similar materials.
Warning! Pesticides are poisonous. Read and follow all directions and safety precautions on labels. Handle carefully and store in original labeled containers out of reach of children, pets and livestock. Dispose of empty containers carefully and properly. Contact your State Lead Agency (SLA) for pesticide regulation located in either the state Department of Agriculture or state Department of Environmental Protection for current disposal regulations and guidelines.
Before Using Pesticides
Read and post safety rules and the list of poison control centers. See instructions on safe storage of pesticides in an earlier section of this chapter. You should become familiar with the information on storage and toxicity of pesticides listed in the appendix of this guide. Similar pesticide products may not have the same crop uses. Always be certain the crop is listed on the product label before ordering or using the product.
Do not use concentrations greater than stated on the label. Do not apply more pesticide per acre or more frequently than the fewest number of days between applications recommended by the label.
Instruct your family, co-workers and farm laborers on the safe use of pesticides, protective clothing and reentry regulations concerning pesticides. See section on worker protection standards.
Do not spray or dust when bees are active in the field. Morning or late evening is usually the best time to spray.
Precautions
- Read and follow all directions and safety precautions on labels.
- Store pesticides in original containers, out of reach of children, pets and livestock.
- Dispose of empty containers immediately in a safe manner and place. Triple rinse.
- Do not contaminate forage, watersheds or water sources.
- Become familiar with life cycles of pests to properly time applications.
- Keep a complete diary of applications: crop, date of planting, pests, weather conditions, materials, date of application and amounts applied.
- Adhere to farm worker protection standards.
Emergency Information
Human Exposure
If someone has swallowed or inhaled a pesticide or gotten it in the eye or on the skin:
- Call 911 if the person in unconscious, having trouble breathing, or having convulsions.
- Check the label for directions on how to give first aid.
- Call the Poison Control Center at 1-800-222-1222 for help with first aid information.
The National Pesticide Information Center (NPIC) (1-800-858-7378) can also provide information about pesticide products and their toxicity.
Spills
The National Response Center (NRC) is the sole federal point of contact for reporting oil and chemical spills. If you have a spill to report, contact NRC at 1-800-424-8802 (toll-free) or visit their website (https://www.epa.gov/emergency-response/national-response-center) for additional information on reporting requirements and procedures. The NRC can help you decide how to respond to a spill. Producers should be aware that they may be required to report spills to their state Lead Agency (SLA) for pesticide regulation or their state department of environmental protection.
The Comprehensive Environmental Response, Compensations, and Liability Act (CERCLA) requires that all releases of hazardous substances exceeding reportable quantities be reported by the responsible party to the National Response Center (NRC). Title 40 of the Code of Federal Regulations Part 302 promulgates reportable quantities and reporting criteria. All the Extremely Hazardous Chemicals (EHS) that overlap with the CERCLA listed chemicals table (40 CFR Part 302.4) should be reported to NRC as well as to the LEPC and SERC.
For small pesticide spills or for more information, call the pesticide manufacturer or the National Pesticide Information Center (NPIC) at 1-800-858-7378.
More Information
CHEMTREC maintains a large database of Material Safety Data Sheets, chemical information references, resources, and networks of chemical and hazardous material experts who can provide access to technical information regarding chemical products (Emergency call 1-800-424-9300, in the U.S. or 703-741-5500 outside the U.S.).
For more information, contact the National Pesticide Information Center (NPIC) at 1-800-858-7378.
Fumigation: Materials and Risks
The practice of soil fumigation carries significant risks. These risks include the health and safety of agricultural workers and others who can be exposed to these materials, environmental risks from misapplication or accidents and other hazards. Another risk is treatment failure from reintroducing pathogens on transplant material or farm equipment. This can cause a phenomenon called “the boomerang effect” in which a pathogen is (re)introduced in a partially sterilized soil and proliferates rapidly because checks and balances no longer exist in that soil. In such a case, the resulting epidemic is worse than if the soil had never been fumigated. So, it is very important to take care to plant very clean transplant material and to use only clean equipment when working in a newly fumigated field.
Fumigation is also a costly practice, one which a grower must carefully consider before using. The cost must be justified by the anticipated benefits. The benefits must be reliable and predictable. Moreover, availability of fumigants may decline in the future due to EPA restrictions and voluntary withdrawal by manufacturers. With this in mind, it is advisable to implement effective crop rotation plans and other soil management practices in anticipation of reduced availability of fumigants.
New Regulations Concerning Fumigation
Fumigants are very biologically active and produce gases that can readily move off site, so they can also be very dangerous to people and other organisms in the surrounding environment. Labels for most soil fumigants were extensively revised in 2011 to require additional steps of fumigant applicators (called risk mitigation measures) to safeguard the general public, the applicators and handlers, and the environment. These requirements are discussed on current fumigant labels. Reading and understanding the new soil fumigant labels is critically important. Additional revisions to these new soil fumigant labels are being developed, further increasing the importance for growers to study the labels and visit EPA’s website. Key changes already in effect include the following:
- All chemical fumigants are now “restricted use.” Previously, metam sodium, metam potassium, and dazomet were considered general use materials.
- Soil fumigant applicators must write a fumigant management plan (FMP) that outlines how the application will be made and describes plans to address problems should any arise. Custom applicators must provide growers with a copy of the FMP, which must be maintained for a period of two years.
- Practices previously recommended to improve efficacy and reduce off-gassing are now requirements, such as proper calibration, soil tillage before application, fumigating when soil temperature and moisture levels are within the proper ranges, etc.
- Maximum application rates are being reduced in some instances and untarped applications for some materials can no longer be made.
- Respiratory protection requirements for those involved with fumigant application or tarp perforation or removal have been significantly expanded and include medical evaluation and fit-testing for respirator use.
- The 48-hour “reentry interval” following soil fumigant application has been changed into a 5-day “entry restricted period.”
- Unless trained/licensed by their state for fumigation (fumigant category), people must now take EPA Fumigant Training. See https://www.epa.gov/soil-fumigants/soil-fumigant-training-certified-applicators.
Additional new label requirements include the establishment and posting of restricted-entry buffer zones around application sites, among other changes. Updates and templates of required forms are available on EPA’s website at https://www.epa.gov/soil-fumigants.
Site Preparation For Chemical Fumigation and Treatment Guidelines
Fumigation must be done carefully in order to be effective. Soil fumigation treatments should be planned well in advance so that the site can be prepared properly. Several rules apply to most treatments.
- Prepare the soil by deep plowing followed by disking. The purpose is to loosen the soil throughout what will be the crop rooting zone and to thoroughly incorporate all plant residues. Do this at least 3 weeks in advance of fumigation so that buried plant residues begin decomposing. Remove all woody or bulky accumulations of plant residues and large rocks from the site. These will foul the chisel applicators, decrease the effectiveness of the job, increase the hazard to workers who must clear them, and can cause a custom applicator to legally withdraw from a contract job.
- If the soil is dry one week prior to treatment, thoroughly wet down the soil to at least 6 inches deep by sprinkler irrigation. Do not attempt to fumigate soil that is too wet or too dry. At the 6- to 8-inch level, a handful of soil should not clump tightly when squeezed, but it should have enough moisture to feel cool in the hand and remain in a loose clump when it is released. Soil that feels warm to the touch or that is crumbly and dusty is too dry. Some moisture in the soil encourages weed seed germination and is necessary for the fumigant to kill nematodes and fungi. Soil that is saturated will limit movement of fumigants through soil so that some of the soil to be treated may not be exposed to the product.
- Soil temperatures at the time of treatment should be above 40°F at the 5- to 6-inch depth to allow for adequate volatilization of the fumigant but below 80°F to avoid too rapid an escape of the chemical. Optimal soil temperatures vary among different fumigants. Consult the label for the fumigant you are using for its specific temperature requirements.
- Chisel fumigants in at least 10 to 12 inches deep with the shanks set 8 to 12 inches apart for broadcast treatments over the whole planting site. Because strip or row fumigation only treats a portion of the field, less chemical is used per field acre, and it is useful for annual strawberry production systems. However, this practice is not recommended for perennial systems where treated areas could be recolonized over time.
- Soil should be sealed as stated on the product label. Leave treated sites undisturbed for at least 5 to 7 days.
- Aerate treated sites to allow any residual fumigant and ammonia (a temporary side effect of fumigation) to escape before planting. Aeration times vary with the type of material used, soil type, temperature, and moisture level. Check the label for details. At least 14 to 21 days should pass between the application of most soil fumigants and the time a crop is planted. Details are available on the manufacturer’s label. A simple lettuce quick test can be done to determine whether planting in fumigated soil is safe. Collect a soil sample from the treated field (do not go below the treated depth). Place the sample in a glass jar with a screw-on lid. Firmly press numerous seeds of a small-seeded vegetable crop (lettuce, radish, etc.) on top of the soil (moisten if necessary) and tighten the lid securely. Repeat the process in another jar with nonfumigated soil to serve as a check. Observe the jars within 1 to 2 days. If the seeds have germinated, planting in the field is safe. If the seeds have not germinated in the fumigated sample and have germinated in the nontreated sample, then the field is not safe to plant. Wait and retest.
- Fumigation kills most weed seeds, but it can also stimulate the germination of some species, such as Carolina geranium, velvetleaf, and morning glory. Use of chloropicrin has been shown to stimulate yellow and purple nutsedge emergence. Treat these problem weeds with herbicides before they become established.
- For annual plasticulture strawberries, fumigation must be completed at least 21 days before planting. The optimal planting date varies widely within the region and also depends on plant type used. Thus, fumigation may need to be completed as early as early summer in cooler areas of New England when using dormant plants or as late as early fall for warmer areas of Virginia when using plug plants. The best timing for fumigation is early fall if planting matted-row strawberries, brambles, or blueberries in the spring, as soil conditions that satisfy the specific temperature and moisture requirements of fumigants are more likely to exist in the fall. The usually wet and often prolonged cool spring conditions in the region often cause delays in fumigation attempts in the spring. If fumigation is done in the fall prior to spring planting, a winter cover crop of small grains or a permanent between-row sod cover can be seeded after aeration.
- Make sure to plant disease-free crops and use good management practices to avoid reintroducing pathogens.
| Common Name | Trade Name | Allowable application Methods | Rate as Stated on Label* (see also next column) | Conditions Under Which Listed Rate Applies | For Control Of: | ||
|---|---|---|---|---|---|---|---|
| Nematodes | Fungi | Weeds | |||||
| Metam-Sodium | Vapam HL | Shank, chisel, etc.; drip irrigation; solid-set irrigation, others listed | 37.5-75 gal per treated acre | All listed application methods | yes | yes | yes |
| Comments: Water-soluble liquid that decomposes to a gaseous fumigant. Efficacy affected by soil moisture, temperature, texture, and organic matter content. May be less effective on nematodes than 1,3-D and possibly iodomethane. VAPAM HL is phytotoxic. Protect valuable, non-target plants by stopping soil applications of this product at least three feet short of the drip line of trees, shrubs and other desirable plants. | |||||||
| Metam-Potassium | K-Pam HL | Shank, chisel, etc.; drip irrigation; solid-set irrigation, others listed | 30-62 gal per treated acre | All listed application methods | yes | yes | yes |
| Comments: Water-soluble liquid that decomposes to a gaseous fumigant. Efficacy affected by soil moisture, temperature, texture, and organic matter content. May be less effective on nematodes than 1,3-D and possibly iodomethane. K-PAM HL is phytotoxic. Protect valuable, non-target plants by stopping soil applications of this product at least three feet short of the drip line of trees, shrubs and other desirable plants. | |||||||
| 1,3Dichloropropene | Telone II | Shank, chisel, etc. May not be applied through any type of irrigation system | 27-35 gal per acre (label states product may be concentrated in the row) | Annual or Perennial plantings on mineral soils | yes | no | no |
| Comments: Liquid that diffuses as a gas through soil. Effective against nematodes and insects. Rates vary with soil texture; efficacy strongly affected by soil moisture and temperature. May have some suppressive effect on Symphylans and Wireworms. | |||||||
| 1,3Dichloropropene | Telone EC | May be applied only through a drip system | 9-24 gal per acre broadcast equivalent | Annual or Perennial plantings on mineral soils | yes | no | no |
| Comments: Liquid that diffuses as a gas through soil. Effective against nematodes and insects. May have some suppressive effect on Symphylans and Wireworms. Rates vary with soil texture; efficacy strongly affected by soil moisture and temperature. If the material is applied only to beds and not row middles, rates must be reduced proportionately. This can be calculated as follows: product rate x bed width/ row spacing. Not labelled in all New England states. | |||||||
Biological Controls
Biological control is taking place in fruit crops all the time, because native and naturalized populations of natural enemies overwinter on the farm and move into crops to feed on or lay their eggs into pest insects. Predators consume several insects over the course of their development. Parasites and parasitoids tend to lay eggs in their host insect, which then feed internally, develop and kill the host. Pathogens invade the body of the host insect. The impact of beneficial insects is often underestimated because it is easy to overlook and difficult to measure. It may become obvious if they are killed by broad-spectrum insecticides and pest outbreaks occur as a result. Conservation of beneficials by use of selective insecticides when pests exceed threshold levels is recommended wherever practical.
The release of lab-reared beneficials can also aid in suppressing pests. These tend to be more successful in greenhouses than in the field, but there are several instances where releases in the field have been proven to suppress or completely control key pests. For example, Neoseiulus fallacis and Phytoseiulus persimilis are tiny mite predators that feed on pest mites such as two-spotted spider mites and European red mites. N. fallacis is indigenous to the Northeast as well as available for release from reared populations in commercial insectaries. Both have been very useful tools for New England fruit growers.
Another example involves beneficial nematodes, very small roundworms that attack soil-dwelling insects. Two in particular (Steinernema and Heterorhabditis) have been mass-reared for commercial use. These seek out and penetrate their host insects, multiply within the host and kill it. They are most likely to be effective against the soil-dwelling immature stages of susceptible hosts, such as root weevils, cutworms, white grubs, wireworms, and maggots. Nematodes require moist soil conditions to survive. Consult the Resources section in the appendices of this guide for sources of further information and suppliers of beneficial organisms.
Biorational Pesticides
Pesticides vary in their toxicity and in their potential ecological impact. Pest control materials that are relatively non-toxic to people with few environmental side effects are sometimes called “biorational” pesticides. These fit well into an IPM strategy, which relies on monitoring for early detection of pests and emphasizes the use of selective products that provide control while minimizing negative effects on beneficial insects that suppress pests. The term ‘biorational’ is a qualitative term intended to help provide information and guidance for decision making. All pesticides have some toxicity; always read and follow the label regarding agricultural use requirements and personal protective equipment. All of the pesticides listed as biorationals in the tables below carry the signal word “Caution”, the least toxic classification, on the label. None are federally restricted-use products. Most have dermal and oral LD50 values over 2,000 mg/kg.
Some, but not all, biorationals are approved for use on crops that are certified organic under the National Organic Program. For a given active ingredient, some products or formulations may be approved for use in certified organic crops, while others are not. Products that are generally approved for organic production are designated "OMRI" or "OMRI listed," which indicates they are listed on the website of the Organic Materials Review Institute (https://www.omri.org/about-products-list). Growers should consult with their certifying agency to be sure which products are approved for use.
Table 10 lists biorational insecticides and biological controls for insect management. Table 11 lists biorational fungicides and biological controls for disease management. The major categories of biorationals include botanicals, microbials, minerals, and synthetics.
Botanicals are plant-derived materials and include pyrethrin, azadiractin and neem oil, garlic, capsaicin, and vegetable oil. Botanicals are generally short-lived in the environment, as they are broken down rapidly in the presence of light and air. In general, these products require thorough coverage, application at the first signs of disease, and frequent repeated dosages to be effective. Products derived from the seeds of the Neem tree, including azadiractin and neem oil, are selective and have low mammalian toxicity. Garlic and capsaicin act primarily as repellents and thus need to be reapplied as long as pests are present. They are registered for use on a wide range of crops and pests. However, none are listed in this Guide for commercial use unless they carry the proper agricultural use requirements on the label. Vegetable oil may be derived from soybean, corn or other plants; the only labeled product for commercial use is produced from soybean oil.
Microbial pesticides are formulated microorganisms or their by-products. They tend to be selective, so specific pests may be controlled with little or no effect on non-target organisms. Microbial insecticides include bacteria (Bacillus thuringiensis and spinosad) and fungi (Beauvaria bassiana). While these active ingredients are generally approved for organic crops because of their natural origin, certain formulated products are prohibited because the inert ingredients or procedures used to make the product may be prohibited. Microbial pesticides are often living organisms that require specialized storage and application procedures. These include beneficial fungi and bacteria (Streptomyces, Gliocladium, Trichoderma harzianum) that compete with plant pathogenic fungi, produce toxic metabolites, or actively parasitize pathogens. Their effectiveness in University research trials has been inconsistent because of variations in environmental conditions and disease pressure. Microbial fungicides perform best in a greenhouse environment where they can establish and flourish. Control of plant pathogenic organisms on the leaf surface is especially problematic, as the competing organisms may have difficulty becoming established due to dessication and exposure to sunlight. These materials have a limited shelf life, must be protected from temperature extremes, and must be applied correctly (with plenty of water and under the correct environmental conditions) to be effective.
Minerals and synthetics. Some biorational pesticides are minerals, mined from the earth and minimally processed. Kaolin clay, insecticidal soap, and iron phosphate are examples. Minerals that are heated, chemically reacted, or mixed with surfactants may be considered synthetics. Synthetics include growth inhibitors or insect growth regulators (IGR), materials that interrupt or inhibit the life cycle of a pest.
| Active Ingredient | Trade Name(s) | Target Pests | Comments |
|---|---|---|---|
| azadiractin | Aza-Direct, Azatin XL, Neemix |
Aphids, leafminers, thrips, whitefly, leafhopper, flies, true bugs, some beetles and caterpillars | Insect growth regulator, repellent, antifeedant. Disrupts growth of immature stages. Use preventatively before outbreaks. Repeat applications may be needed. Efficacy varies. |
| Beauvaria bassiana strain GHA |
Mycotrol O, BotaniGard 22WP |
Aphids, whiteflies, thrips | This fungus penetrates the insect cuticle, proliferates and eventually releases new spores. Best applied in evening. Use preventatively based on monitoring before pest populations are high. |
| Bacillus thuringiensis subsp. kurstaki |
Biobit, Deliver, Dipel, Javelin |
Caterpillars, including cranberry/cherry fruitworm, blueberry sawfly, winter moth, grape berry moth, leafrollers, etc. | Acts as stomach poison, must be ingested to be effective. Not all products are OMRI listed; check the label. |
| Bacillus thuringiensis subsp. aizawai |
Agree WG | Caterpillars, including armyworms, grapeleaf skeletonizer | Acts as stomach poison, must be ingested to be effective. OMRI listed. |
| bifenazate | Acramite 50WS, Floramite SC |
Mites | A long residual selective nerve poison for mite control. |
Burkholderia spp. strain A396 |
Venerate | Caterpillars, scale insects | Highly active against grape berry moth. Make two applications 7-days apart for each generation when needed. Grandevo and Venerate can be rotated but do not tank-mix the two products together. |
Chromobacterium subtsugae strain PRAA4-1 |
Grandevo | Grape berry moth, mites, spotted wing drosophila suppression | Early application is important for Grandevo against any of the sucking pests as the primary MOA is reduction in reproduction and typically a 7-day application interval or shorter is needed. Highly active against grape berry moth. Make 2 applications 7 days apart for each generation when needed. Grandevo WDG at 3 lb/acre + adjuvant for spotted wing drosophila. |
| extract of neem oil | Trilogy | Primarily labeled for (but not limited to) mite control | Can be used to control mites. For best results use when population levels are low to prevent build-up. Repeat applications are needed. Do use on table grapes after bloom or on wine grapes after bunch closure. |
| potassium salts of fatty acids (insecticidal soaps) | M-Pede, Des-X | Aphids, leafminers, mites, thrips, whiteflies | Works on contact. Can be phytotoxic to some crops, test on small plot first. Avoid treatment when plants are stressed or air temperatures are above 85˚F. May also harm some beneficials. Also active against powdery mildew. Do not use on table grapes onces they become 6-7 mm or use at lowest recommended rate (75 gal/A) |
| iron phosphate | Sluggo | Snails, slugs | Bait which causes feeding to cease. Death occurs over 3-5 days. Exempt from tolerance and has a zero hour reentry interval due to low mamalian toxicity. |
| methoxyfenozide | Intrepid | Many species of caterpillar | Insect Growth Regulator. Mimics molting hormone; causes premature molt and death. Labeled for Grape Berry Moth. |
| pyrethrin | Pyganic EC, Pyrenone Crop Spray |
Many pests of fruit crops; see label. | Botanical insecticide with broad-spectrum activity. Contact toxin with rapid knockdown bur short residual. Highly toxic to fish. Derived from chrysanthemum. Some formulations OMRI listed. |
| spinosad | Entrust 2SC | Caterpillars, leafminers, thrips | Acts both as a contact and stomach poison. Somewhat toxic to some beneficials. Rotate with other selective biorationals to prevent the development of resistance. |
| spiromesifen | Oberon | Whiteflies and some mites | Contact insecticide and miticide. |
| Steinernema and Heterohabditis parasitic nematode species |
Beneficial Nematodes | White grubs, weevil larvae, wireworms | Predatory nematodes seek out and penetrate host insects, multiply within the host and kill it. They are most likely to be effective against soil-dwelling immature stages of susceptible host insects. They require moist soil conditions to survive. |
| Active Ingredient | Trade Name(s) | Target Pests | Comments |
|---|---|---|---|
| Acibenzolar-S-methyl | Actigard 50 WG | Downy mildew, Xanthomonas | Plant defense activator. |
| Bacillus amyloliquefaciens | Triathlon, Double Nickel | Botrytis, Alternaria, fungal leaf spots and blights, Powdery mildew | Most recommendations are to mix Double Nickel with Cueva. |
| Bacillus pumilus strain QST 2808 | Sonata | Powdery mildew, rust, leaf spots | |
| Bacillus subtilis QST | Serenade Max | Botrytis, leaf spot, Anthracnose, Powdery mildew | |
| Calcium polysulfide | Lime-Sulfur (various manufacturers) | Cane and spur blights, Phomopsis, Fusicocum, overwintering inoculum of Monolinia | This is a caustic compound that must be thoroughly cleaned from spray equipment to avoid damage. Some formulations are OMRI listed. |
| Copper hydroxide | Champion WP, Champ, Nu-Cop, Kocide | Botrytis, Downy mildew, Powdery mildew, Anthracnose, Phomopsis | Be careful of potential phytotoxicity in some crops or cultivars; do not apply in close succession with Captan; read label carefully for cautions and restrictions. |
| Copper octanoate | Cueva | Powdery mildew, leaf spots, Anthracnose, Botrytis | |
| Copper sulfate | Cuprofix-Ultra 40 Disperss | Powdery mildew, leaf spots, Anthracnose | |
| Harpin protein | Messenger | Bacterial diseases, adverse environmental conditions | Plant defense activator; variable efficacy |
| Hydrogen dioxide | Oxidate | Alternaria, Phytophthora, Pythium, Rhizoctonia, Anthracnose, Botrytis, Powdery mildew | Kills on contact by oxidation. Will also kill beneficial organisms. Requires repeated applications. |
| Kaolin clay | Surround WP | Powdery mildew, heat stress, sunscald | Creates a thin film of clay particles on the surface of treated plants. Must be rinsed off of harvested fruit if residue persists. |
| Laminaria digitata plant extract | Vacciplant | Botrytis, Anthracnose, mummyberry | Plant defense activator. Start applications preventatively or when conditions for disease development become favorable. Reapply every 7 – 14 days. Under moderate to heavy disease pressure, tank mix this product with another registered fungicide. |
| Neem oil | Trilogy Agroneem Azatrol Aza-Direct Neemix |
Anthracnose, Botrytis, Downy and Powdery mildew | Also effective for insect and mite control. Repeat applications needed for good control. |
| Potassium bicarbonate | Kaligreen Armicarb MilStop |
Alternaria, Botrytis, Downy and Powdery mildew | |
| Potassium phosphite | ProPhyt, Phostrol | Downy mildew, Phytophthora | Systemic material |
| Mono- and dibasic sodium, potassium, and ammonium phosphites | Phostrol | Downy mildew, Pythium, Phytophthora | Systemic material, see label for tank mix cautions |
| Pseudomonas fluorescens | BlightBan A506 | Strawberry frost protection and grape bunch rot protection | For strawberry frost protection, start application when first bloom initials emerging from crown. Repeat treatments as necessary, with a total of 2-3 applications. As an aid to control bunch rot caused by species of Acetobacter bacteria (sour rot) in combination with Aspergillus niger and Botrytis cinerea. Apply at bloom and again prior to bunch closure. |
| Reynoutria sachaliensis (giant knotweed) Extract | Regalia | Botrytis, Anthracnose, mummyberry | Plant extract to boost plants’ defense mechanisms to protect against certain fungal and bacterial diseases, and to improve plant health. Applications need to start early. Regalia + NuFilm P for control of mummyberry and anthracnose fruit rot. |
| Streptomyces lydicus | Actinovate AG | Powdery mildew, Botrytis | |
| Sulfur |
Kumulus Microthiol |
Powdery mildew | Be careful of potential phytotoxicity in some crops or cultivars; do not apply in close succession with Captan; read label carefully for cautions and restrictions. |
Protecting Honeybees & Native Pollinators
Honeybees and native pollinators visit fruit crops during flowering and pollen shed. In crops such as blueberries, their activity is crucial to the success of the crop. In other crops such as grapes, bees are among many beneficial insects who seek out pollen or nectar resources as a food source, but crop yield does not depend upon their activity. Strawberries and brambles benefit from the presence of pollinators but are also achieve some level of pollination from wind blown pollen. Populations of honeybees and native pollinators have declined worldwide in recent years. A wide range of factors have contributed to their decline; pesticides applied to crops is one of these.
Pesticides applied to protect fruit crops can affect pollinators through multiple routes of exposure: direct contact with sprays, contact with treated surfaces, pesticide-contaminated dust or pollen particles that are collected or adhere to the body of the insect (and may be taken back to hive), and ingestion of pesticide-contaminated nectar. Decisions made by the farmer make a difference in the exposure of bees and other beneficials to lethal or sublethal levels of pesticides. While pesticides applied to crops are only one among many factors that threaten pollinators, this is one factor that growers can do something about. Taking precautions to minimize pesticide poisoning of pollinators in all crops is an important responsibility of all pesticide applicators.
Reducing pesticide injury to honey bees requires communication and cooperation between beekeepers, farmers and applicators. It is important that beekeepers understand cropping practices and pest management practices used by farmers in the vicinity of their apiaries. Likewise, insecticide applicators should be sensitive to locations of apiaries, obtain a basic understanding of honey bee behavior, and learn which materials and application practices are the most hazardous to bees. While it is unlikely that all poisonings can be avoided, a balance must be struck between the effective use of insecticides, the preservation of pollinators and the rights of all--the beekeeper, farmer and applicator. In most cases, bee poisonings can be avoided by observing the following practices.
Steps that can reduce pesticide exposure of pollinators
Timing. Avoid applications when crop or weeds are in bloom. In crops that bloom over long periods, make applications late in the day or at night when pollinators are not foraging, and so that there is sufficient drying time before foraging begins. Control weeds within the planting but allow for some blooming native plants in field edges and hedgerows as forage habitat when crops are not in bloom. Take care to avoid spray drift in areas where pollinators are foraging when spraying.
Formulation. Wettable powders, dusts and microencapsulated products have a greater toxic hazard than emulsifiable concentrates (or other liquid formulation with active ingredient in solution). Products that do not have acute toxicity but could cause injury to immature bees if carried back to the hive should not be applied in particulate form; this includes insect growth regulators.
Drying time before exposure. Some products are highly toxic when wet, but much less so after the pesticide is dried. Spinosyns have this characteristic. Apply when there will be adequate drying time (usually 2-3 hours, depending on weather conditions and crop canopy) before pollinator activity. Applying these materials in the evening can help achieve good drying before pollinators become active again the following day. If temperatures following treatment are unusually low, insecticide residues can remain toxic longer than if higher temperatures prevail.
Drift. Avoid drift on non-target areas near the field where blooming plants may be located. Windspeed and application equipment both influence drift. In general, sprays should not be applied if wind speed exceeds 10 mph.
Mode of application. Soil applications reduce exposure compared to foliar applications, unless plant uptake of the active ingredient produces residues in pollen or nectar. In the case of neonicotinoids, there is evidence that foraging bees may receive sublethal doses in pollen and nectar when crops were treated with a systemic at early growth stages. This effect appears to be reduced by using lower rates and applying as early as possible, but may not be entirely eliminated by these methods. A sublethal dose may make bees more vulnerable to other stressors, or may combine with doses from contact with other treated plant material.
Acute toxicity. EPA registration includes an acute, single-dose laboratory study designed to determine the quantity of pesticide that will cause 50% mortality (LD50) in a test population of bees.
Read the label for bee hazard rating. If a pesticide is used outdoors as a foliar application, and is toxic to pollinating insects, a “Bee Hazard” warning and easily identified Bee icon is required on the label. In addition a standardized information box is also required.
The EPA bee toxicity groupings and label statements are as follows:
High (H) Bee acute toxicity rating: LD50 = 2 micrograms/bee or less. The label has the following statement: "This product is highly toxic to bees and other pollinating insects exposed to direct treatment or residues on blooming crops or weeds. Do not apply this product or allow it to drift to blooming crops or weeds if bees or other pollinating insects are visiting the treatment area." If the residues phrase is not present, this indicates that the pesticide does not show extended residual toxicity.
Moderate (M) Product contains any active ingredient(s) with acute LD50 of greater than 2 micrograms/bee, but less than 11 micrograms/bee. Statement: "This product is moderately toxic to bees and other pollinating insects exposed to direct treatment or residues on blooming crops or weeds. Do not apply this product if bees or other pollinating insects are visiting the treatment area."
Low (L) All others. No bee or pollinating insect caution required.
For an easy to use, sortable list of materials, their EPA bee toxicity ratings and synergistic effects with other materials see: https://www2.ipm.ucanr.edu/beeprecaution/
See below, Tables 12a and 12b, for information about the hazards posed to non-target organisms by several common small fruit pesticides.
| Active Ingredient (common product names)** |
DURATION OF HAZARD TO HONEYBEES (Residual Toxicity) | Active Ingredient (common product names)** |
DURATION OF HAZARD TO HONEYBEES (Residual Toxicity) |
|---|---|---|---|
| EXTREMELY to Highly TOXIC: DO NOT APPLY ON BLOOMING CROPS OR WEEDS | |||
| *Beta-cyfluthrin (*Baythroid, *Leverage, *Tempo) |
1 day RT§ |
Lambda-cyhalothrin (Warrior, Voliam) |
> day ERT > day ERT for encapsulated formulation |
| *Bifenthrin (*Brigade, *Sniper) |
< 1 day RT > 1 day ERT |
Malathion (Malathion, Cythion) |
2-6 hrs RT 2-5 days ERT |
| Carbaryl (Sevin) |
< 1 day RT 2-14 day ERT |
*Methomyl (*Lannate, *Nudrin) |
2 hrs RT 1.5 days ERT |
| *Chlorpyrifos (*Dursban, *Lorsban) |
2 hrs RT 4-6 days ERT |
*Naled (*Dibrom) |
2 hrs RT 1-1.5 days ERT |
| Clothianidin (Belay, Clutch) |
? RT > 5 days ERT |
Phosmet (Imidan) |
3-5 days ERT |
| Copper Sulfate + Lime (Bordeaux Mixture) |
? | Pyrethrin (Azera, Pyganic, Pyrenone) |
< 2 hrs RT |
| *Cyfluthrin (*Baythroid, *Tombstone, *Tempo) |
? RT > 1 day ERT |
Pyridaben (Nexter, Pyramite, Sanmite) |
< 2 hours RT > 8 hrs ERT |
| *Diazinon (*Diazinon) |
? RT 2 days ERT |
Sabadilla (Veratran-D) |
1 day ERT |
| Dinotefuran (Venom, Scorpion) |
? RT 39 hrs ERT |
Sulfoxaflor (Closer) |
3 hrs RT |
| *Esfenvalerate (*Asana) |
< 1 day RT 1 day ERT |
Thiamethoxam (Actara, Platinum, Voliam) |
7-14 days ERT |
| *Fenpropathrin (*Danitol) |
< 1 day RT 1 day ERT |
*Zeta-cypermethrin (*Mustang, *Hero, *Mustang Max) |
> 1 day ERT |
| Imidacloprid (Admire, Brigadier, Merit, Pasada, Provado) |
8 hrs RT > 1 day ERT |
|
|
|
Indoxacarb |
|||
| MODERATELY TOXICA: APPLY ONLY DURING LATE EVENING, NIGHT, OR EARLY MORNING IF BLOOMING PLANTS ARE PRESENT. | |||
| Acetamiprid (Assail) |
2 day ERT | Copper Hydroxide ( Badge, Champ, Kocide, Nu-Cop) |
? |
| Azadirachtin (Neemix, Aza-Direct, Azera) |
2 hr RT | Horticultural Oil (Superior, Dormant, Summer) |
< 3 hr RT |
| Beauvaria bassiana (Mycotrol, Botaniguard) |
? | Novaluron (Rimon) |
? |
| Bifenzate (Acramite) |
? | Oxydemetonmethyl (Metasystox-R) |
< 2 hours RT |
| Capsacin (Hot pepper wax) |
? | Petroleum/Paraffinic Oil ( JMS Stylet Oil) |
< 3 hours RT |
| Chlorfenapyr (Phantom, Pylon) |
< 4 hr RT > 2 day ERT |
Spinetoram (Delegate, Radiant) |
3 hour RT |
| Spinosad ( Entrust, Success) |
? | ||
| Chromobacterium subtsugae (Grandevo) |
? | Spirotetramat (Movento) |
? |
| SLIGHTLY TOXIC OR NONTOXIC: CAN BE APPLIED AT ANY TIME WITH REASONABLE SAFETY TO BEES. | |||
| Acequinocyl (Kanemite) |
Lime Sulfur (Lime Sulfur) |
||
| Aluminum tris O-ethyl phosphonate (Alliette, Fosetyl-Al) |
Mancozeb (Dithane, Gavel, Manzate, Penncozeb, Ridomil Gold MZ) |
||
| Azoxystrobin (Abound, Quadris) |
Mefenoxam (Maxim, Ridomil) |
|
|
| Bacillus subtilis (Rhapsody, Serenade, Cease) |
Laboratory tests suggest potential effects on bumble bees. | Metaldehyde bait (Deadline) |
|
| Bacillus thuringiensis (BT, Agree, Javelin, Thurcide) |
Metconazole (Quash) |
||
| Boscalid (Endura, Pristine) |
Methoxyfenozide (Intrepid) |
||
| Calcium Polysulfide (Lime Sulfur, Sulforix) |
Metrafenone (Vivando) |
||
| Captan (Captan, Captec, Captevate) |
Up to 7 day ERT for mason bees. Effects on honey bee brood in laboratory, but not in field tests. | Myclobutanil (Rally, Sonoma) |
No impact on bumble bees. |
| Chlorantraniliprole (Altacore, Coragen, Grubex) |
No impact on bumble bees. | Neem oil (Trilogy) |
Must be ingested to be toxic. |
| Chlorothalonil (Bravo, Echo) |
Tentatively associated with “entombed pollen”. Common contaminant of beeswax. |
Oils: Cottonseed, Clove, Garlic (Pest Out, GC-mite) |
|
| Clofentezine (Apollo) |
*Paraquat (*Paraquat) |
Although no PS on label, laboratory studies suggest effects on honey bee larvae, and paraquat has been associated with colony losses. | |
| Cyflufenamid (Miltrex, Torino) |
Penthiopyrad (Fontelis) |
||
| Cymoxanil (Tanos) |
Phosphorous acid, mono and di-potassium salts (Fosphite, Prophyt) |
|
|
| Cyprodinil (Switch, Vanguard) |
No impact on bumble bees. | Polyoxin D zinc salts (Oso, Ph-D, Tavano) |
|
| Dicofol (Dicofol) |
Mixing with insecticides increases hazard to bees. | Potassium bicarbonate (MilStop, Greencure, Kaligreen) |
No impact on bumble bees. |
| Difenoconazole (Inspire, Quadrus, Revus) |
Progargite (Omite) |
Mixing with insecticides increases hazard to bees |
|
| Dodine (Syllit) |
Propiconazole (Propicure, Quilt, Tilt) |
Mason bees more sensitive than honey bees. If mixed with lambda- cyhalothrin, may increase toxicity. | |
| Etoxazole (Zeal) |
3 days ERT for bumble bees | Pyraclostrobin (Cabrio, Pristine) |
|
| Famoxadone (Tanos) |
Pyrimethanil (Luna, Scala) |
||
| Fenarimol (Rubigan, Vintage) |
Pyriproxyfen |
≺2 hours RT for alfalfa leafcutting and alkali bees. May be toxic to bumble bee larvae. Avoid direct application or spray drift to honey bee hives (per label). No PS on label, other sources suggest ERT to bees. |
|
| Fenbuconazole (Indar) |
Quinoxyfen (Quintec) |
||
| Fenbutatin-oxide (Vendex) |
Reynoutria sachaliensis |
||
| Fenhexamid (Elevate) |
Spiromesifen (Oberon) |
Structure and mechanism of action similar to spirodiclofen and spirotetramat, which are potentially toxic to honey bee larvae. | |
| Fenpyroximate (Fujimite, Akari) |
Streptomyces lydicus (Actinovate) |
||
| Flonicamid (Beleaf) |
Possible effects on honey bees, further research needed. Short RT for alfalfa leafcutting bees and alkali bees. Short RT for bumble bees. |
Sulfur (various products OMRI classification varies by product) |
See also lime sulfur. While most sources say sulfur poses little risk for bees, other sources suggest sulfur may cause toxicity for bees for up to a day and a half. |
| Flubendiamide (Belt, Tourismo, Vetica) |
Possible effects on honey bee larval development, further research needed. | Tebuconazole (Adament, Luna, Orius) |
2 days ERT for bumble bees. |
| Fludioxonil (Switch) |
No impact on bumble bees. | Tebufenozide (Confirm) |
|
| Fluopicolide (Presidio) |
Tetraconazole |
1 day ERT for bumble bees | |
| Fluopyram (Luna) |
Thiacloprid (Calypso) |
Less toxic to bees than most other neonicotinoids. 1-2 days ERT for bumble bees. | |
| Hexythiazox (Onager, Savey) |
≻2 hours RT for alfalfa leafcutting and alkali bees | Thiophanate-methyl (Topsin-M) |
|
| Iprodione (Rovral) |
Laboratory studies suggest effects on honey bee larval development, field studies needed. | Triflumizole (Procure) |
May increase toxicity of certain neonicotinoids. |
| Kaolin Clay (Surround) |
Ziram (Ziram) |
Laboratory studies suggest effects on honey bee larval development, field studies needed. | |
| Kresoxim methyl (Sovran) |
|||
|
†Sources: 2010 New England Apple Pest Management Guide and Oregon State University Bulleting PNW591 ‘How to Reduce Bee Poisoning from Pesticides’. |
|||
| (SOURCE: 2010 THE MID-ATLANTIC BERRY GUIDE FOR COMMERCIAL GROWERS) | ||||||
|---|---|---|---|---|---|---|
| TOXICITY TO: | ||||||
| MITE PREDATORS | APHID PREDATORS | |||||
| PESTICIDE | BIRDS | FISH | BEES | N. FALLACIS | Z. MALI | |
| INSECTICIDES | ||||||
| Actara | Na | N | H | N | N | H |
| Admire | M | M | H | M | S | S-M |
| Asana | N | H | H | H | M | H |
| Aza-Direct | -- | H | N | -- | -- | S |
| Brigade/Capture | M | H | H | H | M | H |
| Confirm | S | H | M | N | N | N |
| Danitol | H | H | H | H | M | H |
| Diazinon | H | H | H | M | S | M |
| *Dibrom | -- | -- | M | -- | -- | -- |
| Dipel (B.t.) | N | N | N | N | N | N |
| Entrust/Spintor | H | -- | H | S | N | N |
| Esteem | -- | -- | N | S | N | N |
| Imidan | S | H | H | S | S | S |
| Lannate | H | H | H | H | M | H |
| *Lorsban | M | H | H | M | M | H |
| Malathion | M | H | H | S | -- | M |
| M-Pede | N | N | N | S | S | -- |
| Mustang Max | -- | H | H | H | M | H |
| Platinum | -- | M | -- | -- | -- | -- |
| Provado | M | M | H | S | S | M |
| Sevin XLR | S | N | H | M | M | M |
| *Thionex | H | H | S | S | N | M |
| MITICIDES | ||||||
| Acramite | -- | -- | H | M | M | S |
| AgriMek | N | N | H | H | M | -- |
| Kanemite | -- | Hb | -- | S | S | S |
| Kelthane/Dicofolc | M | H | N | H | S | S |
| Oberon | -- | H | -- | -- | -- | -- |
| Savey | -- | H | N | S | S | N |
| Vendex | M | M | N | M | M | H |
| Zeal | -- | -- | N | M | S | M |
|
a N = reasonably safe (for bees, apply anytime); S = slightly toxic (for bees, apply in evening after bees have stopped foraging until early morning before they start foraging); M = moderately toxic (for bees, apply in evening after bees have stopped foraging); H = highly toxic (for bees, do not apply to blooming plants); — = insufficient data *Restricted use pesticide; pesticide applicators license required. OMRI certified for organic production |
||||||
Weed Management General Notice
The primary goal of weed management is to optimize yield by minimizing weed competition. Weeds can reduce yields by competing with the crop for space, water, light, and nutrients. Weeds also promote pest injury by acting as alternate hosts for plant pathogens and insects, inhibiting spray penetration, and maintaining a high humidity in the crop canopy. Timely cultivation, wise use of herbicides and mulches, and not allowing weeds to go to seed are integral parts of a good weed management system. Many of the weeds found in small fruit plantings are difficult-to-control perennials that are not common in other crops. Do not expect chemicals to completely control weeds. Every herbicide does not control every weed species and the selection of a given herbicide should be made on the basis of specific weed species present in the field.
Herbicide rates listed on the product label are for broadcast applications. Reduce rates proportionally for banded or strip applications. For best results with herbicides, follow the manufacturer’s application directions regarding rates, additives, soil type, soil moisture conditions, time of year, crop age, stage of weed growth, environmental conditions, and product limitations.
It is unlawful to use any pesticide for other than the registered use. ALWAYS READ AND FOLLOW ALL LABEL DIRECTIONS. The user assumes all responsibilities for use inconsistent with the label on the product container.
Trade names are used for identification. No product endorsement is implied, nor is discrimination intended against similar materials not mentioned. Cooperative Extension and the participating universities make no warranty or guarantee of any kind, expressed or implied, concerning the use of these products.
Certain herbicides listed in this publication may be discontinued by the manufacturer and thus no longer available. Use of remaining stocks on dealers' shelves or farm storage is encouraged and legal provided the label directions are followed.
Herbicides - General
Herbicides are chemicals designed to control weeds. Proper rate selection, timing of application, activation, and observance of all precautions on the label must be followed to obtain optimum performance. Each herbicide controls certain weeds or families of weeds. Therefore, knowledge of the type of weed species present in the field is essential for good weed control (see the “Weeds of the Northeast” reference in the Resource Materials section). Once the weed problem is known, select the proper herbicide.
When selecting herbicides, take into account the following:
- Restrictions on rates, timing and crops for which the herbicide is approved.
- Degree of susceptibility of each weed to a specific herbicide.
- Limitations and special requirements of the herbicide.
General principles for safe use:
- Know the herbicide. Read the label.
- Check the output of sprayer frequently.
- Replace worn nozzles. It may be necessary to replace them several times a season if the sprayer is used constantly.
- Avoid skips and overlapping.
- Rinse spray equipment immediately after use. If possible, use one sprayer for herbicides and another for insecticides and fungicides.
- Follow the Worker Protection Standards information printed on the label.
Herbicide Rate Selection
Always check the label to determine the proper rate to apply. For most soil-applied herbicides, knowledge of the type of soil and the percentage organic matter usually determines the rate. Generally, the more clay and/or organic matter present in the soil, the higher the herbicide rate necessary for good weed control. When applying herbicides to fresh mulch, use the lowest labeled rate. For postemergence herbicides, the type of weed as well as its size will usually determine the rate.
Incorporation of Herbicides
Some herbicides must be incorporated into the soil to be effective. Herbicides are incorporated because they are volatile and evaporate into the air if left on the soil surface or they will decompose when exposed to sunlight. Herbicides differ in their incorporation requirements; check the product label for the manufacturer’s requirements.
Weed Sprayer Systems
- Select a sprayer and pump that can deliver a volume of 20 to 50 gallons per acre. Most herbicides are applied at rates of 20 to 40 gallons of water per acre. Pressures of 20 to 40 p.s.i. at the nozzle are recommended for most herbicides. Higher pressures result in finer droplets and increase the chance for more drift. Lower pressures sometimes cause uneven spray patterns.
- Use 50-mesh screened filters for nozzles and suction lines.
- Select 80˚ or 110˚ flat fan nozzles. Because of wear, brass tips used exclusively for applying wettable powders should not be used on more than 30 acres before being replaced. Use stainless steel or hardened stainless steel tips for longer wear. Stainless steel nozzle tips are more than twice the cost of brass tips but last about 20 times longer. Hardened stainless steel tips are only slightly more expensive than stainless steel tips but last three times longer. Ceramic nozzles are the most durable.
- Calibrate sprayers frequently and check for wear, especially when wettable powders have been used.
Mechanical Weed Control
Cultivation is an important component of weed control in small fruits, particularly when the use of herbicides and/or mulches is to be minimized or eliminated. The timing of cultivation should be based on the stage of weed growth that your equipment is best suited to control, as well as to the stage of crop development that is most sensitive to weed pressure. In general, weeds are most effectively cultivated shortly after they germinate, and crops are most sensitive to weed pressure during their early stages of growth. Thus, cultivation is most critical early in the growing season. To get good weed control with cultivation requires use of the proper machinery, driven by a competent operator, in a timely fashion.
A variety of cultivation equipment is used by small fruit growers. These include rotovators, multivators, rolling cultivators, rotary hoes, sweep cultivators and discs, S-tine or Danish S-tine cultivators, basket weeders, finger weeders, spring-hoe and spyder weeders, and spring-tine weeders. For a full description of these cultivators, see references in resource materials section.
Stale Bed Technique
In many cases, choice of herbicides for use in newly planted small fruit crops is limited. Even when a herbicide is registered for use in the crop, certain weed species may be present which the herbicide cannot control. In many cases, it may be possible to use a method which utilizes Gramoxone, Roundup, Touchdown, Scythe or flaming. Except for cool early spring conditions, when weeds may be slow to germinate, this method, termed the stale bed technique, can mean the difference between good weed control and poor or no weed control. Here are the steps:
- Prepare the soil for transplanting. If a soil-incorporated herbicide is used, it must be applied and incorporated at this time. The soil should have good moisture (irrigate with 1/4” of water if necessary).
- Wait as long as possible so that weeds will germinate and emerge. Allow weed seedlings to grow to the third leaf stage, or at least to the first true leaf.
- Flame the soil or make an application of Gramoxone, Scythe, Touchdown or Roundup (if registered for the crop) to the soil surface before transplanting. Transplant the crop and then apply any preemergence herbicide, which you would normally use, to the soil surface.
The main idea with this technique is that most of the weeds that have the potential to germinate, because of their placement in the upper 1” to 2” of the soil, will usually do so within two weeks after the soil is prepared. Adequate soil moisture and temperature (at least 50 ̊ F at a depth of 2”) must be present. Gramoxone, Roundup, Touchdown, Scythe or flaming will kill these weeds. By not redisturbing the soil any more than is absolutely necessary during the transplanting process, no new weed seeds will be brought close to the soil surface. This technique, because it reduces the number of viable weed seeds near the soil surface will also help the residual herbicide, if any, to perform better than it normally would. Finally, any cultivation which is performed should be kept extremely shallow (3/4” to 1” maximum) so as not to reposition any additional weed seeds. Note: Check the current herbicide recommendations by crop to determine if Gramoxone, Scythe, Touchdown or Roundup is registered for use in that crop.
Finally, Roundup or Touchdown can be used for control of perennial weeds, such as quackgrass and dock, during the summer or fall prior to planting. For best results, the soil should be tilled about 2 weeks after application. Rates vary considerably so check the label for directions. Control of perennial weeds in the spring will be poor. Contact herbicides, including Gramoxone, Scythe and flaming will have minimal long-term effect on perennial weeds.
Flame Weeding
Flame weeding is the killing of weeds with intense, directed heat produced by a propane burning device, either hand-held or tractor-mounted. Flaming can be used as an alternative to non-selective herbicides for stale seedbeds. This involves preparing the soil as if for planting, without actually planting the crop. Instead, weeds are allowed, even encouraged (with irrigation or row covers), to grow. Weeds are then killed. Because, like with contact herbicides, flaming kills weeds without soil disturbance, it is ideal for stale seedbeds. Some growers use hand-held units to flame just in the row, relying on cultivation for between-row weed control.
Prepared fields or beds may be flamed one or more times, depending on when weeds appear and when the crop is to be planted. Once broadleaf weeds reach the 1-3-leaf stage, they should be flamed to prevent them from growing too large. For the longest weed control effect, it is important that the final flaming be applied as late as possible or just prior to transplanting. Digging in the soil to check crop seeds for sprouting, or using a small piece of glass or row cover as an early warning system is one way to optimize the timing of flaming after direct seeding.
Flaming does not burn the weeds but “blanches” them. They will not collapse and die for several hours. There are exceptions. The growing points of grasses are usually below ground for some time and will not be affected by flaming. Purslane can take high temperatures without dying. These weeds require subsequent cultivation or hotter temperatures. When weeds are moist from rain or dew, more heat (a slower tractor or walking speed) will be necessary. Safety is a big issue with flaming. Consult with a gas professional if constructing your own flaming unit. Do not mount propane tanks intended for stationary use onto tractors. Flame against the breeze and avoid areas with dry residues or dry hedgerows. Liability concerns may hinder the use of flaming.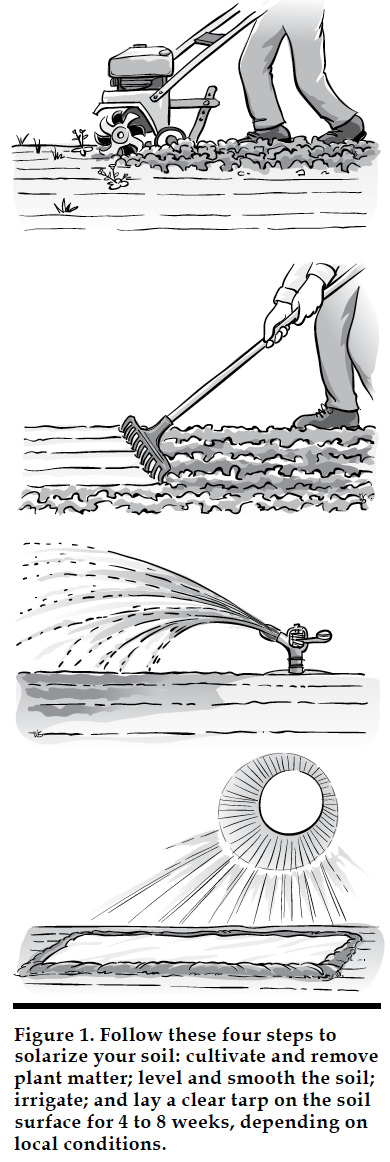
Soil Solarization
Soil solarization is a nonchemical method for controlling soilborne pests using high temperatures produced by capturing radiant energy from the sun. The method involves heating the soil by covering it with a clear plastic tarp for 4 to 6 weeks during a hot period of the year when the soil will receive the most direct sunlight. When properly done, the top 6 inches of the soil will heat up to as high as 140°F, depending on the location. The plastic sheets allow the sun’s radiant energy to be trapped in the soil, heating the top 12 to 18 inches and killing a wide range of soilborne pests, such as weeds, pathogens, nematodes, and insects.
The effect of solarization is greatest at the surface of the soil and decreases at deeper soil depths. The maximum temperature of soil solarized in the field is usually 108° to 131°F at a depth of 2 inches and 90° to 99°F at 18 inches. Control of soil pests is usually best for organisms found in the upper 6 inches of earth.
Soil solarization controls many of the annual and perennial weeds present in New England. However, some weed species seeds or plant parts are very sensitive to soil solarization, others are moderately resistant and require optimum conditions for control (good soil moisture, tight-fitting plastic, and high solar radiation). Solarization generally does not control perennial weeds as well as annual weeds because perennials often have deeply buried underground vegetative structures such as roots and rhizomes that may resprout. Rhizomes of bermudagrass and johnsongrass may be controlled by solarization if they are not deeply buried. Solarization alone is not effective for the control of the rhizomes of field bindweed. Control of purple and yellow nutsedge, as well as field bindweed arising from rhizomes and some clovers, can be inconsistent, even under favorable conditions.
Water
This section addresses crop water needs during production, water quality considerations relating to the transfer of human pathogens onto fruit crops, water management for pesticide use, and groundwater contamination resulting from crop production activities.
For berry crops in general, access to 1.5 inches of water every 12–14 days during the growing season (April-October) will aid in maximum growth and fruit bud development. During fruiting, ensuring that there is adequate moisture (at least 1 inch of water per week) will enable plants to maintain fruit size and production.
Microbial Water Quality
Water has the potential to transfer plant pathogens, spoilage organisms, and human pathogens onto fruit. This section will focus on the water quality management practices that help ensure that human pathogens are not transferred onto crops as a result of water use on the farm. These same practices by-and-large limit the negative impacts of plant pathogens and spoilage microorganisms on crop output and quality.
When thinking about the food safety risk relating to microbial water quality, agriculture water can be separated into two groups: production water and postharvest water. Production water is water that contacts the harvestable portion of a crop and includes any water used for irrigation, crop sprays, or frost protection. Postharvest water is any water used during and after harvest and includes water used for washing fruit, commodity cooling, ice making, postharvest fungicides and wax applications, handwashing, and cleaning and sanitizing of food contact surfaces.
Know your Water Source. Consider the source of your agricultural water and how the water will be used in order to manage potential contamination. Here is some general information on microbial risk by water source.
- Surface water, including rivers, streams, lakes, ponds, reservoirs, and any other water source that is open to the environment, carries the highest microbial risk. Water quality from surface water can vary greatly between sites and over time. Some contamination risks include animal impacts (such as from nearby livestock operations and animal intrusion) and other users of the water system.
- Ground water, or well water, poses less risk than surface water for agricultural uses, however, hazards such as cracked well casings and leaky septic systems increase the risk that ground water can become contaminated.
- Public water supplies are monitored and treated by municipalities and therefore pose the least risk, although water still may become contaminated within your distribution system. You can obtain water quality test results from the public utility supplier.
Water Quality Standards and Risk Reduction Practices. It is important to test ground and surface water for generic E. coli (an indicator of fecal contamination) to get a measure of its microbial quality. These tests in conjunction with a risk assessment should be used to determine appropriate water use practices and risk reduction strategies.
Post-harvest water:
- Do not use untreated surface water for postharvest applications.
- Ground water used for postharvest application should have no detectable generic E. coli.
- Assess your distribution system from your source to the use point (hose nozzle) for potential contamination risks and clean out the distribution system at least annually.
Wash or Rinse Water: Small fruit crops are typically not washed as part of postharvest activities (See ‘Postharvest’ handling section). If for some reason, fruit is rinsed or washed, use single-pass water (e.g. spray from a hose, spray bar in conveyor) instead of recirculated or batch water (e.g., from a recirculating conveyor or dunk tank).
Pre-Harvest or Production Water:
- Test ground and surface water for generic E. coli (an indicator of fecal contamination) to get a measure of its microbial quality. There is currently no specific microbial standard set for pre-harvest water regardless of source. Aim to keep E. coli levels as low as possible, look for spikes and trends in test results to identify increased risks of fecal contamination, and address those risks. Use the information in conjunction with other risk assessment factors to determine appropriate use patterns.
- Conduct a risk assessment that includes information on the following factors: water system (source and nature of distribution and contamination risks), use practices, types of crop, and environmental factors (sun exposure (UV).
- Keep potentially high-risk water from contacting the harvestable portion of a crop. You can do this by switching from overhead irrigation to drip irrigation.
- Lengthen time interval between direct application of water and harvest in order to allow time for microbial die-off.
- If possible (and relevant to your farm), shift use of high-risk water from use on fruit crops to crops not typically eaten raw (e.g. sweet corn or potatoes).
It is generally recommended to test your water when you are likely to see an increase in bacterial levels and when you are using the water for agriculture activities. Late spring and summer can be a good time to test your water, since contamination with coliform bacteria (such as E. coli) is most likely to show up during wet or warmer weather. It is important to understand that the sample you collect is just a “snapshot” of the water quality and that trend information is the most helpful for making water use decisions.
In addition, it is important to follow federal and state guidelines relating to agricultural water quality standards and testing. See the ‘Produce Safety’ section for information on the Produce Safety Rule.
Water Quality Test Procedures. Follow these procedures when collecting your water sample. These steps should apply to all samples regardless of the lab used for analysis.
- Sample Location: The location of the sample will depend on whether you are trying to understand the water quality of the water source or the distribution system. Here are some general guidelines to follow for testing different water sources and the distribution system.
- Ground Water Source (Wells): Take the sample from the tap or spigot closest to the source (pump head).
- Surface Water Source: Take the water sample from a location that most accurately represents the water that is used on produce. For example, if you pump irrigation water out of a river or pond, collect the water sample as close as possible to the intake pipe located in the water source.
- Distribution System: If you use equipment that may reduce risk (e.g., a filter) or introduce risk (e.g., pipes with dead legs) or you just want to test the effect of the distribution system on the water quality, test at the end of the line (e.g., nozzle of a hose, or irrigation spigot) as well as at the source.
- Flush the line: For testing a well or somewhere along the distribution line, turn the spigot on and let the water run for at least 30 seconds or until the water sitting in the line between uses exits the system.
- Collect the sample using aseptic methods: Obtain a sterile container from the testing lab (closed and sealed). Open the container using clean hands (single use gloves can be worn for added protection), fill the container from the collection site (at least 100 ml of water), and close the container without touching the inside of the container or inside of the top. You only want to allow the sample water to touch the inside of the container. You do not want to allow microorganisms from other sources into the container.
- Put the sample on Ice: The sample must be held on ice, or otherwise maintained at below 50 °F (10 °C). Do not freeze the sample. One way to do this is to put the sample container in a sealed plastic bag and then place this bag into a larger plastic bag containing ice.
- Delivery Time: Transport the sample to the lab in under 6 hours.
Water Quality Test Labs. Use this interactive map to find lab locations in New England that will analyze your agricultural water sample. Make sure you call ahead to the lab that you are planning to use even if you have worked with this lab in the past. Confirm the following items:
- The lab tests for generic E. coli and uses an analytical method approved by the FDA for this purpose,
- Type of collection container (lab should provide sealed sterile bottle),
- Directions on sample collection, transport, and preparation (including sample documentation)
- Time from sample collection to arrival at the lab (less than 6 hours), and
- Ensure the sample can be analyzed when you drop it off.
Water Management and Pesticides
The quality of water used when applying pesticides can impact pesticide efficacy. For example, organic matter in water can bind with some pesticides or clog nozzles. The pH of the water in your tank mix can also affect the efficacy of some pesticides. Insecticides, in particular, have a tendency to break down (hydrolyze) rapidly in alkaline water. Water pH can vary, depending on the source, from 5 to 9.5. Neutral water has a pH of 7, while alkaline water is higher than 7. If your water pH is much higher than 8, you may want to consider using an acidifying agent such as vinegar to lower the pH in the tank. Many of the pH-sensitive pesticides have acidifying agents in the formulation that moderate the effect of alkaline water. However, growers who suspect a pH problem should have their water tested. This can be done on the farm with pH test kits.
Groundwater Protection
There is considerable public concern about water quality, and agriculture is coming under increasing scrutiny regarding practices that can affect water quality.
Pesticide and Fertilizer Impact on Water Quality
Many pesticides and fertilizers are soluble in water and can leach through the soil to contaminate underlying groundwater. Several factors affect the movement of chemicals in the soil and their likelihood of reaching groundwater. Consideration of these factors can minimize the threat to groundwater.
Adsorption is the binding of a chemical to the surfaces of soil particles and organic matter. Some chemicals are tightly adsorbed and do not easily leach from soils.
Persistence refers to the amount of time a chemical will stay in the environment before being broken down into nontoxic substances. The rate of breakdown is affected by sunlight, temperature, soil pH, moisture and microbial activity. Pesticide persistence is measured in terms of half-life which is the length of time needed for one-half of the amount applied to break down. Persistent chemicals break down slowly, increasing the chance for them to leach from the soil. Conversely, short-lived materials may be degraded before significant leaching occurs. Many pesticides are broken down by sunlight (photodegradation) and/or microbial action. Incorporation of pesticides into the soil reduces or eliminates photodegradation. As depth in the soil increases, there is less microbial degradation. Any practice that slows degradation increases persistence and the likelihood of leaching. Generally, foliar applied materials are more likely to break down before significant leaching occurs than those that are applied to the soil.
Pesticide Characteristics: Solubility is very important in the leaching of a pesticide. Chemicals that are highly soluble in water are easily leached as water moves downward. If practical, use the least soluble material at the lowest effective rate.
Soil Characteristics: Soil texture and organic matter greatly influence the movement of pesticides and fertilizers. Fine-textured soils and those with high amounts of organic matter are highly adsorptive, whereas sandy soils low in organic matter are not. Highly permeable soils with permeable underlying layers allow for rapid downward movement of water and dissolved chemicals. Know your soils and apply chemicals accordingly.
Water Table: High water tables are especially vulnerable to contamination because little time is required for chemicals to reach groundwater.
Fertilizers: Nitrogen (N) in the nitrate form is highly soluble, persistent and not adsorbed to soil particles. Nitrate N is not only leachable but is recognized as a health threat at concentrations above 10 ppm in drinking water. Infants are most susceptible to nitrate in drinking water. The ammonium form of N is adsorbed by soil particles and is less subject to leaching. However, ammonium N is converted to nitrate N in the soil, and this can occur quite rapidly. Note that urea, a common form of fertilizer N, is converted in the soil to ammonium and then to nitrate.
Appropriate management practices can reduce the likelihood of nitrate leaching. Any time large amounts of N are applied, significant leaching can occur if there is heavy rain. By applying some of the needed N at planting and the rest during one or more topdressings, you can avoid having large amounts of nitrate present at any one time. Not only can this reduce leaching, it can improve production by providing N during periods of greatest crop uptake.
Nitrogen left over in the soil at the end of the season is highly subject to leaching. A cover crop should be planted to take up unused N. The N will again become available for future crops as the cover crop breaks down.
Postharvest Water Discharge
Discharge of wash pack area water is regulated differently in each state. Wash water may be of variable microbial quality and also may contain antimicrobial pesticides (sanitizers for cleaning and sanitizing or in produce wash water). Consider the area around your wash and pack shed (or outside area) and think about where it would be appropriate to discharge wash water. Direct discharge away from food crop production areas, avoid areas with human or vehicle traffic, and do not discharge directly into any bodies of water. Be sure to check with your local and state regulatory authorities to ensure your water discharge plan is appropriate. If you are using antimicrobial pesticides, follow the label directions for water discharge (many labels do not contain this information).
Worker Protection Standard
Pesticides can be useful tools for farmers. However, applicators, family members and workers can be harmed due to improper storage and use of pesticides.
For this reason, the EPA has developed the Agricultural Worker Protection Standard (WPS) for Pesticides (US EPA regulation, 40 CFR Part 170). The WPS applies to all pesticides that are used in the production of agricultural plants on farms, forests, nurseries, and greenhouses. This includes general use pesticides including those allowed in organic production (OMRI-approved), as well as restricted-use pesticides. Also, even if a pesticide license is not required, employees and handlers must still receive education in and comply with the WPS.
The WPS requires the owner or employer to take steps to reduce the risk of pesticide-related illness and injury: 1) if pesticides are used on the farm or 2) workers or pesticide handlers are employed who may be exposed to such pesticides.
You will know a pesticide product is covered by the WPS if you see the following statement in the "Directions for Use" section of the pesticide labeling:
Agricultural Use Requirements
Use this product only in accordance with its labeling and with the Worker Protection Standard, 40 CFR Part 170. This standard contains requirements for the protection of agricultural workers on farms, forests, nurseries, and greenhouses, and handlers of agricultural pesticides. It contains requirements for training, decontamination, notification, and emergency assistance. It also contains specific instructions and exceptions pertaining to the statements on this label about personal protective equipment, notification of workers, and restricted-entry intervals.
The primary WPS resource is the How to Comply manual (https://www.epa.gov/pesticide-worker-safety/pesticide-worker-protection-standard-how-comply-manual), developed by EPA. The manual is available from your State Lead Agency (SLA), pesticide education office of the Cooperative Extension Service, the EPA Region 1 office and EPA's National Agricultural Compliance Assistance Center. Every agricultural producer should have a copy of the EPA How to Comply manual.
Key Elements of the Worker Protection Standard
The following is a brief summary of the major elements of the WPS. Producers should refer to the manual for complete details and explanations of the requirements of the Worker Protection Standard.
Information and Education. To ensure employees will be informed about exposure to pesticides, the WPS requires:
- Annual pesticide safety training for workers and handlers,
- Pesticide safety poster to be displayed for workers and handlers
- Access to labels and material safety data sheets for pesticide handlers and early-entry workers
- Access to specific information in a centrally-located Application List of pesticide treatments on the establishment
Protection. To ensure employees will be protected from exposures to pesticides, the WPS requires employers to:
- Prohibit handlers from applying a pesticide in a way that will expose workers or other persons
- Exclude workers from areas being treated with pesticides
- Exclude workers from areas that remain under a restricted entry interval (REI) with narrow exceptions
- Protect early-entry workers who are doing permitted tasks in treated areas during an REI requirements include special instructions and duties related to correct use of Personal Protective Equipment (PPE)
- Notify workers about treated areas so they can avoid inadvertent exposures
- Protect handlers during handling tasks. Requirements include monitoring while handling highly toxic pesticides and duties related to correct use of PPE.
Mitigation. To mitigate exposures that employees receive, the WPS requires:
- Decontamination sites that provide handlers and workers an ample supply of water, soap and towels for routine washing and emergency decontamination,
- Emergency assistance that provides transportation to a medical care facility if an agricultural worker or handler may have been poisoned or injured by a pesticide and providing information about the pesticide(s) to which the person may have been exposed.
Agricultural Owner Exemptions. Even if you are the owner of the farm, forest, nursery, or greenhouse and you or members of your family do all the work there, you are a "WPS employer." You must comply with SOME of the WPS requirements, such as adhering to restricted entry intervals, personal protective equipment (PPE) and ALL the specific requirements listed in the pesticide labeling. If you hire commercial handlers, certain information must be given from you (the operator) to the commercial handler employer.
- Specific location and description of any areas that may be treated with a pesticide or be under an REI while handler is there, or that the commercial handlers may be in (or walk within 1/4 mile of),
- Restrictions on entering those areas.
Crop Advisors. The WPS requires employers to provide certain protections to their employees who are working as crop advisors. Examples of crop advisors are crop consultants, scouts, and integrated pest management monitors. An independent or commercial crop advisor is any person working as a crop advisor who is employed (including self-employed) by anyone other than the agricultural establishment on which the work is being done. Certain provisions of the WPS apply to crop advisors depending on when the advisor is on the farm and when the pesticide has been applied.
Commercial Handlers. Employers of commercial handlers must make sure that their customer the operator of the farm, forest, nursery or greenhouse, knows certain information such as: specific location and description of the area treated with the pesticide, time and date pesticide is to be applied, product name, EPA registration number, active ingredient(s), REI for the pesticide, whether the labeling requires treated area posting and oral notification and any other specific requirements on the pesticide labeling concerning protection of workers and other persons during or after application.
For more information on the WPS, contact your Cooperative Extension Pesticide Safety Education Coordinator, SLA or EPA Region 1 office. See also the web site for WPS: https://www.epa.gov/pesticide-worker-safety/agricultural-worker-protection-standard-wps
Produce Safety
Fruit crops may be contaminated with various food safety hazards during growing, harvest, postharvest handling, and distribution. Cultural practices to reduce the likelihood of these hazards affecting human health are best integrated directly into day-to-day production practices. Hazards can be physical (choking hazards from sticks or rocks), chemical (pesticide residues that exceed tolerance levels), or biological (illness causing microorganisms).
Good agricultural practices, or GAPs, are practices that are effective in reducing food safety hazards during all stages of production. This section will primarily focus on the cultural practices that prevent human pathogen hazards (biological) from being transferred onto fruit crops. Implementing cultural practices to prevent physical and chemical hazards from occurring is also important and was either handled in other sections (e.g. appropriate pesticide use) or will be briefly discussed in this section.
In the case of human pathogen hazards (e.g. viruses, bacteria and parasites), contamination can occur through direct contact with contaminated water, soil, containers, equipment, or employees. Fresh fruit is frequently eaten raw and so preventing crops from coming into contact with these organisms is the best way to prevent foodborne illness from occurring.
Federal and state regulations now require certain standards for the growing, harvesting, packing, and holding of produce for human consumption. These standards known as the Produce Safety Rule also focus on microbiological hazards (pathogens) and align with the widely recognized Good Agricultural Practices noted above. The New England state agriculture agencies listed below implement the Produce Safety Rule requirements. Refer to the FDA’s Final Rule on Produce Safety and contact your state Extension or responsible regulatory agency for more information on the specific requirements or to find out whether your farm is subject to these standards.
Connecticut: Connecticut Department of Agriculture
Maine: Maine Department of Agriculture, Conservation and Forestry
Massachusetts: Massachusetts Department of Agricultural Resources
New Hampshire: New Hampshire Department of Agriculture, Markets, and Food
Rhode Island: Rhode Island Department of Health
Vermont: Vermont Agency of Agriculture, Food & Markets
Efforts to prevent contamination of fruit from microbiological hazards focus on the following Good Agricultural Practices.
Employee Hygiene and Training
Teach employees about microbial risks on the farm and the importance of good hygiene. Provide and maintain clean restrooms in or near the field and in food handling areas. Supply soap, clean water and single-use towels for hand washing and enforce their use. Make sure policies are understood, and if necessary, deliver trainings in workers’ native languages. Model good behavior and the standards and expectations you have for employees.
Educate employees with the information they need for their particular job regarding good agricultural practices. An employee who only harvests berries will need different information than an employee who works full time in the wash/pack area. Ensure that employees know how to identify potentially contaminated fruit or food contact surfaces (do not harvest berries with feces or that have dropped to the ground) and know what to do if produce becomes contaminated or if they or another employee is sick.
Harvest / Postharvest Handling and Sanitation
Check that all harvest containers are clean and in good repair. Clean and sanitize harvest bins prior to the harvest season and clean bins regularly during harvest. Only use single-use containers once. Ensure that all food contact surfaces, the wash-pack area, and storage area are kept clean and organized so that they don’t become an area that harbors pathogens that could be transferred to fruit.
Keep produce handling areas separate from other farm activities such as tractor repairs, pesticide mixing, or employee break areas. Do not store sanitizers and other chemicals where they could contaminate produce. Bacteria survive and grow in water, so allow equipment to dry and minimize standing water with good drainage and/or by routinely clearing pooled water. If the packing area is outside, be sure that the area drains well. A gravel pad can help with drainage and soil splash. Keep pests from entering produce wash, pack, and storage areas and establish a pest management program, if necessary.
In addition to general cleanliness, it is important to know how to clean and, when necessary, sanitize tools, equipment, and surfaces effectively. While cleaning and sanitizing should be focused on food contact surfaces—any surface that comes into physical contact with produce—you should also clean “secondary” surfaces that may indirectly contact food or food contact surfaces. Cleaning and sanitizing refer to separate actions. Cleaning is the physical removal of dirt and organic matter from surfaces, using water and a detergent. Sanitizing is the treatment of a cleaned surface to reduce bacterial pathogens to a level considered safe as judged by public health entities. A dirty surface cannot be sanitized—cleaning always comes first.
Promote Good Hygiene for U-Pick Customers
Provide clean and convenient restrooms for all U-pick customers. Supply soap, clean water, and single-use towels and encourage their use. Discourage visitors from coming to your farm when they are sick.
Keep Produce Cool
Cool fruit quickly to minimize growth of potential pathogens. See Postharvest Handling and Storage for practices that help to maintain good quality; these same practices will also minimize human pathogen growth and transfer.
Soil Amendments
Food safety risks regarding soil amendments generally involve raw manure, or other untreated animal-based soil amendments. All animal-based soil amendments can contain pathogenic microorganisms if they are not processed in a way that kills such pathogens. If you use composted manure on your farm, you need to ensure that the manure is composted correctly and fully. Otherwise, it should be used as raw manure.
In the fall, if applying manure to land in food production, do so preferably when soils are warm (over 50ºF), non-saturated, and cover-cropped. The rest of the year, incorporate manure whenever possible. Maximize the time between application of manure and harvest—a good guideline is the USDA National Organic Program standard of a 90-day interval for crops that do not touch the soil and 120 days for crops that do. Keep records of all manure and fertilizer application rates, source, and dates. Avoid planting root or leafy crops if manure is applied in spring.
Never side-dress food crops with fresh solid manure, slurry manure, manure 'tea' or any mulches containing fresh manure. However, it is ok to side-dress with stabilized compost.
A stabilized compost is one that has followed a biological treatment process to meet microbial standards for detectable amounts of bacteria (including Listeria monocytogenes, Salmonella spp., fecal coliforms, and E. coli 0157:H7). FDA has validated both a turned and static composting treatment process. If these processes are followed there is no need to test the compost for microbial organisms. If you do not have records or certification that compost was properly treated to control pathogens, handle it like raw manure and observe the suggested 90-120 day application interval.
Wildlife, Domesticated Animals, & Land Use
Animals on fruit farms can pose food safety concerns because they can carry certain human pathogens (e.g., Salmonella, Listeria, and E. coli) and can spread those pathogens through fecal matter directly to produce in fields, or indirectly through water sources. Avoid grazing or housing livestock near produce fields and keep pets out of production areas. Assess risks posed by livestock on adjacent land and also review the land history for prior use and possible applications of sludge. Note: Sludge can be a potential source of environmental contaminants (such as PFAS and other chemical hazards) as well as a source of microbiological contamination.
It is impossible to exclude all wildlife from produce fields but minimize wild and domestic animal traffic by use of fences and other means. Consider berms to prevent runoff entering a produce field. Have a plan for how you will manage contamination when it happens. Never harvest produce that is contaminated with animal feces or from flood waters.
Agriculture Water
Only use water of adequate microbial quality during production and postharvest activities. See the Water section for more information on agriculture water quality.
Farm Food Safety Plans
Accurate recordkeeping and documentation of practices ensure that the risk management strategies described above are done consistently and effectively. There are many recordkeeping templates available through resources such as the Produce Safety Alliance or Extension programs. A farm food safety plan helps growers compile relevant food safety documents such as risk assessments, standard operating procedures, training information and record keeping logs. A food safety plan may also be required by buyers or third-party audit programs.
Traceability Program
A traceability program allows supply chain entities to trace produce one step forward and one step back within the distribution chain in order to quickly respond in the case of a foodborne illness incident. For growers, tracking produce requires defining a “lot” (distinct production of a crop) and creating a code for identifying that lot. Lot codes should be a unique code and would typically include the following information: farm, crop and variety name, field or harvested block, and the harvest and packing date. This code helps identify a particular lot once it has been sold.
The FDA’s Food Traceability Final Rule requires that supply chain entities keep traceability records for designated foods. Small fruit (berries) are not a designated food and thus growers of these crops are not subject to the requirements.
Resources
- UMass Extension Food Safety for Farmers - https://ag.umass.edu/resources/food-safety/food-safety- for-farmers
- Produce Safety Alliance at Cornell University - https://producesafetyalliance.cornell.edu/
- A practical GAPs self-assessment for farms, with worksheets that can be printed out from Cornell University's GAP Program - https://cals.cornell.edu/national-good-agricultural-practices-program/re...
- Wholesale Success: A Farmer’s Guide to Food Safety, Selling, Postharvest Handling, and Packing Produce. Fifth Edition. https://goodfoodfarmertraining.org/programs/#section3
Risk Management
Crop Insurance/Risk Management Information for Fruit Growers
![]()
The role of the USDA Risk Management Agency (RMA) is to help farmers manage their business risks through effective, market-based risk management solutions. As part of this mission RMA, through the Federal Crop Insurance Corporation (FCIC), provides crop insurance to producers. Fifteen private-sector insurance companies (commonly referred to as reinsurance companies) sell and service the policies. RMA develops and/or approves the premium rate, administers premium and expense subsidies, approves and supports products, and reinsures the companies.
Crop and revenue insurance are important risk management tools available to farmers. The New England states have been identified as “underserved states” by RMA, primarily because the region’s farmers have not been significant users of crop insurance products. RMA, in collaboration with New England Land Grant Universities, State Departments of Agriculture and private industry associations, have been reaching out to growers and agricultural professionals to make them aware of the opportunities, as well as the limitations, of crop and revenue insurance policies. The results of these efforts have led to improved farmer understanding and use of crop and revenue insurance products.
RMA continuously reviews and modifies insurance policies to better suit the particular needs of the region’s growers. New England fruit growers who grow apples, blueberries, cranberries, grapes and peaches know the value of coverage for those crops. Other crops can be covered as components of a whole farm revenue policy under the Whole Farm Revenue Protection (WFRP) policy. Coverage under WFRP is based on total farm revenue, not production levels of individual insured crops. WRFP is available in all counties in the country.
An important point to keep in mind is that coverage availability for individual crops varies by state and county. Please check the RMA website or an authorized crop insurance sales agent to see which crops are available in your county.
If you grow a crop that is not covered by Federal crop insurance in your county you still have two options to obtain coverage on those crops. 1) Contact an authorized crop insurance sales agent to see if you could obtain coverage on the crop(s) under a "Written Agreement". Even if an individual crop is not listed as an insured crop in your county, producers may request crop insurance coverage through a process called a “Written Agreement”. A “Written Agreement” is a process completed by an authorized crop insurance sales agent that applies for coverage using actuarial data and prices for crops covered in other counties; or 2) The USDA-Farm Service Agency (FSA) administers the Noninsured Crop Disaster Assistance Program (NAP) which was developed to provide a basic level of coverage for non-insured crops in a county.
NAP offers catastrophic (CAT) coverage on losses over 50% of the producer's approved yield and losses are paid at 55% of the approved market price for the county. Rather than paying an insurance premium for CAT coverage, producers have paid a service fee of $250/crop with a maximum of $750/county for CAT coverage. Under provisions of the 2018 Farm Bill, the service fee will increase beginning in the 2020 crop year to $325/crop with a maximum of $825/county for CAT coverage. The 2014 Farm Bill expanded NAP coverage to offer producers of noninsured crops “Buy-Up” coverage. Under “Buy-Up” coverage a producer can elect coverage levels from 50 - 65% (in 5% increments) of the producer’s approved historical yield and losses are paid at 100% of the approved market price for the county. The fee for “Buy-Up” coverage is a service fee of $250 (increasing to $325 in the 2020 crop year) plus a formula calculated by multiplying the acres of the crop times the producer’s historical yield for the crop times the coverage level times 5.25%. Beginning, limited resource and traditionally underserved farmers are eligible for a waiver of the service fee plus a 50% reduction on the additional cost of “Buy-Up” coverage. The 2018 Farm Bill has permanently authorized “Buy-Up” coverage under NAP. Producers are encouraged to contact their local USDA-FSA Office for more information including sales closing deadlines for NAP.
For more information about RMA, crop insurance policies and risk management strategies go to the RMA website at http://www.rma.usda.gov. Specific information about polices for each New England State can be found under “Field Offices, Regional Office State Directory.” You can locate a crop insurance agent online at http://www.rma.usda.gov/tools/agent. Keep in mind that crop insurance agents are not employees of RMA or FCIC, rather, they are employed/contracted by private reinsurance companies. Crop insurance agents are the professionals with on-the-ground experience and knowledge of what works and what doesn’t for a particular situation. Part of the effort to improve service in New England includes increased communications with well-informed agents. Your unique scenarios will help this to happen, whether or not you actually purchase coverage.
Is now the time to be covered by crop insurance? Let’s consider a few important factors which may help you decide:
- The volatility of farm income has increased significantly in recent years. Environmental and economic conditions have let to greater variability and uncertainty in farm sales and profits.
- There has been a trend away from funding historical “ad hoc disaster programs” that have at times provided direct financial assistance to producers where losses have been catastrophic. Congress has been under constant pressure to share the management of risk with the farmer.
- Lenders see crop insurance as a means to reduce their risk exposure, improving a farmer’s eligibility as well as an opportunity to secure better loan terms.
- Crop and revenue insurance can be a very good value if the coverage fits your needs. Due to significant ongoing subsidies from the Federal Government, farmers do not pay for the full cost of coverage. Under Federal Crop Insurance policies, the Federal Government subsidizes from 38 to 75 percent of the premium cost depending on the crop, type of policy and the coverage level selected by the grower, making crop insurance affordable to fruit growers.
The Big Five: Types of Agricultural Risk
As you think about managing risk to stabilize farm income, there are five basic sources of agricultural risk that you should consider - production, marketing, financial, legal, and human resource management risks. There are different tools and strategies you can use to manage each of these risks.
1) Production Risks
Production risks relate to the possibility that your yield or output levels will be lower than anticipated. Major sources of production risks arise from inclement weather conditions (such as drought, freezes, or excessive rainfall at harvest), but may also result from damage due to insect pests and disease.
Tools and Strategies:
- Follow recommended production practices.
- Diversify enterprises by growing different crops and varieties.
- Expand production or plant excess acreage.
- Purchase multi-peril crop insurance coverage to stabilize income.
- Adopt appropriate technology such as drip irrigation, tile drainage, or resistant varieties.
- Consider site selection - use or rent acreage less susceptible to specific pests or frost.
- Maintain equipment and keep facilities in good working condition.
2) Marketing/Price Risks
Marketing risks relate to the possibility that you will lose the market for your products or that the price received will be less than expected. Common sources of marketing risk include lower prices due to increased supply or decreased consumer demand; loss of market access due to the relocation or closing of a processor or other buyer; and, lack of marketing power due to the small size of farm sellers relative to others in the market.
Tools and Strategies:
- Develop a marketing plan with realistic sales forecasts and target prices.
- Form or join a marketing cooperative to enhance prices and guarantee a market.
- Increase direct marketing efforts to capture a higher price.
- Market through multiple channels or outlets to reduce reliance on a single market.
- Enter into sales or price contracts with buyers.
- Spread harvest and sales over the season by scheduling planting and considering storage options.
- Conduct basic market research - survey your customers.
3) Financial Risks
Financial risks relate to the possibility of having insufficient cash to meet expected obligations, lower than expected profits, and loss of net worth. Sources of financial risk commonly result from the production and marketing risks described earlier. In addition financial risks may also be caused by increases in key input costs, increases in interest rates, excessive borrowing, lack of adequate cash or credit reserves, and changes in exchange rates.
Tools and Strategies:
- Develop a comprehensive business plan identifying mission, objectives and goals.
- Monitor financial ratios and benchmarks related to liquidity, solvency and profitability.
- Control key farm expenses.
- Conduct a trend analysis to assess what’s happening with farm income and net worth over time.
- Purchase whole farm revenue insurance, such as AGR or AGR-Lite, to provide a safety net.
- Communicate with suppliers and lenders to review and renegotiate exiting contracts and loan terms.
- Consider leasing and rental options rather than purchasing machinery, equipment or land.
- Evaluate the possibility of business expansion (getting larger) or contraction (reducing size).
- Control or defer unnecessary family and household expenditures.
- Find off-farm employment for a family member, preferably a job with benefits such health insurance, group life insurance, and a retirement program.
- Use non-farm investments such as IRAs or mutual funds to diversify your asset portfolio.
4) Legal and Environmental Risks
In part, legal risks relate to fulfilling business agreements and contracts. Another major source of legal risk is tort liability, i.e., causing injury to another person or property due to negligence. Legal risk is also related to environmental liability and concerns about water quality, erosion and pesticide use.
Tools and Strategies:
- Review business insurance policies and be certain to carry sufficient liability coverage.
- Evaluate your choice of business legal structure; a sole proprietorship is not always the best business organization.
- Understand business contracts and agreements; ask questions if you are unsure.
- Take time to develop good relationships with neighbors and address their concerns.
- Use good agricultural practices to limit environmental risk.
- Know and follow State and Federal regulations related to your farming operation.
5) Human Resource Management Risks
Human resource risks pertain to risks associated with individuals and their relationships to each other, their families and the farm business. Sources of human resource risk include the three D’s: divorce, death, or disability of a business owner, manager, employee or family member. It also includes risks arising from poor communications and people-management practices.
Tools and Strategies:
- Develop and practice good “people skills” for family as well as employees.
- Evaluate alternative sources of labor.
- Provide adequate training for employees, formalized programs may help your safety record as well as improve performance.
- Communicate with employees and family members.
- Recognize and reward good performance.
- Review estate and business transfer plans to help insure the farm continues.
- Consider long-term care and life insurance needs.
Originally written by Michael Sciabarrasi, Extension Professor, Agricultural Business Management, UNH Cooperative Extension and updated by Tom Smiarowski, Extension Educator, Crop Insurance/Risk Management Education, UMass Extension. Adapted from version appearing in prior edition. This information is provided by The United States Department of Agriculture's Risk Management Agency (RMA), in cooperation with the Extension programs of the New England states.
Post Harvest Handling and Storage
Summary
- Berries are highly perishable and high value crops with high respiration rates.
- Sensitive to bruising and other mechanical damage.
- Precooling with forced air cooling is important for getting to storage temperature (~32oF) quickly.
- Need to maintain high humidity (>90% RH, but avoid liquid water from, e.g., condensation.)
- Postharvest is a hotel, not a hospital: Nothing improves with storage and distribution, especially not berries.
- Consider intentional air movement and exchange for ethylene management.
Introduction
This will focus on strawberries, blueberries, and raspberries. A key principle when considering postharvest operations is that berries are still alive even after they’ve been harvested. The main process of life is respiration; converting glucose to carbon dioxide and water vapor. This results in heat production as well. Meanwhile, berries are dying. Ethylene, a naturally occurring ripening hormone, is being produced and along with bruising, other physiological disorders and postharvest pathogens, will eventually lead to decay.
The storage of berries demands precooling to storage temperature as quickly as possible. There is a need for high humidity, but not liquid water or condensation. It may also be possible to achieve higher quality for longer periods by providing air exchange in storage to remove ethylene.
Packing
Postharvest handling of berries aims to minimize the number of times the fruit is handled. Fruit is generally field packed in pint or quart punnets or even clam shell containers when destined for retail markets. Wholesale or processing harvest may be handled differently. Packing containers are ideally new, clean, sturdy and ventilated to allow for precooling and air exchange. Bruising is controlled by keeping the stacked level of fruit to a minimum (some say no more than 3 berries high). Flats and lugs can be used to safely move and stack multiple punnets for efficient handling and cooling.
Precooling
Forced air cooling (FAC) is the industry standard for rapid reduction of temperature following harvest. The lower the temperature the lower the respiration rate. For every 10oF reduction in temperature, the respiration rate is generally reduced by 50%. The lower the respiration rate, the lower the rate of sugar conversion and longer the berry quality will be maintained. FAC draws cold room air over the product with an intentional flow path by using punnets and lugs or flats designed with ventilation holes for the purpose. A tarp and blocking sheets are used to prevent bypass flow through pallet holes and other larger areas. The key mechanism by which FAC works is convective cooling; the rate of heat transfer from the berries to the air is increased due to air velocity. Air distribution is important which is the reason for drawing air through the stacks by suction instead of pushing air through by pressure. Larger enterprises may have need for a dedicated precooling room, although a shared cooler can be used for the purpose by employing a dedicated air plenum and fan. Designs of forced air coolers for 1-3 cartons, half pallets, or full pallets can be found at the following link: http://blog.uvm.edu/forced-air-cooling-on-the-farm/.
Control of humidity in the precooling environment is important. Humidity is the amount of water vapor in air. If humidity is too low, berries will suffer from weight loss, shrivel and discoloration. If humidity is too high, condensation can occur on colder surfaces leading to liquid water and postharvest diseases.
Storage
Berries are ideally stored near 32oF with high humidity >90% RH. They tend to not be sensitive to chilling injury or freezing injury and can tolerate even 30-31oF air temperatures due to their high respiration rates and sugar content. Many northeast growers avoid berry storage by growing for immediate sale and picking directly for market. However, storage for multiple days is possible under the right conditions (see Table 1).
Ethylene is a naturally occurring ripening hormone that is an especially important consideration. Berries have relatively high respiration rates (heat producing) and also generally high ethylene production rates. In berries, the production of ethylene has been linked with Botrytis cinerea. The easiest way to reduce ethylene is to provide air exchanges in the storage area. This does present a challenge for maintaining high humidity in drier conditions.
The control of humidity is best handled by ensuring the refrigeration system is designed with a high evaporator temperature (relatively high refrigeration temperature). The temperature of the refrigerant determines the absolute minimum temperature in the room which determines the amount of water removed from the air when it is cooled.
|
Crop |
Optimal Storage Temperature (oF) |
Optimal Storage Humidity (% RH) |
Storage Life |
Chilling / Freezing Sensitivity |
Ethylene Production and Sensitivity |
|---|---|---|---|---|---|
|
Blueberry |
31-32 |
>90 |
2 weeks for lowbush, northern highbush, and southern highbush.
Up to 4 weeks for rabbiteye |
Insensitive |
Not a negligible producer (higher production in Rabbiteye).
Promotes Botrytis growth.
|
|
Postharvest disorders and pathology: The major disorders are shrivel (water loss), sunscald, and fruit cracking. Botrytis cinerea (gray mold) and anthracnose Ripe rot (Colletotrichum gloesosporiodes). Rhizopus stolonifer above 50oF. |
|||||
|
Raspberry |
31-32 |
>90 |
2-5 days |
Insensitive |
Not a negligible producer.
Can lead to Botrytis and darkening (purple). |
|
Postharvest disorders and pathology: Shriveling (water loss), leakers (berries with leakage of juice), and UV damage (white drupelets) are the primary disorders found in Raspberries. The most common postharvest diseases are gray mold (Botrytis cinerea) and rhizopus rot (Rhizopus stolonifer) |
|||||
| Grape | 31-32 | 85-90 | 4-7 weeks | Insensitive |
Low Producer.
Insensitive, though Botrytis is supported by high ethylene. |
| Postharvest disorders and pathology: The major disorders are shrivel (from low RH storage) and sunburn. The most common postharvest diseases are Botrytis cinerea (gray mold), ripe rot (Colletotrichum gloeosporioides), macrophoma rot (Botryosphaeria dothidea), powdery mildew (Uncinula necator), blue mold (Penicillium), Alternaria alternata and Cladosporium herbarum. | |||||
|
Strawberry |
32 |
90-95 |
7 days |
Insensitive |
Low Producer.
Insensitive, though Botrytis is supported by high ethylene. |
|
Postharvest disorders and pathology: Botrytis cinerea, Rhizopus stolonifer. |
|||||