A monthly e-newsletter from UMass Extension, published March to October, for home gardeners.
To read the articles in each section of the newsletter, click on the section headings below to expand the content:
Tips of the Month
June is the Month to…..
- Use Integrated Pest Management (IPM) in your garden and landscape. IPM focuses on a series of science based steps including: 1) Proper Identification – often the first mistake made in pest control. The UMass Plant Diagnostic Lab offers diagnostic services for disease, insect, and weed problems to aid in proper identification. 2) Monitor – Thoroughly check your plants to determine where and how widespread a pest may be. 3) Thresholds – Determine whether intervention is needed. Oftentimes, the mere presence of a pest does not necessitate a need for control. Research to find out whether the pest will harm the health of the plant or if it only affects its aesthetics. 4) Control Tactics – Focus on cultural controls as a first option, biological control as a second option, and, if a pesticide is needed, use the least toxic option that will do the job. 5) Evaluate – Did your plan work? Plan ahead for next year utilizing cultural controls for prevention.
- Stay on top of the weeding. Weed seeds will germinate quickly in warm soils. Use mulches to reduce your weeding efforts. Organic mulches such as bark mulch, straw, or chopped leaves all make good mulches. Mulches should be applied liberally, maintaining a depth of about 3” for good weed suppression. When applying mulch around plants, make sure you taper the mulch so that it is not piled up against the trunks or stems. Don’t use compost as a mulch in perennial beds unless you enjoy weeding; most composts contain lots of weed seeds.
- Use organic mulches, such as straw, in the vegetable garden around plants that prefer cool conditions, like the Brassicas (broccoli, cabbage, kale, etc). This will keep the weeds down and keep soil temperatures slightly cooler. For heat loving crops like tomatoes, peppers and melons, use Infra Red Transmitting (IRT) plastics these can heat the soil an additional 8°F.
- June is a great month to move your houseplants outside. Make sure you provide them with the appropriate amount of sunlight - many houseplants prefer dappled shade or, at the least, protection from midday and early afternoon sun. It is also a good time to repot them into a larger, clean pot using a soilless growing media.
- Have some holes in the perennial garden? Instead of buying more mulch, plant some annuals such as petunias and verbena. They will fill in quickly and provide a splash of color all summer long.
- Continue to sow quick growing crops or crops that bolt quickly. Lettuce, cilantro, and radishes can all be grown throughout the summer. Sow every few weeks and harvest promptly.
-
June is often the first month in which supplemental watering is needed for your gardens, plants, or lawn. Install a rain gauge so that you know when and exactly how much precipitation is occurring. Summer rains can be extremely variable from one town to the next or even in the same town. Generally, plants need at least an inch of water per week. This is best done with one deep watering instead of many light, shallow applications. When watering is needed, make sure you are getting water into the root zone. This is typically about 6” deep for lawns, 8” for gardens and about 10” for trees and shrubs. The best way to know whether you watered enough is to physically check by digging down a few inches into the soil.
-
Consider setting up drip irrigation for your flower beds, vegetable garden, or containers. Drip irrigation systems are simple to put together, offer precise watering, and can reduce the severity of foliar disease. Not only that, but they can be hooked up to a timer so that you don’t under or over water and free up some time to do other garden chores – like weeding.
Russ Norton, Cape Cod Cooperative Extension
Timely Topics
 Mushrooms in Lawns
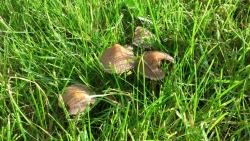
With the wet weather pattern this spring, mushrooms are a common sight in lawn areas. Mushrooms in general tend to be a minor nuisance, but the specific reaction to their presence can vary from case to case. Some home owners are concerned with the disruption of lawn appearance that mushrooms can cause, while others worry that children or pets may handle or ingest a toxic variety. A few even appreciate the biological diversity and curiosity that they bring to a site.
Mushrooms are the reproductive structures of various fungi that occur naturally in the landscape. When considered individually, mushrooms are only a small part of a much larger fungal organism. The main “body” of the fungus consists of web-like growth called mycelium that is normally tightly integrated with the soil and/or thatch beneath the turf canopy. These fungi feed on many varied sources of organic matter in the soil such as plant matter, tree roots, animal waste, or buried wood debris. To this end, the vast majority of these fungi can be considered beneficial, as part of the multitude of microorganisms that release and recycle valuable nutrients within the system as they degrade organic material.
Some mushrooms are associated with a unique phenomenon commonly referred to as a fairy ring. The mycelium of fairy ring fungi gradually grows outward radially from the origination point. As the leading edge of the mycelium comes into contact with new organic matter sources, the nutrients released promote enhanced greening and growth of the turf, resulting in noticeable rings or arcs. Mushrooms also commonly arise along this mycelial “front”. Over time, the mat of fungal mycelium within the ring can become so thick and dense that it can inhibit water infiltration and lead to localized dry spots, causing further stress and decreased turf vigor.
Although usually unnecessary, complete eradication of mushrooms or fairy ring symptoms in many circumstances can be challenging. Eradication requires destruction of the fungal mycelium that gives rise to the mushrooms. This can be relatively straightforward if the source of organic matter can be pinpointed (e.g. a buried stump that could be removed), or virtually impossible if the fungus is thriving throughout a rich soil with a high organic matter content. Fungicide intervention is seldom productive in a lawn, as it is difficult to apply the fungicide in a way that will adequately penetrate the thatch and soil and effectively come into contact with the mycelium. Soil replacement is another approach that may provide relief in problem areas, but is typically prohibitively disruptive and impractical in most lawn settings.
Most of the time, the appearance of mushrooms ebbs and flows depending upon the amount and duration of moisture, and is frequently a temporary situation. Mushrooms are rarely responsible for direct lawn injury and only a handful are poisonous, which generally makes major intervention unwarranted. If expectations dictate, hand picking, raking, or even the simple practice of mowing is often enough to stay ahead of mushrooms during wet weather.
Jason D. Lanier, UMass Extension Turf Specialist
Gypsy Moth
Gypsy moth caterpillars are in various sizes or developmental stages (instars), depending upon the location in Massachusetts. In many areas, caterpillars are in the 4th instar stage – meaning that they are larger and will be causing more noticeable defoliation this month. These caterpillars will continue to feed and grow throughout roughly the 3rd week of June, at which time the caterpillars typically begin to pupate. Following pupation, adult gypsy moth males and females will emerge around the end of June, early-July. Adult males are brown and can be seen flying to find and mate with the white colored, flightless females. The females will lay their eggs in fuzzy, brownish-tan masses that can contain 500-1000 eggs and will overwinter in that stage. The caterpillars are the only stage of the gypsy moth that feed, so once pupation has begun, management is no longer applicable or necessary.
To treat individual landscape ornamental and shade trees, a lower-risk option that is effective on both younger and older gypsy moth caterpillars (such as the older caterpillars present and feeding now) would be spinosad. This active ingredient is from a naturally occurring, soil dwelling bacterium and is considered a lower risk option, with the exception that it is toxic to pollinators until dried, so avoid applying to host plants that are in bloom. Btk (Bacillus thuringiensis kurstaki), is most effective on caterpillars that have settled to feed on fully expanded foliage and are roughly between ¼ - ¾ inch in length. Larger caterpillars (over ¾ inch) are less susceptible to Btk. Therefore, at this time in the 2017 season, Btk applications may no longer provide the desired results.
The most effective organisms at regulating gypsy moth outbreaks tend to be two pathogens that have become well established in New England - the fungus, Entomophaga maimaiga and the NPV virus. We need the cool and rainy conditions that we have been experiencing to continue through June to help facilitate the successful infection of gypsy moth caterpillars with the insect-killing fungus Entomophaga maimaiga. It is important to note that even with fungal infection in the caterpillars, we may still see significant defoliation in certain areas of Massachusetts this year due to this insect.
For more detailed management information, go to ag.umass.edu/landscape/fact-sheets/gypsy-moth and sign up to receive the Landscape Message for seasonal updates about this insect, including what impact the fungus is having on the caterpillar population this year, at ag.umass.edu/landscape/landscape-message.
Tawny SImisky, UMass Extension Entomologist
News for Gardeners
Perennial Garden Maintenance
The perennial garden is always a busy place. There is always something to be done and the summer is no different. After spring flowering plants have gone by, deadheading, pinching, and cutting back can help keep your garden in tip top shape for the months to come.
Deadheading is the practice of removing spent flowers after bloom and before they set seed. The production of seed requires a lot of energy; in theory, deadheading allows the plant to use more energy for other types of growth such as roots, shoots, and flowers. Sometimes deadheading can even help reduce the chance for disease; senescing flower parts can easily be infected with botrytis that will then infect other plants or plant parts. In many instances, it is just a way of keeping the garden looking good. Remove the flower stalks of peonies, iris, and daylily after they are done flowering. To make the job easier, use hedge shears to deadhead plant like Coreopsis ‘Moonbeam’.
Sometimes you may want your perennials to set seed, especially with wildflower meadows, pollinator gardens, and more informal landscapes. Not only will this allow new plants to take root, but also provide resources for wildlife like birds. Agastache, Campanula, Centurea, columbine, Digitalis, Echinacea, Liatris and lupine are some of the most prolific self-seeders. Beware, the color of the offspring will not necessarily be the same as the parent plant, especially if the parent plant is a hybrid. If you don’t want these to set seed, deadhead them or harvest the stalks when they have begun to dry and spread the seed where you want.
Pinching is another practice for the perennial garden that can be really helpful. Pinching is the process of removing a soft growing shoot, usually by pinching it off using your fingers. Pinch and remove only the very tip or a few inches of soft growth, depending the effect wanted. Pinching affects the plant hormone auxin. Auxin is produced in the growing point of plants. Auxin flows from growing tips towards the roots in a plant. As the auxin flows down through the stems, it suppresses the buds lower down on the stem and keeps them from growing. When you pinch out the growing tip, you remove the source of auxin and thus the suppression of those lower buds stops, resulting in several new shoots below the pinch. Pinching can produce a bushier plant and more flowers.
Pinching can also increase the number of flowers you have or produce bigger flowers. To make more flowers, pinch the growing point out. Pinching is a common practice on chrysanthemum, aster, sedum, phlox, joe-pye and Russian sage. Asters and chrysanthemum are often pinched more than once. Pinching can also be used to extend bloom. Pinch one-third to one-half of the shoots on these same plants, which will result in a longer period of bloom. The pinched stems will bloom about 2 weeks later, extending the flowering season. Pinching should generally be done in June. On some plants, such as show quality dahlias, you may want to pinch to increase flower size. To do this, lateral buds and flowers are removed from the stem, leaving more energy for the primary bud and resulting in bigger, more impressive flowers.
Cutting back is another summer maintenance practice for the perennial garden. Many spring flowering plants respond well to a hard cut after flowering. Delphinium and painted daisy (Tanacetum coccineum), are good examples. These plants, if cut back almost completely after flowering, will result in new basal growth that will help the plants be long lived. Other plants that can take some cutting back after flowering include catmint, salvia, oxeye daisy, Iberis, Arabis, and moss phlox (Phlox subulata).
Lastly don’t forget to water and keep the garden weed free for a beautiful looking garden throughout the summer.
Russ Norton, Cape Cod Cooperative Extension
Trouble Maker of the Month
Stem Blight of Vinca
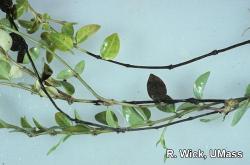
Stem blight of vinca is most active in just the kind of cool, wet weather we’ve had in Massachusetts this spring. The fungus Phoma exigua is the most commonly cited cause of stem blight, though it is sometimes referred to as Phomopsis and Phyllosticta. The fungus overwinters in infected leaf litter, and spores released in spring cause infection of new growth. The optimum temperature range for infection is 50-65°F (10-18°C), and stem lesions will become evident approximately 2 weeks after infection. Stem blight may also occur in the fall.
Wilting or dead shoots may be the first visible symptom of stem blight. Brown or black stem lesions will be observed on closer inspection, often around leaf nodes, and adjacent leaves may be brown and withered. Stems may be completely girdled and die back. Spores are produced within the lesions in tiny black fruiting bodies called pycnidia. These may be visible with a hand lens. Rhizoctonia causes similar symptoms in vinca, but it does not produce pycnidia. The infection cycle can continue as long as the weather is conducive.
Management: Plant diseases are easier to prevent than they are to control. Start with healthy plants, and use resistant cultivars if they are available. The cultivar ‘Darts Blue’ is reportedly resistant to stem blight. Other cultivars may also be tolerant or resistant. Vinca prefers partial to full shade and reasonably fertile, well-drained soil. Plants that are stressed by improper site conditions will be more susceptible to disease.
Remove dead and unhealthy plant material regularly. Phoma is an excellent saprophyte that survives in plant litter and thrives in moist conditions. Thinning plants will improve air circulation and promote drying of foliage after rain or irrigation. Avoid overhead watering if possible. Water early in the morning, as the sun will allow foliage to dry more quickly. Do not work with plants when they are wet.
An annual soil drench in late April or early May with thiophanate-methyl or copper sulfate may be useful to keep stem blight in check. In areas where infection is severe, consider replacing vinca with a different ground cover.
Angela Maderias, Plant Pathologist, UMass Extension Plant Diagnostic Lab
Plant of the Month
Kalmia latifolia, mountain laurel
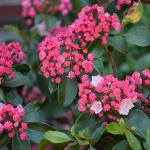
Kalmia latifolia is a broadleaf evergreen shrub native to woods, mountain slopes, and woodland margins in eastern North America. Form can vary from dense and compact to open depending on light exposure. Size can range from 5-12’ tall and wide, and can grow larger especially in native habitats. Mountain laurel is cold hardy to zone 5 and protected areas of zone 4. Leaves are elliptical with smooth margins and pointed tips. The 2-5” long and 0.75-1.5” wide leaves are dark green, glossy, leathery and clustered towards shoot tips.
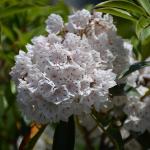
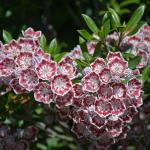
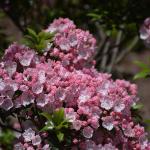
Flowers occur in early June (sometime late May). Individual flowers are small, cup shaped, and around 1”, but grow in 4-6” clusters at branch tips. The species has pink flowers that fade to almost white. Cultivars offer many variations including red or pink buds, red bands or dots, white, deep pink or red flowers. Flowers last several weeks and are very showy. It is best to remove spent flowers as the brown, dehiscent seed capsules are not showy and will persist into winter. Bark is lightly ridged and furrowed. As plants age trunks can become twisted and gnarly providing additional ornamental interest.
Mountain laurel should be planted in part sun to full sun, with part shade being best. It can be grown in deeper shade but will be more open and bloom less. A cool, moist, acidic, well-drained soil is best. Kalmia latifolia has a fine, fibrous, shallow root system which benefits from mulching. Pruning should done be after blooming. Leaf spot can be a problem, especially in heavy shade, but some cultivars offer improved resistance. Lacebug can also be a problem. Leaf burn can be an issue in exposed sites. All parts of the plant are toxic if ingested.
The genus was named after Pehr Kalm, who explored plants in eastern North America from 1747-1751. Kalmia latifolia is the state flower of Pennsylvania and Connecticut. Kalmia latifolia v. myrtifolia cultivars ‘Elf’, ‘Minuet’, Tiddlywinds’, ‘Tinkerbell’, and ‘Little Linda’ were the 2003 Cary Award Winners.
Kalmia latifolia v. myrtifolia – slower growth rate and smaller leaves. Many of the new dwarf cultivars are from this variety, including ‘Elf’ and ‘Minuet’.
There are numerous cultivars offering dwarf habits and variations in flowers.
- ‘Bullseye’ – flowers have a purple band; upright growth habit to 4-5’; emerging foliage is reddish-bronze
- ‘Carousel’ – to 8’; pale pink buds open to white flowers with purple bands and blotches
- ‘Elf’ – semi-dwarf (2-3’); smaller leaves and slower growth; pink buds opening to white
- ‘Minuet’ – 2-3’, light pink buds open to white flowers with a maroon band
- ‘Ostbo Red’ – 4-6’; bright red buds open to light pink flowers
- ‘Raspberry Glow’ – 4-5’, red buds open to raspberry-pink flowers
- ‘Sarah’ – 4-5’, red buds open to pink-red to coral pink with red markings
Mandy Bayer, Extension Assistant Professor of Sustainable Landscape Horticulture, University of Massachusetts Amherst
Additional Resources
Landscape Message - for detailed timely reports on growing conditions and pest activity
Home Lawn and Garden Resources
Find us on Facebook! https://www.facebook.com/UMassExtLandscape/
Follow us on Twitter for daily gardening tips and sunrise/sunset times. https://twitter.com/UMassGardenClip
Diagnostic Services
The UMass Extension Plant Diagnostic Lab provides, for a fee, woody plant and turf disease analysis, woody plant and turf insect identification, turfgrass identification, weed identification, and offers a report of pest management strategies that are research based, economically sound and environmentally appropriate for the situation. Accurate diagnosis for a turf or landscape problem can often eliminate or reduce the need for pesticide use. Sampling procedures, detailed submission instructions and a list of fees.
The UMass Soil and Plant Nutrient Testing Laboratory at the University of Massachusetts Amherst provides test results and recommendations that lead to the wise and economical use of soils and soil amendments. The Routine Soil Analysis fits the needs of most home gardeners. Sampling procedures plus the different tests offered and a list of fees.
Spread the Word!
Share this newsletter with a friend! New readers can subscribe to our Home Gardener E-Mail List.
